WPRentals can be used in two main ways:
- Single owner / site admin setup – one site admin or one selected owner manages all listings.
- Multi-owner setup – multiple owners register on the website and manage their own listings from the front-end User Dashboard.
This help article explains the multi-owner setup.
For the single owner / site admin setup, use this help article:
How to use WPRentals as the site administrator / single property / single owner
In a multi-owner setup, different users can register on your website, become owners, submit their own listings from the front end, manage booking requests from their dashboard, and communicate with guests through the built-in booking and messaging system.
In WPRentals, listings are managed from the front-end User Dashboard. This applies to owners who register from the front end and also to site admins who manage listings from the front-end dashboard.
WPRentals does not send booking payments directly to each owner account. Online payments collected through the theme go to the site admin payment account. The site admin decides how to monetize the platform: through booking deposit/service fee, paid listing submission, or membership packages.
What a Multi-Owner Setup Means
A multi-owner setup allows more than one owner to manage listings on the same website.
Depending on your settings, owners can:
- register from the front end
- create an owner profile
- submit new listings
- edit their own listings
- manage booking requests
- receive messages from guests
- update their profile details
Users who register only as renters can book properties, but they do not receive listing submission access.
Where Admins and Owners Manage Listings
Both site admins and registered owners can manage listings from the front-end User Dashboard.
This applies to:
- site admins who manage all listings themselves from the front-end dashboard
- owners who register from the front end and manage their own listings
The User Dashboard is accessed from the User Dashboard icon on the front end, after the user logs in.
Both admins and owners manage listings the same way:
User Dashboard > My Listings > Add New Listing
or
User Dashboard > My Listings > Edit Listing
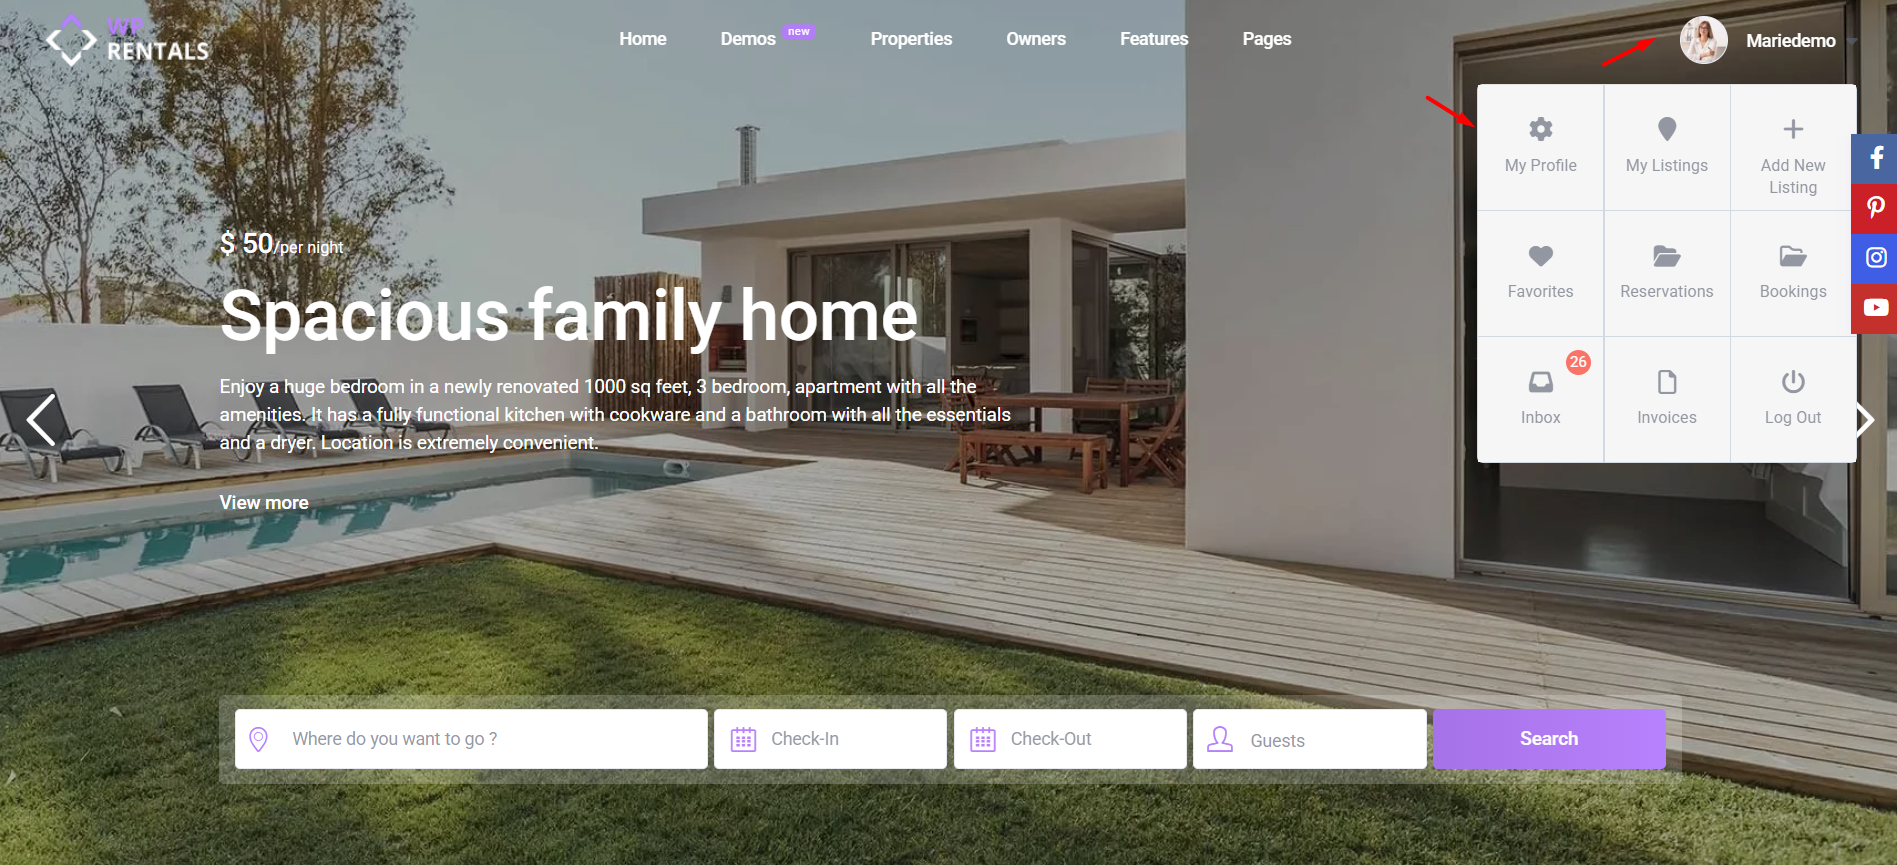
The front-end User Dashboard is the recommended place to add or edit listings. This keeps the owner workflow, listing fields, booking options, and dashboard permissions consistent.
Before You Begin
Before setting up a multi-owner website, decide how users, listings, and payments should work on your site.
You should decide:
- whether users can register as Owners, Renters, or both
- whether owners will register from the front end or be created manually from wp-admin
- whether all owners can submit listings or only selected users can submit listings
- whether the website is for Vacation Rental listings or Object Rental listings
- whether booking payments should require a deposit and/or service fee
- whether listing submission is free, paid per listing, or membership-based
- whether submitted listings are published automatically or require admin approval
Choose What Type of Rentals Owners Can Add
Before allowing multiple owners to submit listings, the site admin should decide what type of rentals the website supports.
This is managed from the booking configuration settings, under the option for what you rent.
WPRentals supports two main rental types:
- Vacation Rental – used for holiday homes, apartments, villas, rooms, or accommodation rentals. The booking form includes guest selection.
- Object Rental – used for equipment, items, spaces, or rentals where guest selection is not needed. The guest field is hidden, and daily booking wording can change from night to day.
Object Rental bookings still reserve a full 24-hour period for daily bookings. If you need hourly booking, hourly booking is managed separately from the rental type setting.
Related help:
Theme Options – Booking Configuration
How to manage Object Rental options
Configure Registration and User Roles
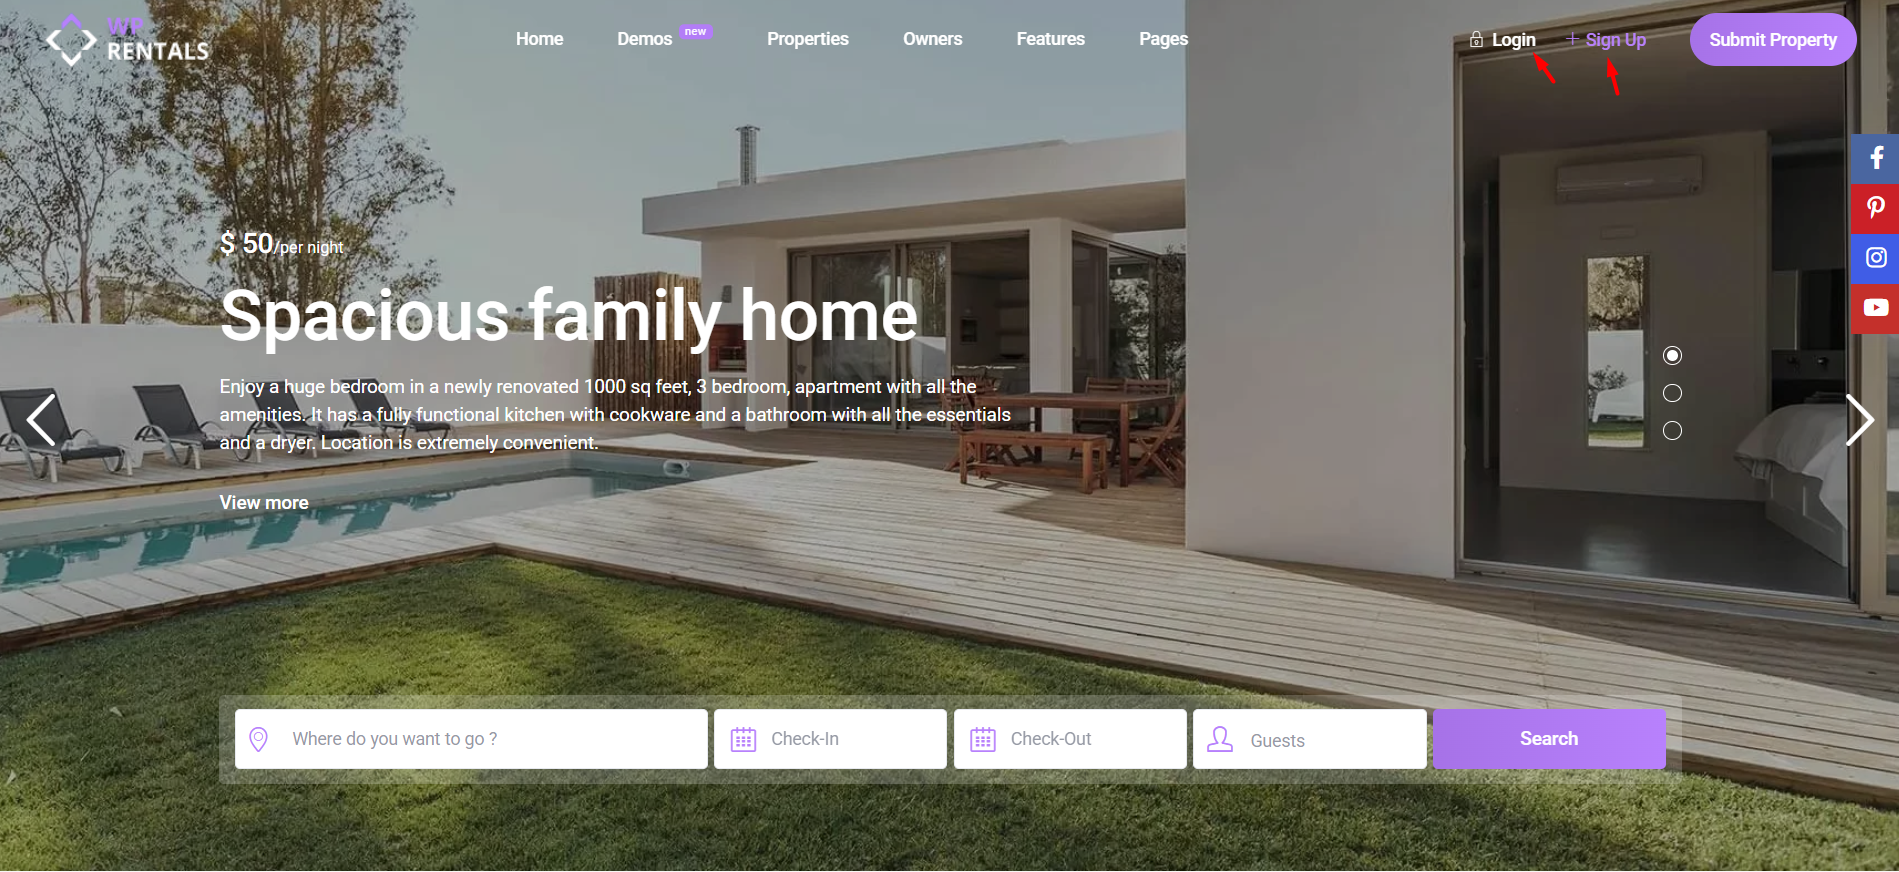
For users to register on the website, WordPress registration must be enabled first.
Go to:
Wp-admin > Settings > General
Enable:
Membership: Anyone can register
Then configure the WPRentals registration options from:
Theme Options > Register & Login Settings
From this area, you control how users register and what access they receive after registration.
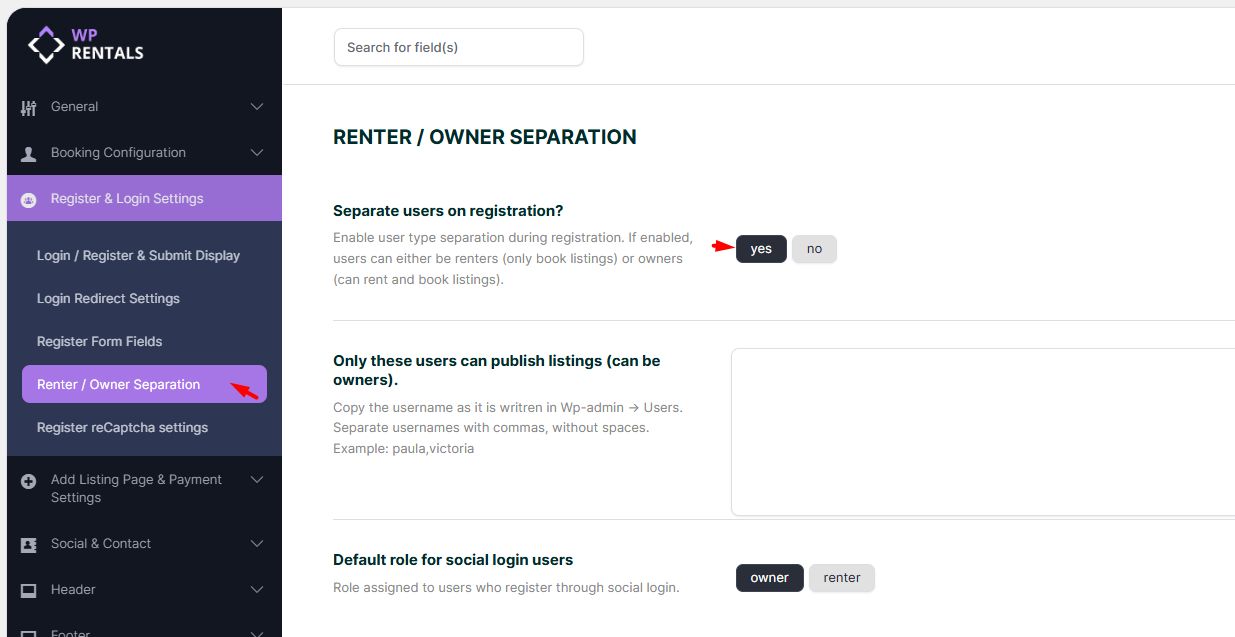
The most important option for a multi-owner website is Renter / Owner Separation.
When renter and owner separation is enabled, users can choose their account type during registration:
- I only want to book – the user is registered as a renter and receives booking-only access.
- I want to book and rent – the user is registered as an owner and receives listing submission access.
When renter and owner separation is disabled, users can be treated as owners depending on your selected settings.
Related help:
Choose How Owners Are Created
There are two ways to create owners in WPRentals.
Option 1: Owners Register From the Front End
This is the recommended setup for multi-owner websites.
When users register from the front-end register form and choose the owner option, WPRentals creates the owner account and connects it to the User Dashboard access.
This is the safest workflow because the user account, owner access, and dashboard permissions are created together.
Option 2: Owners Are Created Manually From wp-admin
You can also create owners manually from the WordPress admin area.
For this setup, you must make sure the owner profile and WordPress user account are connected correctly.
If the owner profile and user account are not synced correctly, the owner may not be able to manage listings from the User Dashboard.
For full manual setup steps, check this guide:
How to Add and Sync Owners from the WordPress Admin in WPRentals
For most multi-owner websites, use front-end owner registration instead of creating owners manually from wp-admin.
Decide Who Can Submit Listings
After registration is configured, decide who can submit listings from the front end.
You can choose one of these approaches:
- allow all registered owners to submit listings
- separate renters and owners so only owners can submit listings
- allow only specific users to submit listings
This is useful when you want a controlled website where some users can only book, while selected users can also add and manage listings.
Related help:
How to allow only certain users to submit properties in front end

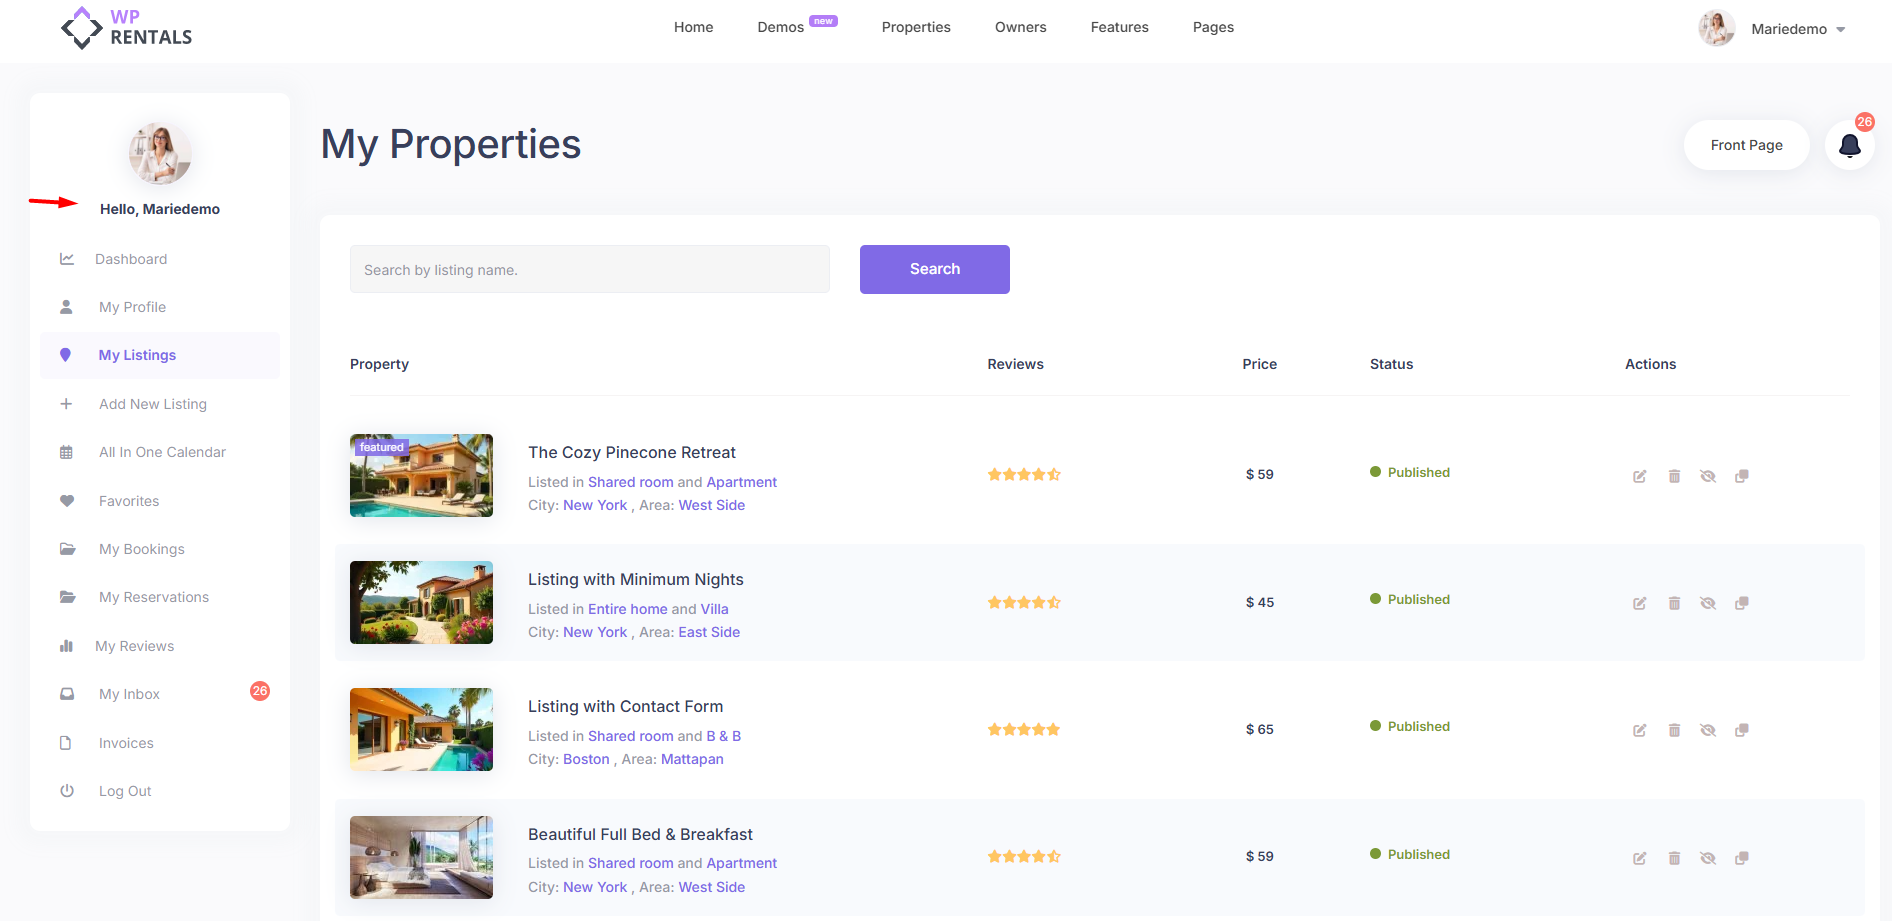
Required User Dashboard Pages for Owners
For owners to manage listings, the User Dashboard pages must exist and be published.
These pages are usually imported with the demo. If they are missing, they can be created manually from:
Wp-admin > Pages > Add New
Each dashboard page must use its correct WPRentals dashboard page template.
The most important dashboard pages for owners are:
- Dashboard
- My Profile
- My Listings
- Add New Listing
- My Bookings
- My Reviews
- Invoices
- My Inbox
Related help:
How to create the User Dashboard pages
Submit a Property from the User Dashboard
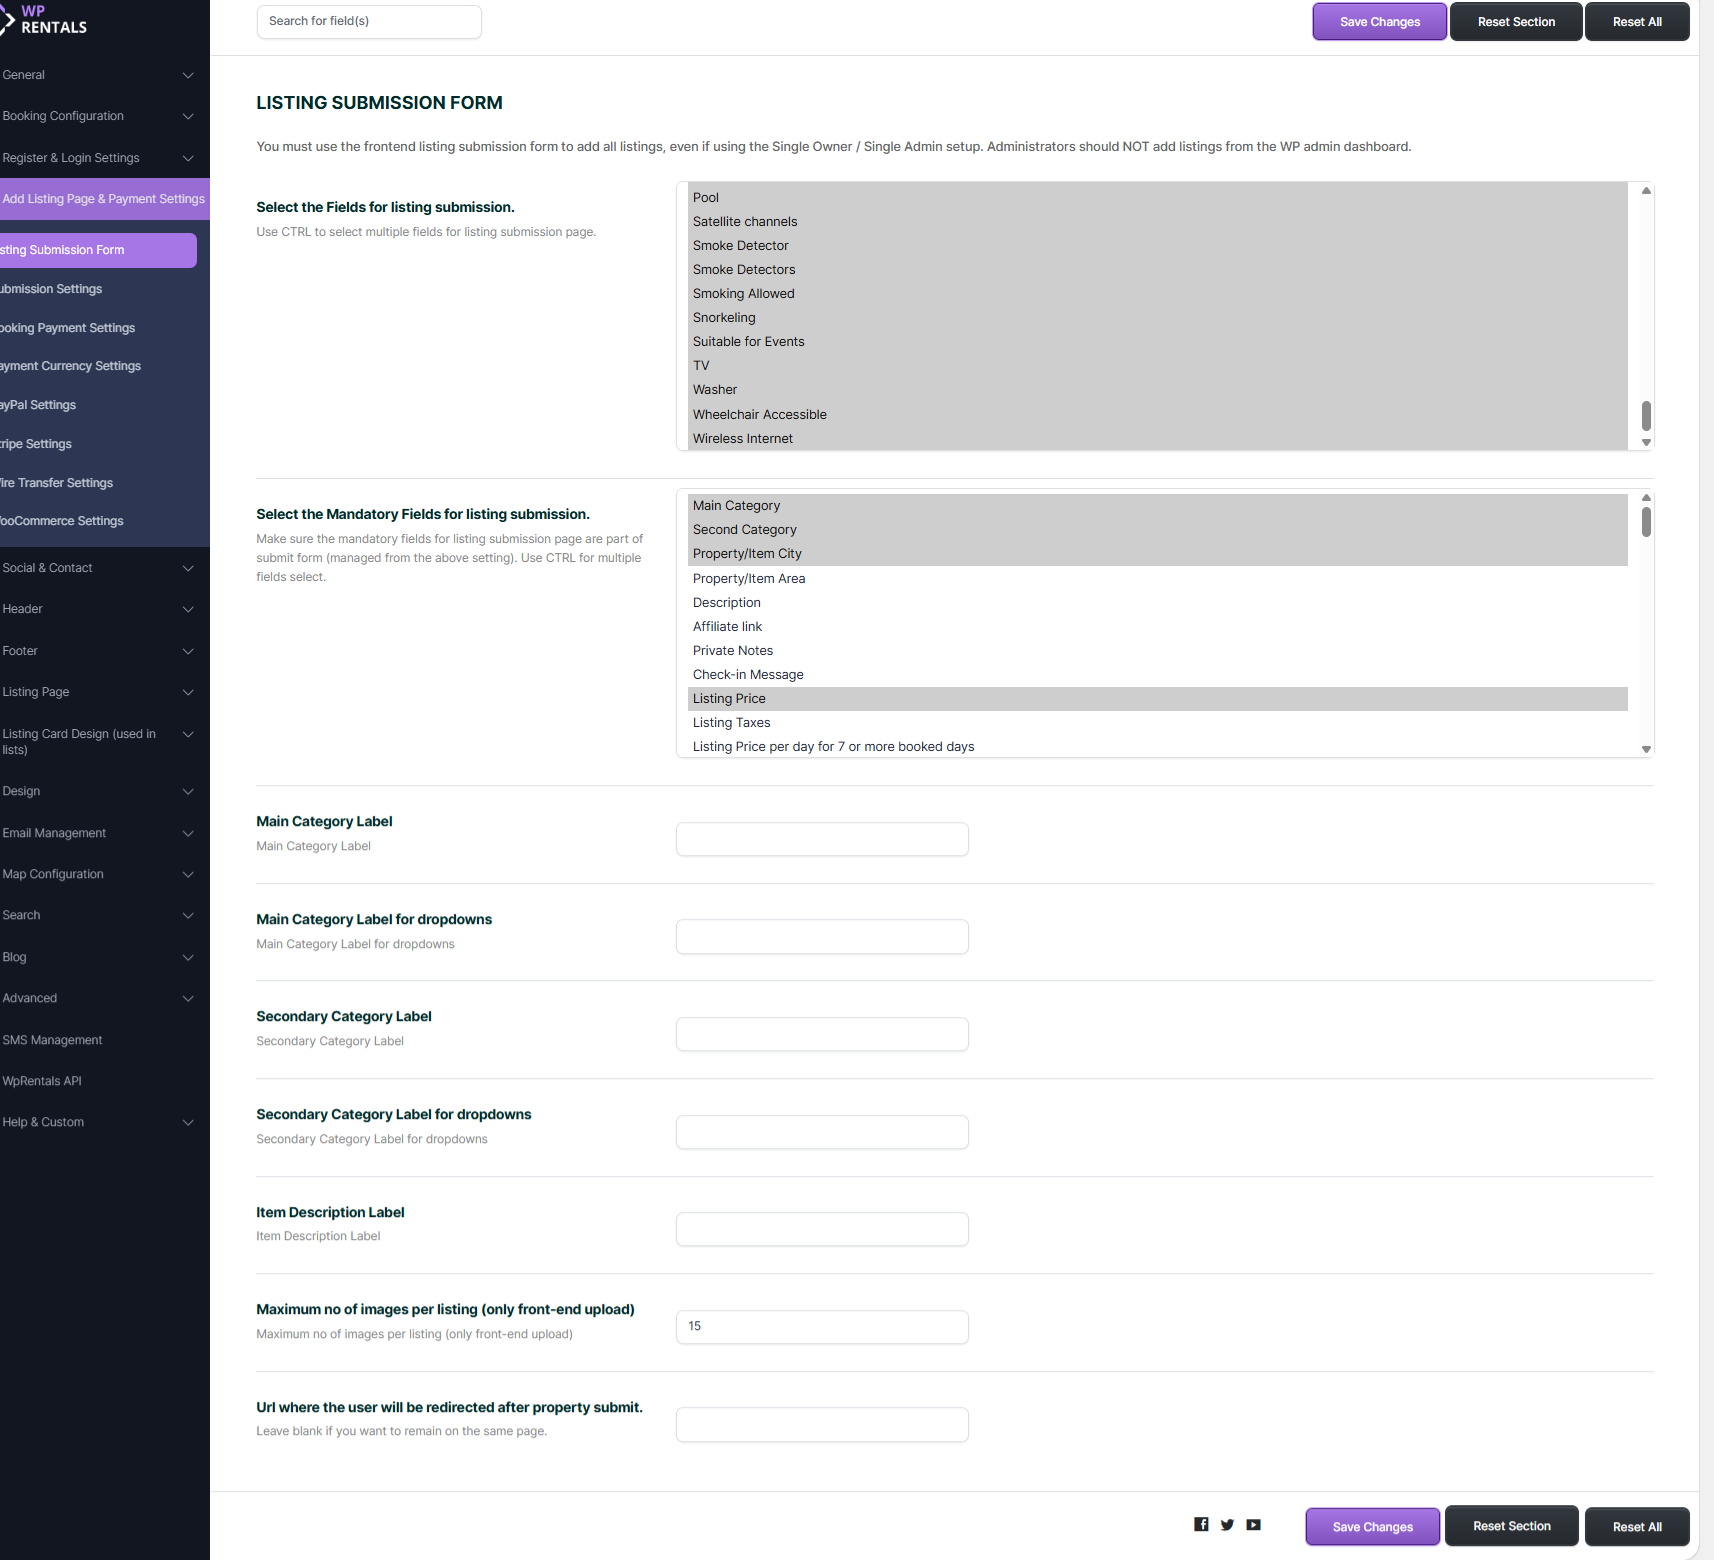
Manage the Listing Submission Form Fields
The fields shown when owners add or edit listings are managed by the site admin.
Go to:
Theme Options > Add Listing Page & Payment Settings > Listing Submission Form
From this section, the admin can choose which fields appear in the listing form and which fields are mandatory.
This affects what owners see when they go to:
User Dashboard > My Listings > Add New Listing
or
User Dashboard > My Listings > Edit Listing
Related help:
How to manage submit form fields and mandatory fields
Choose How the Website Makes Money from Rentals
Before launching a multi-owner website, the site admin must decide how the platform will make money.
There are two main monetization models:
Option 1: Charge a deposit or service fee for bookings
The admin can require guests to pay a deposit and/or service fee before a booking is confirmed.
In this model:
- owners can submit listings based on your submission settings
- guests send booking requests or use Instant Booking, depending on the listing setup
- the guest pays the required booking amount through the enabled payment method
- the payment goes to the site admin payment account
- the admin can use the service fee as the platform commission
Option 2: Set booking deposit and service fee to 0 and charge owners for listing submission
The admin can choose not to charge a booking deposit or service fee through the theme.
In this model:
- booking confirmation can work without collecting an admin deposit/service fee
- the admin can monetize the site by charging owners to add listings
- owners can pay per listing with Paid Submission
- owners can buy listing packages with Membership Submission
Booking fees and listing submission fees are separate systems. Decide whether your platform should earn money from bookings, from listing submissions, or from membership packages.
Booking: How to work with Deposit Fee and Service Fee
How to confirm a booking when admin deposit and service fees are 0
What payment platforms are supported in WPRentals?
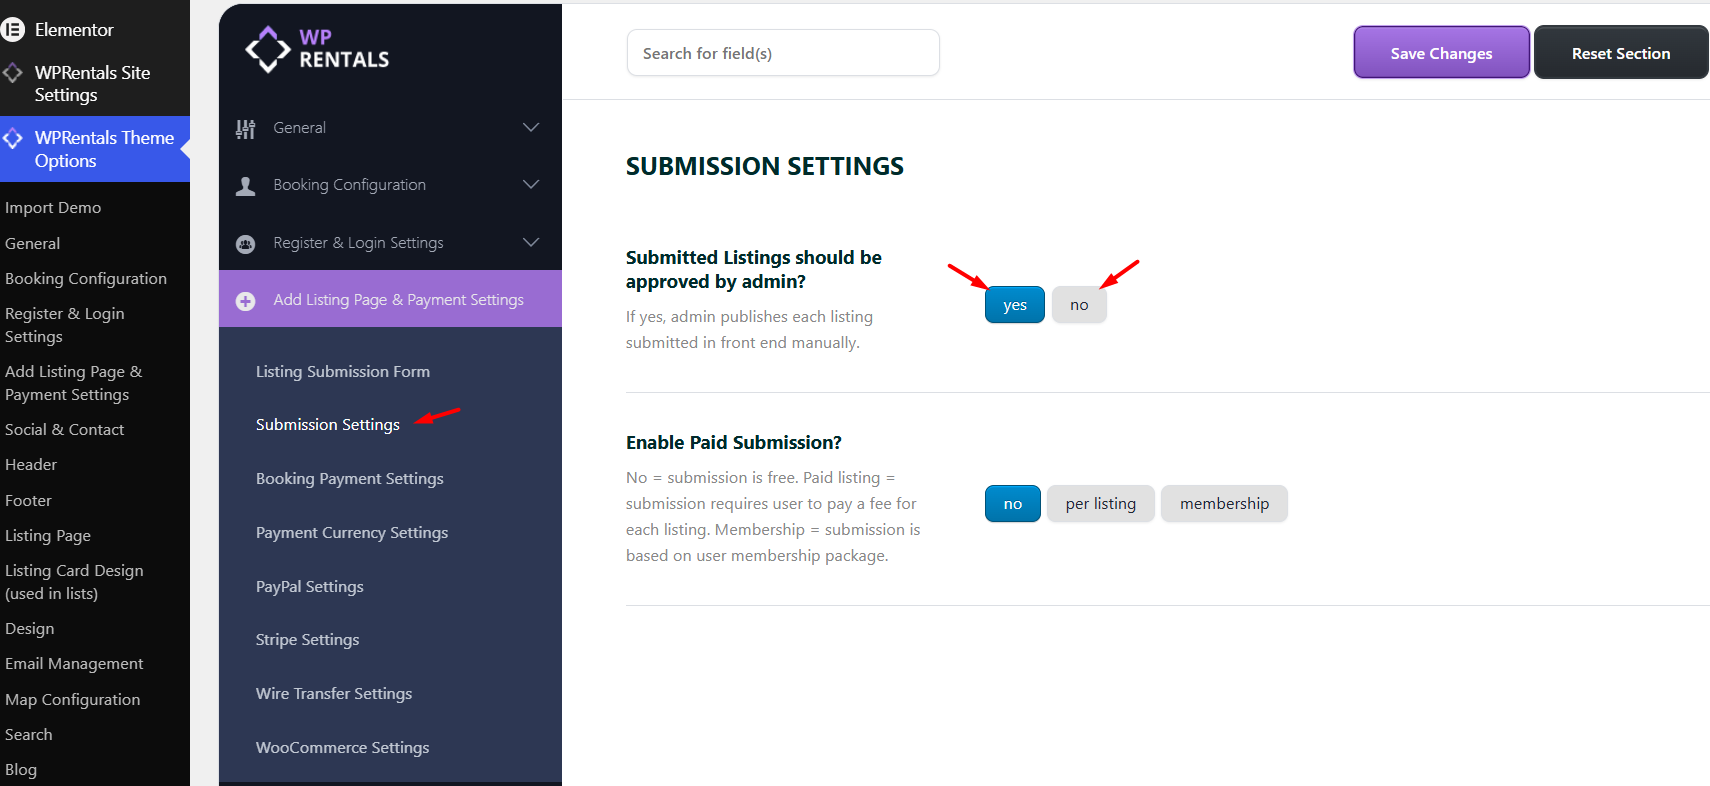
Paid Listing Submission and Membership Submission
If the site admin does not want to charge a booking deposit/service fee, or if the business model is based on charging owners to publish listings, WPRentals supports listing submission payments.
You can configure this from:
Theme Options > Add Listing Page & Payment Settings > Submission Settings
WPRentals supports:
- Free submission – owners can submit listings without payment.
- Paid submission per listing – owners pay for each submitted listing.
- Membership submission – owners submit listings based on the membership package assigned to their account.
Use Paid Submission if owners should pay each time they add or publish a listing.
Use Membership Submission if owners should buy a package that includes a certain number of listings and/or featured listings.

Related help:
Adding Listings with Paid Submission
Choose How Listings Are Approved
As site admin, you can choose whether listings submitted from the front end are published automatically or require manual approval.
This option is managed from:
Theme Options > Add Listing Page & Payment Settings > Submission Settings
If manual approval is enabled:
- new listings are saved as pending
- the admin reviews them from wp-admin
- the admin publishes them when ready
If automatic approval is enabled, listings submitted from the front end can be published without manual admin approval, depending on your submission and payment setup.
Related help:
Admin can approve properties manually or automatically
Owner Profile and Contact Visibility
Each owner can have a public owner profile page that displays their profile information and listings.
Owner contact information visibility depends on the theme rules.
In general:
- non-registered users cannot see owner contact details
- registered users without a confirmed booking cannot see owner contact details
- users with a confirmed booking can see owner contact details
- owners can see their own contact details
- admins can see all owner contact details
Related help:
Owner Contact Info: How it works

Social Login Role Assignment
If you use Google or Facebook login, check which role is assigned to users who register through social login.
In WPRentals, social login users can be assigned as:
- Owner
- Renter
This matters on multi-owner websites because it determines whether users who register through social login can submit listings or only book properties.
Related help:
About Orphan Listings Without Owner
If a non-logged-in visitor starts the listing submission process but does not complete registration or login, WPRentals can treat that listing as an orphan listing.
These orphan listings can be auto-deleted by the daily cron job, depending on your theme settings.
This helps keep the website clean when visitors start a listing submission but do not complete the account creation process.
Check this setting from:
Theme Options > General > General Settings > Auto delete orphan listings

Theme Options – General – Orphan Listings
Recommended Setup
For most multi-owner websites, we recommend this workflow:
- choose the rental type: Vacation Rental or Object Rental
- enable WordPress registration
- enable front-end registration in WPRentals
- use front-end owner registration instead of manually creating owners from wp-admin
- enable renter and owner separation if you want different user types
- make sure the User Dashboard pages are created and published
- make sure owners can access My Listings and Add New Listing
- choose how the website makes money: booking service fee, paid submission, or membership packages
- choose whether listing approval is manual or automatic
- review owner profile and contact visibility rules
- check the role assigned to social login users
Important Notes
- This help article is for multi-owner websites. If one site admin or one owner manages all listings, use the single-owner setup instead.
- The recommended way to create owners is from the front-end registration form. This creates the owner access and dashboard permissions correctly.
- Admins and owners manage listings from the front-end User Dashboard. Use User Dashboard > My Listings > Add New Listing or User Dashboard > My Listings > Edit Listing.
- Booking payments go to the site admin payment account. They are not sent directly to the owner account by WPRentals.
- The admin can use booking deposit/service fee as the commission model.
- If the admin does not want to charge booking deposit/service fee, listing submission can be monetized with Paid Submission or Membership Submission.
- If owners are created manually from wp-admin, the user account and owner profile must be synced correctly. Otherwise, the owner may not be able to manage listings correctly.
- If renter and owner separation is enabled, only users registered as owners can submit listings.
- If needed, you can allow only specific users to publish listings in the front end.
Related Help Articles
How to use WPRentals as the site administrator / single property / single owner
Theme Options – Booking Configuration
How to manage Object Rental options
How to create the User Dashboard pages
Submit a Property from the User Dashboard
How to manage submit form fields and mandatory fields
Booking: How to work with Deposit Fee and Service Fee
How to confirm a booking when admin deposit and service fees are 0
What payment platforms are supported in WPRentals?
Adding Listings with Paid Submission
Admin can approve properties manually or automatically
Owner Contact Info: How it works
How to Add and Sync Owners from the WordPress Admin in WPRentals
Summary
- WPRentals can work as a single-owner website or as a multi-owner rental marketplace.
- This article explains the multi-owner setup.
- For a single-owner / site admin setup, use the single-owner help article.
- The site admin decides what type of rentals owners can add: Vacation Rental or Object Rental.
- Owners can register from the front end and manage their listings from the User Dashboard.
- Site admins can also manage listings from the same front-end User Dashboard flow.
- The correct listing paths are User Dashboard > My Listings > Add New Listing and User Dashboard > My Listings > Edit Listing.
- Renter / Owner Separation controls who can only book and who can also submit listings.
- Online booking payments go to the site admin payment account.
- The admin can monetize bookings with deposit/service fee.
- The admin can monetize listing submission with Paid Submission or Membership Submission.
- Submitted listings can be published automatically or require admin approval.
- Owner profile/contact visibility and social login roles should be reviewed before launching a multi-owner website.