
Overview
This help explains how to translate WPRentals with the Loco Translate plugin from WordPress admin.
Some text comes from the theme, some text comes from the WPRentals Core plugin, and some labels are managed directly from Theme Options, widgets, taxonomies, custom fields, or Elementor templates.
First Check: Site Language, File Name and Folder
Start by confirming which language WordPress runs in.
Go to:
Settings > General > Site Language
This setting decides which translation files WordPress picks up.
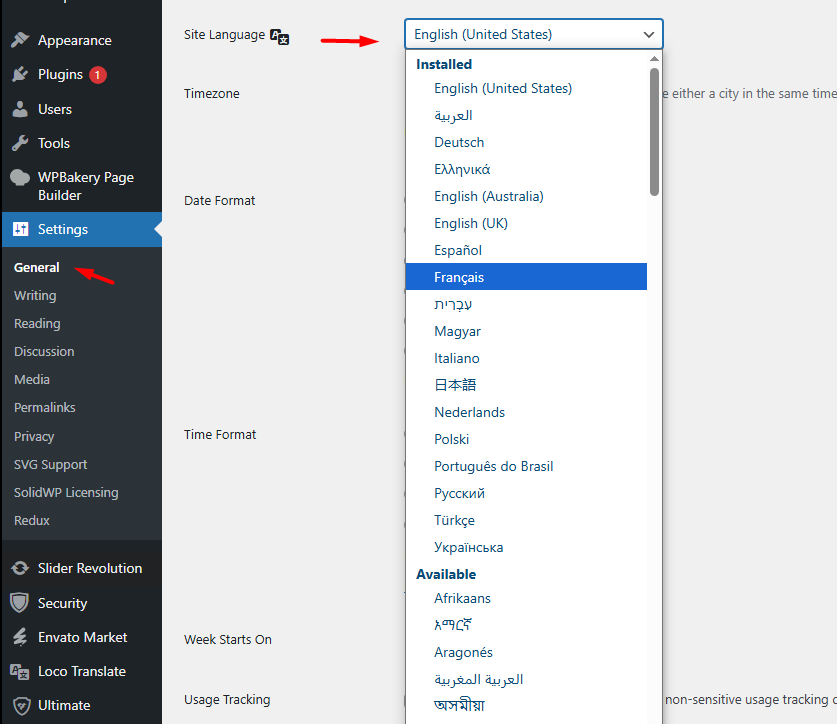
Name the translation file after that language code.
Example for Italian:
- it_IT.po
- it_IT.mo
A file with any other name is ignored on the front end, even when every string in it is translated.
Theme translation files
Keep the theme translation in the child theme:
wp-content/themes/wprentals-child/languages/
Example for Italian:
- wp-content/themes/wprentals-child/languages/it_IT.po
- wp-content/themes/wprentals-child/languages/it_IT.mo
WPRentals Core plugin translation files
For WPRentals Core plugin strings, the files use the plugin prefix.
Example for Italian:
- wprentals-core-it_IT.po
- wprentals-core-it_IT.mo
Where to Translate Each Type of Text
| Text location | Where to translate or edit it |
|---|---|
| Theme layout text | Loco Translate > Themes > WPRentals Child Theme |
| Booking, login, dashboard, submission, or core functionality text | Loco Translate > Plugins > WPRentals – Theme Core Functionality |
| Labels saved in Theme Options | Edit the label directly in Theme Options |
| Property features, amenities, categories, custom fields, or taxonomy terms | Edit them directly from the WordPress admin area where they were created |
| Widget titles | Edit the widget title from Appearance > Widgets |
| Elementor or Studio template text | Edit the text directly inside Elementor |
Install and Activate the Child Theme
The WPRentals Child Theme is recommended for theme translations because it helps keep translations safer during theme updates.
- Download All Files and Documentation from your buyer account > Downloads.
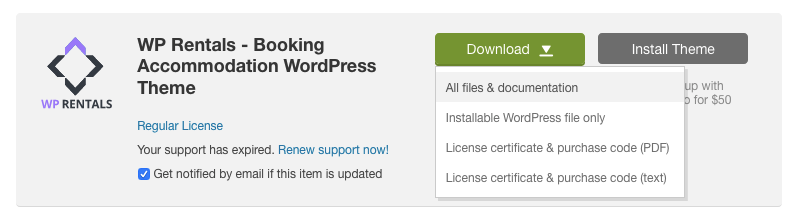
- Unzip the package and locate wprentals-child.zip.

- Install the parent theme first: wprentals.zip.
- Install wprentals-child.zip.
- Activate the child theme.


Translate Theme Strings With Loco Translate
Use this section for text that comes from the WPRentals theme.
Install Loco Translate
- Open Plugins > Add New.
- Search for Loco Translate.
- Install and activate the plugin.

Create or edit the theme language file
- Go to Loco Translate > Themes.
- Select WPRentals Child Theme.
- Click New language, or open the language you already have.
- Name the file after the site language, for example it_IT.po for an Italian site.
- Click Sync if needed.
- Find the text, type your translation and press Save.


Translate WPRentals Core Plugin Strings
Some strings are inside the WPRentals Core plugin, not in the theme language file.
- Go to Loco Translate > Plugins.
- Select WPRentals – Theme Core Functionality.
- Click New language, or open the language you already have.
- For Italian, the files should be named wprentals-core-it_IT.po and wprentals-core-it_IT.mo.
- Click Sync if needed.
- Find the text, type your translation and press Save.


Texts Managed Outside Loco Translate
These labels are not in any .po file. Change them in the screen where they were typed.
Theme Options labels
Some labels are managed from Theme Options, for example listing page labels or search labels.
Common locations:
- Theme Options > Listing Page > Listings Page Text Labels
- Theme Options > Search
- Theme Options > Search > Half Map Search Form
- Theme Options > General > Listing Custom Fields
Features, amenities, and taxonomy terms
Features, amenities, categories, cities, areas, and other taxonomy terms are managed directly in wp-admin.
For listing features, go to:
Listings, Bookings & More > Listing Features
Widget titles
Widget titles are edited directly from:
Appearance > Widgets
Expand the widget, type the new Title and save.
If you prefer the old widget interface, you can install the Classic Widgets plugin.
Elementor and Studio template text
If the text was added inside an Elementor or Studio template, edit the template with Elementor and change the text directly there.


Update Translations After Theme or Plugin Updates
After a theme or plugin update, new strings may be added.
- In Loco Translate, open the child theme language and click Sync.
- Do the same for the WPRentals Core plugin language.
- Translate any new strings.
- Click Save.
If your language files live inside the parent theme or plugin folders, download a copy before you update, since an update replaces those folders.
How to update translations after a theme update


Multi-Language Websites With WPEstate Translate
One language: follow the steps in this article. Loco Translate is all you need.
More than one language: use the WPEstate Translate plugin. It adds the extra languages, the translated pages and the language switcher. See WPEstate Translate for WPRentals.
Translations Are Saved, but the Front End Still Shows English
If a translated string does not show on the front end, check these points:
- Look at Settings > General > Site Language.
- Compare the file name with that language, for example it_IT.po and it_IT.mo for Italian.
- Confirm Loco Translate created the .mo file when you saved.
- Check both the theme language file and the WPRentals Core plugin language file.
- After a theme or plugin update, run Sync in Loco Translate.
- Check if the text is managed from Theme Options, widgets, taxonomies, custom fields, or Elementor.
- Empty every cache once the translations are saved.