This help article explains how to use WPRentals when one site admin or one selected owner manages all listings.
This setup is useful if you do not want multiple owners to register and submit listings on your website.
For example, use this setup if:
- you are the site admin and you manage all listings yourself
- you have one owner account that manages all listings
- you want a single-property website
- you want a single-owner vacation rental website
- you do not want public users to submit listings
Video Tutorials
What This Setup Means
In a single-owner or site-admin setup, the website is not used as a public marketplace where many owners register and submit listings.
Instead, listings are managed by one main account:
- the site admin account
- or one selected owner account
You can still allow guests to register and book properties, but you can prevent them from submitting listings.
How to use WPRentals with multiple owners
Install a Demo of Your Choice
You can start with the WPRentals Solo Demo or any other WPRentals demo.
After importing the demo, you can delete demo content you do not need, such as:
- demo listings
- demo owners
- demo blog posts
You can keep the imported pages and theme settings to save setup time.
Demo Setup with 1-Click Import
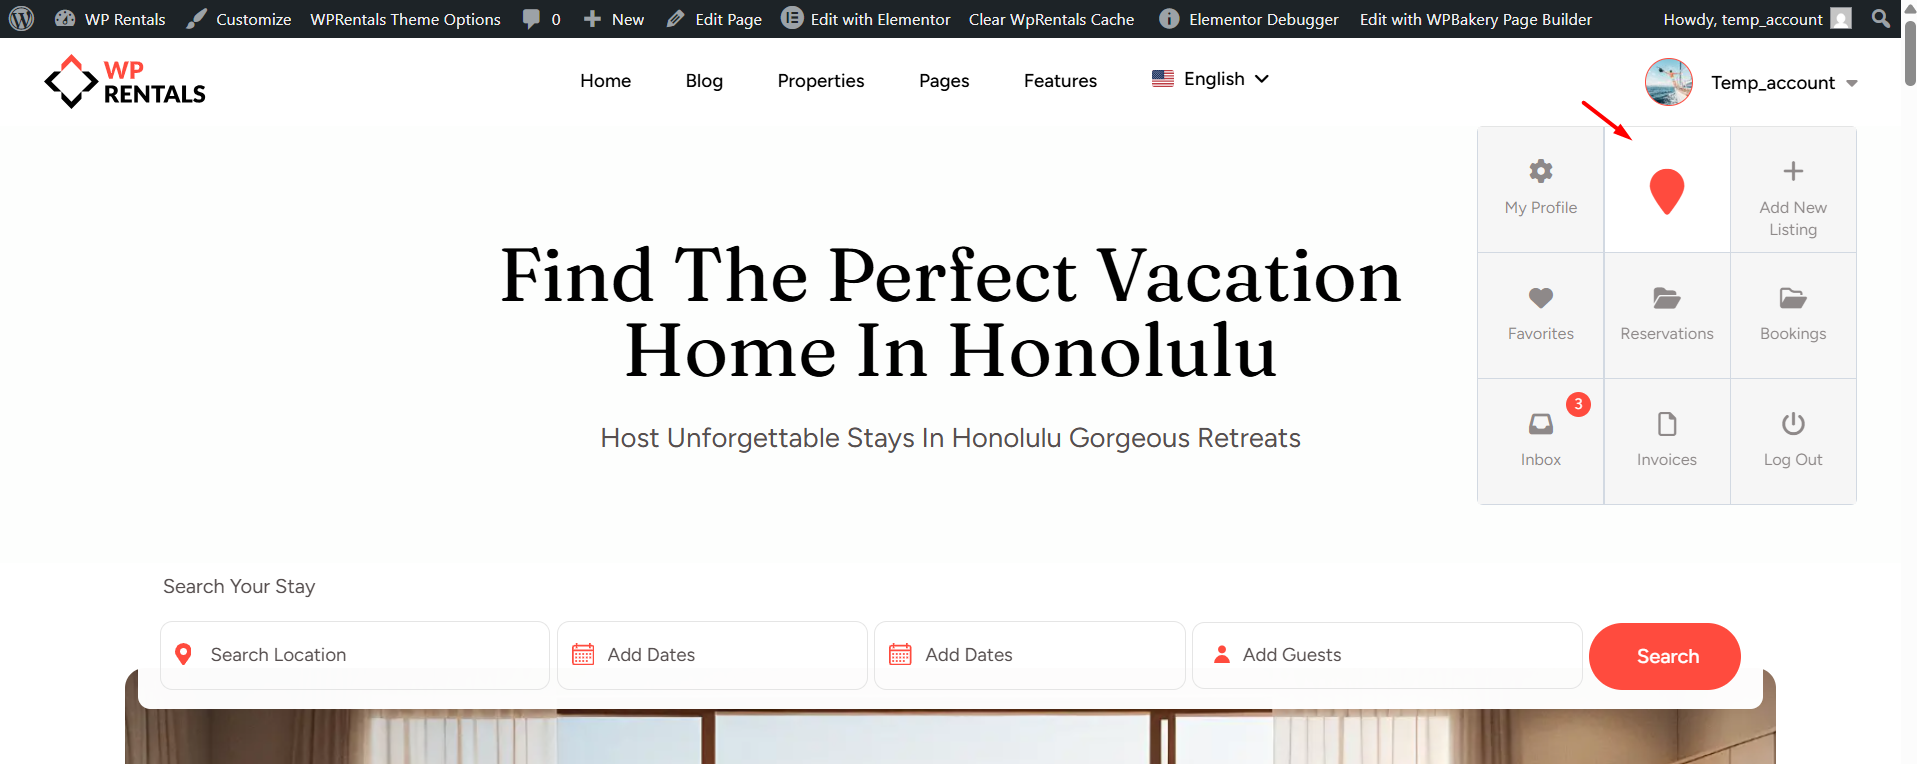
Use the Front-End User Dashboard
In WPRentals, the front-end User Dashboard is the recommended place to manage listing details.
This applies even when you are the site admin.
The correct paths are:
User Dashboard > My Listings > Add New Listing
or
User Dashboard > My Listings > Edit Listing
Using the front-end dashboard gives access to all listing fields and booking settings that are designed for the WPRentals owner workflow.
Fill In Your Profile Information
Go to the front-end dashboard and open My Profile.
Add your owner or administrator profile information, such as:
- name
- phone
- description
- profile image
- social links, if needed
This information is used for the owner details shown on listings and owner profile areas.

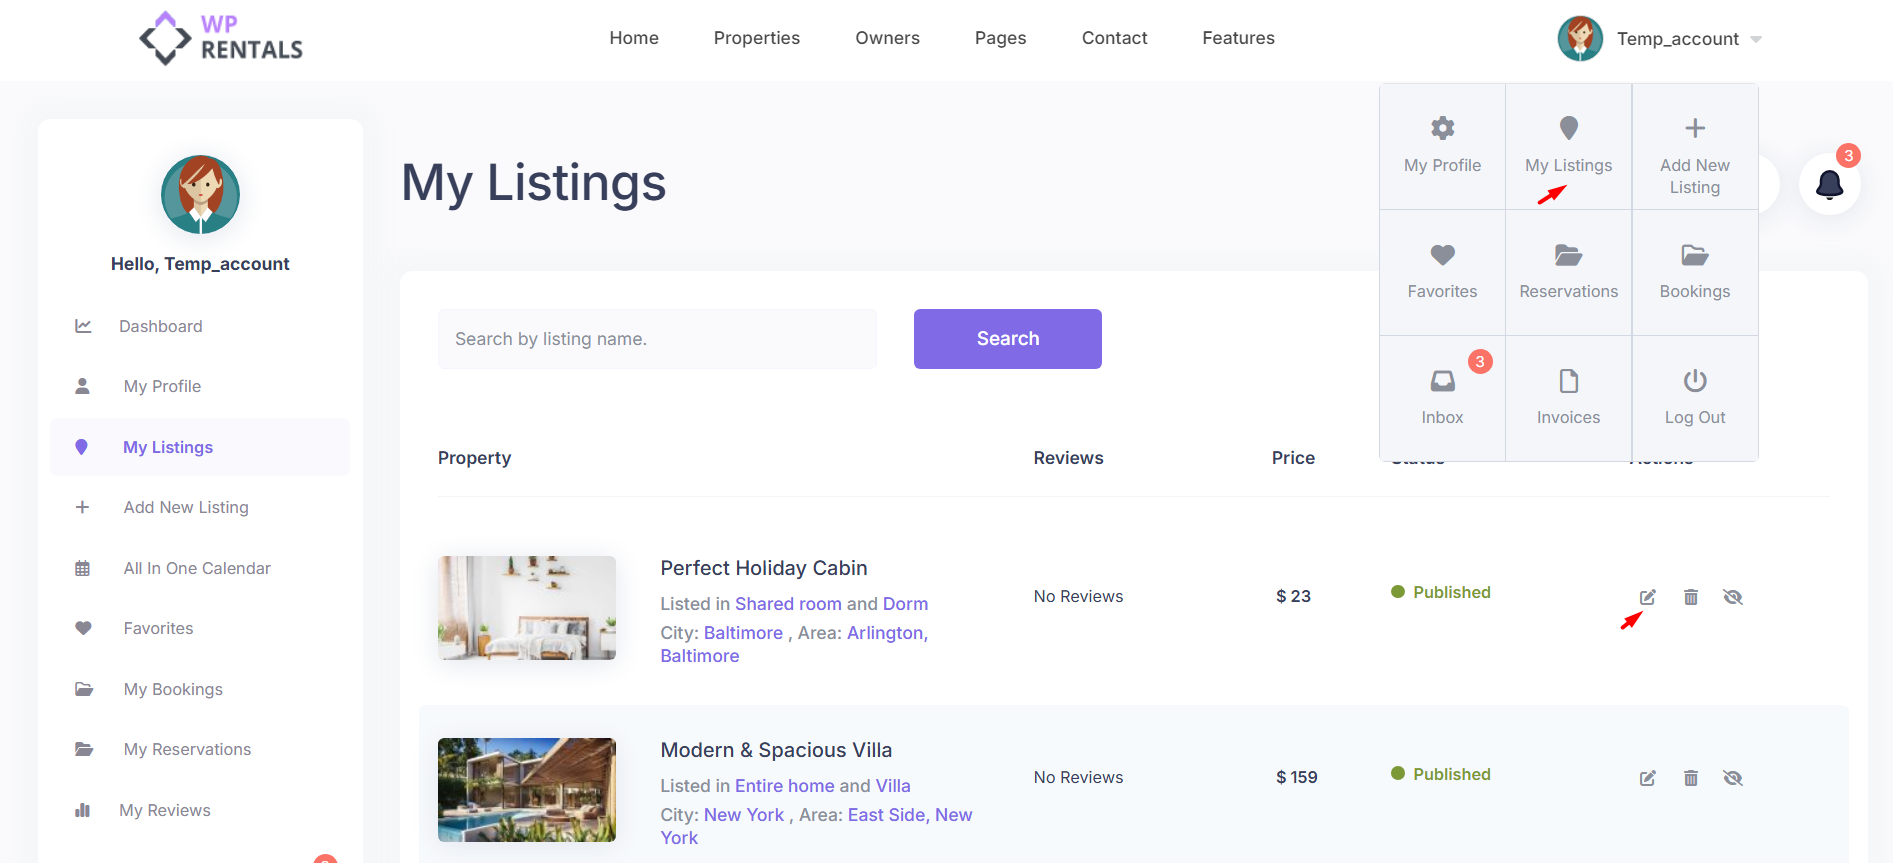
Add Listings From the Front End
To add a new listing, go to:
User Dashboard > My Listings > Add New Listing
To edit an existing listing, go to:
User Dashboard > My Listings > Edit Listing
Always use the front-end submission form when adding or editing listings. This ensures access to the WPRentals pricing, calendar, booking, availability, and owner-related options.

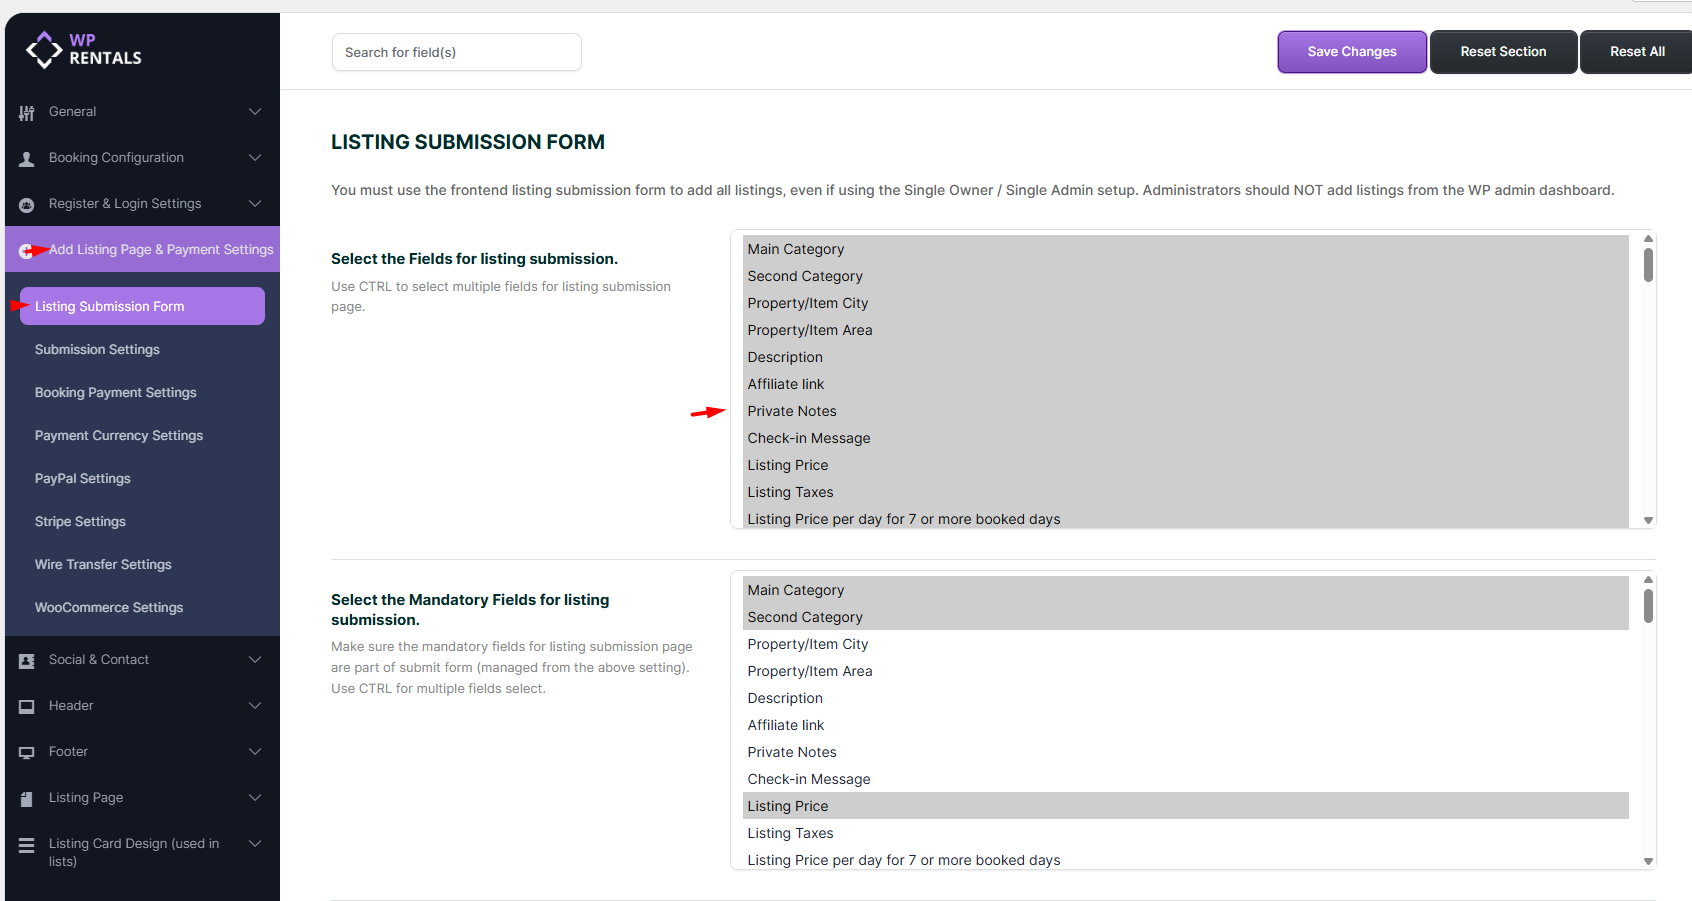
Manage the Listing Submission Form Fields
The site admin controls which fields appear in the front-end listing form.
Go to:
Theme Options > Add Listing Page & Payment Settings > Listing Submission Form
From this section, you can choose:
- which fields show in the Add New Listing and Edit Listing forms
- which fields are mandatory
- which custom fields are available
- which Features and Amenities are available
- how many images can be uploaded
Manage Submit Form Fields and Mandatory Fields
Use Free Submission for a Single-Owner Website
For a single-owner or site-admin website, the usual setup is Free Submission.
This means the admin or selected owner can add listings without paying a listing submission fee.
Go to:
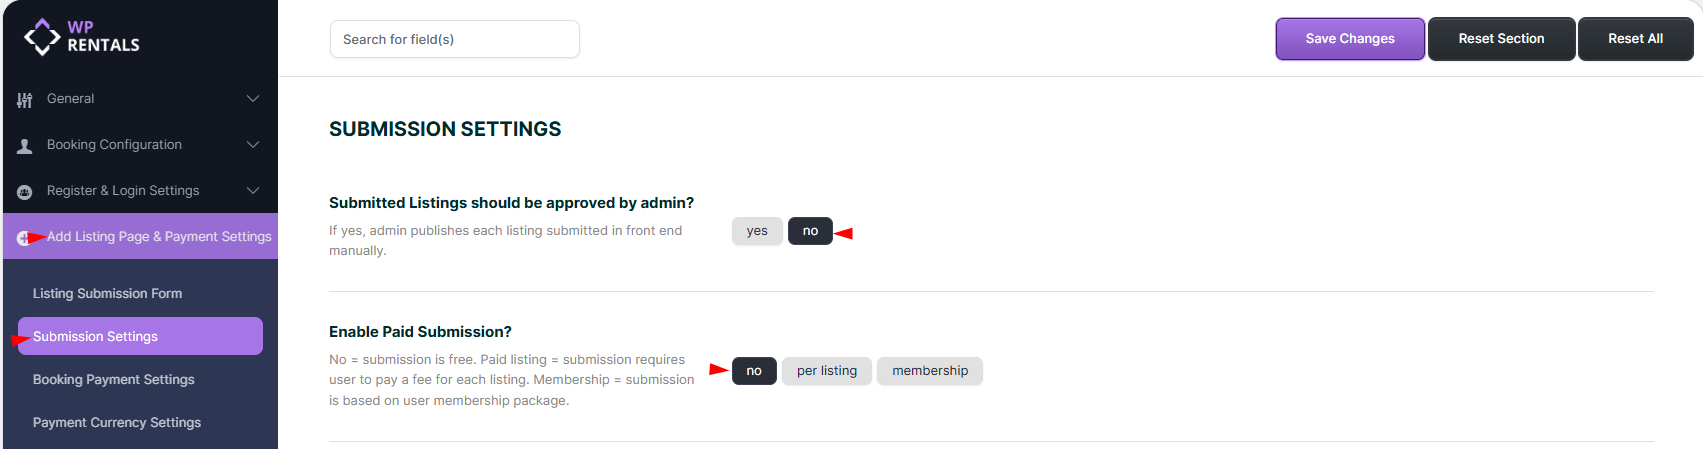
Theme Options > Add Listing Page & Payment Settings > Submission Settings
Set:
Enable Paid Submission: No
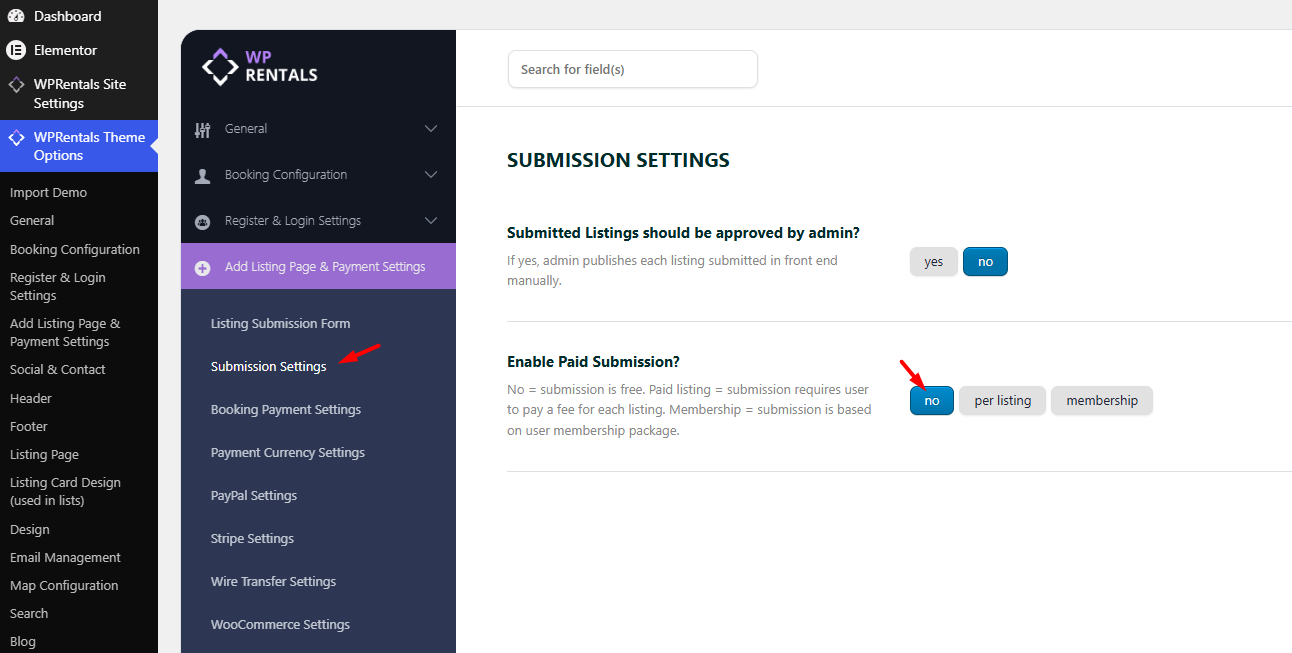
Use this setup when:
- you are the admin and you add all listings yourself
- you have one selected owner who manages all listings
- you do not want to charge yourself or your selected owner to publish listings
- you want to collect money from bookings instead of listing submission fees
Adding Listings with Free Submission
Set Deposit and Service Fee to Collect Money for Bookings
If you want to collect money when guests book a property, configure the booking deposit and service fee settings.
Go to:
Theme Options > Add Listing Page & Payment Settings > Booking Payment Settings
From this section, the admin can set:
- Deposit Fee – the amount or percentage required to confirm a booking.
- Service Fee – the admin service fee / commission added for bookings.

When guests pay online through WPRentals, the payment goes to the site admin payment account, not directly to the owner account.
The deposit can be used to confirm the booking. The service fee can be used as the admin commission for the booking.
For example:
- If you set a deposit fee, the guest must pay that amount to confirm the booking.
- If you set a service fee, the admin can collect a commission from the booking.
- If the deposit and service fee are set to 0, bookings can be confirmed without collecting an admin booking payment through the theme.
Payment merchants are configured by the site admin. WPRentals can use the supported theme payment methods for booking deposits, paid submission, and membership payments.
Booking: How to work with Deposit Fee and Service Fee
How to confirm a booking when admin deposit and / or service fee is set
How to confirm a booking when admin deposit and service fees are 0
What payment platforms are supported in WPRentals?
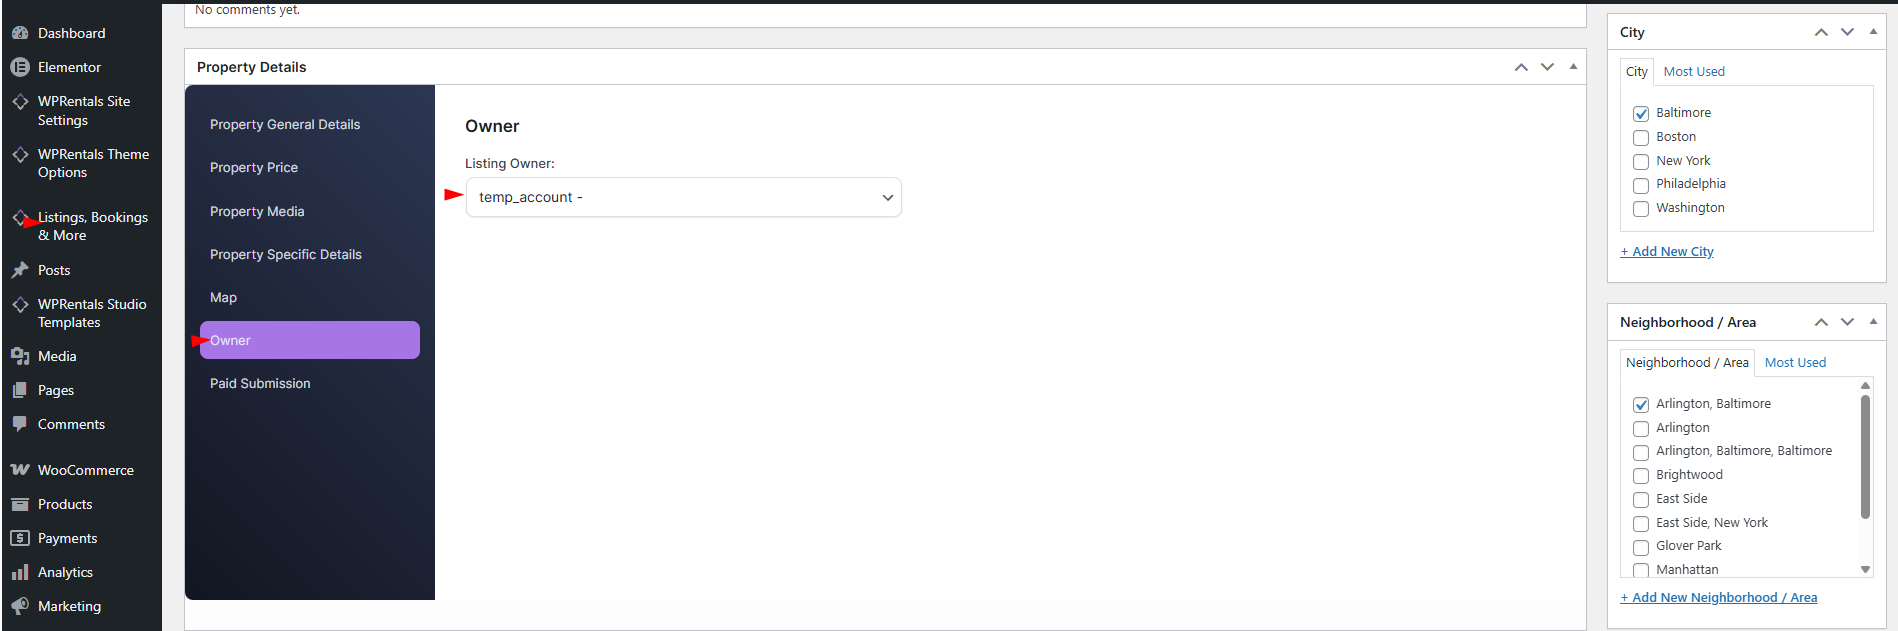
Assign or Change the Listing Owner
If a listing was added from wp-admin or assigned to the wrong owner, you can change the listing owner from the listing edit screen.
Go to:
Wp-admin > Listings, Bookings & More > Properties > Edit Listing
Find the owner option and select the correct owner from the Listing Owner dropdown.
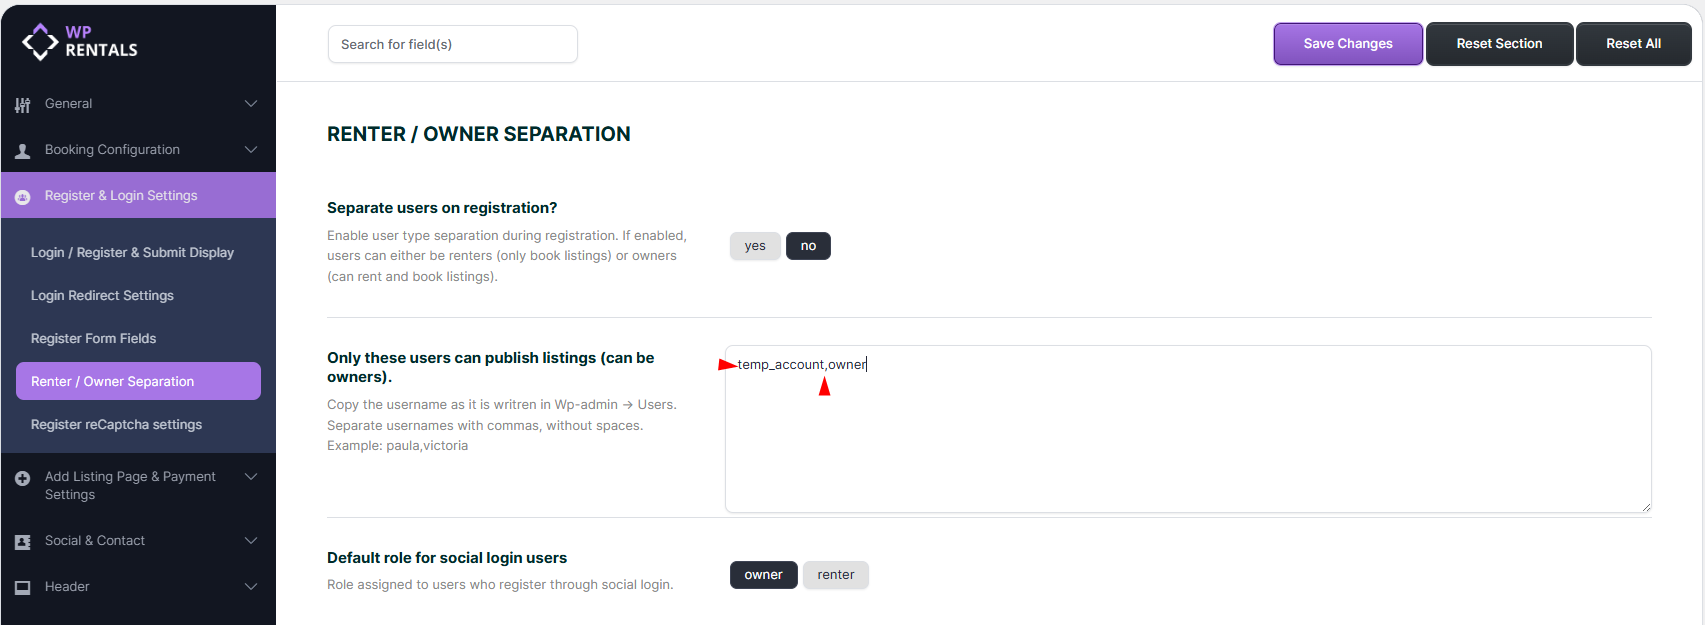
Set Yourself as the Only User Allowed to Submit Listings
If you do not want public users to submit listings, limit listing submission to your own username or to selected usernames only.
Go to:
Theme Options > Register & Login Settings > Renter / Owner Separation
For a single-owner setup, use these rules:
- Set Separate users on registration to NO.
- Add your username in the option for users allowed to publish listings.
- If more than one selected user can submit listings, add the usernames separated by commas, without spaces.
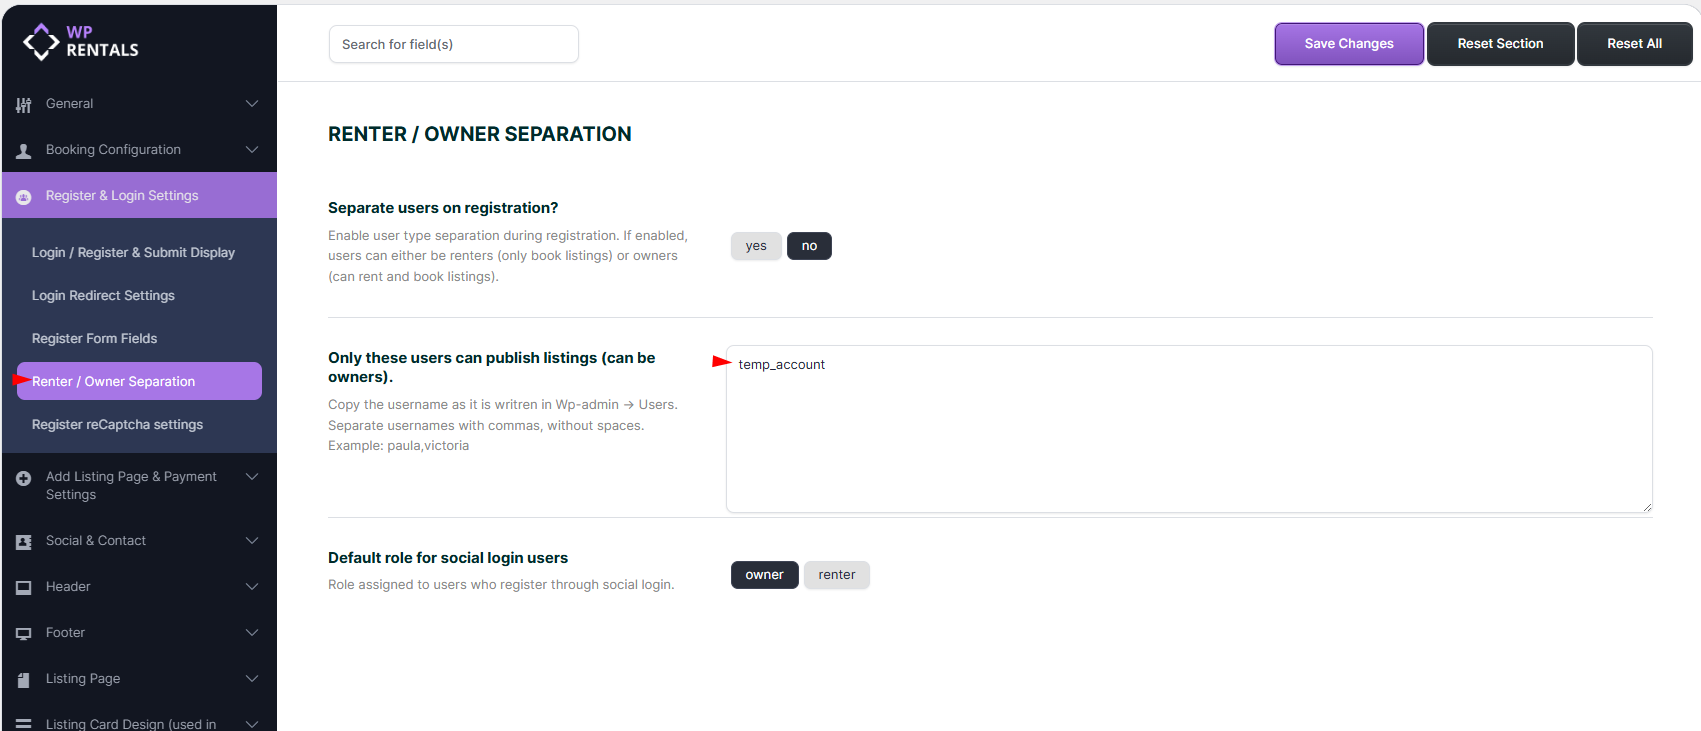
Copy the exact username from:
Wp-admin > Users
This helps avoid mistakes caused by typing the wrong username.
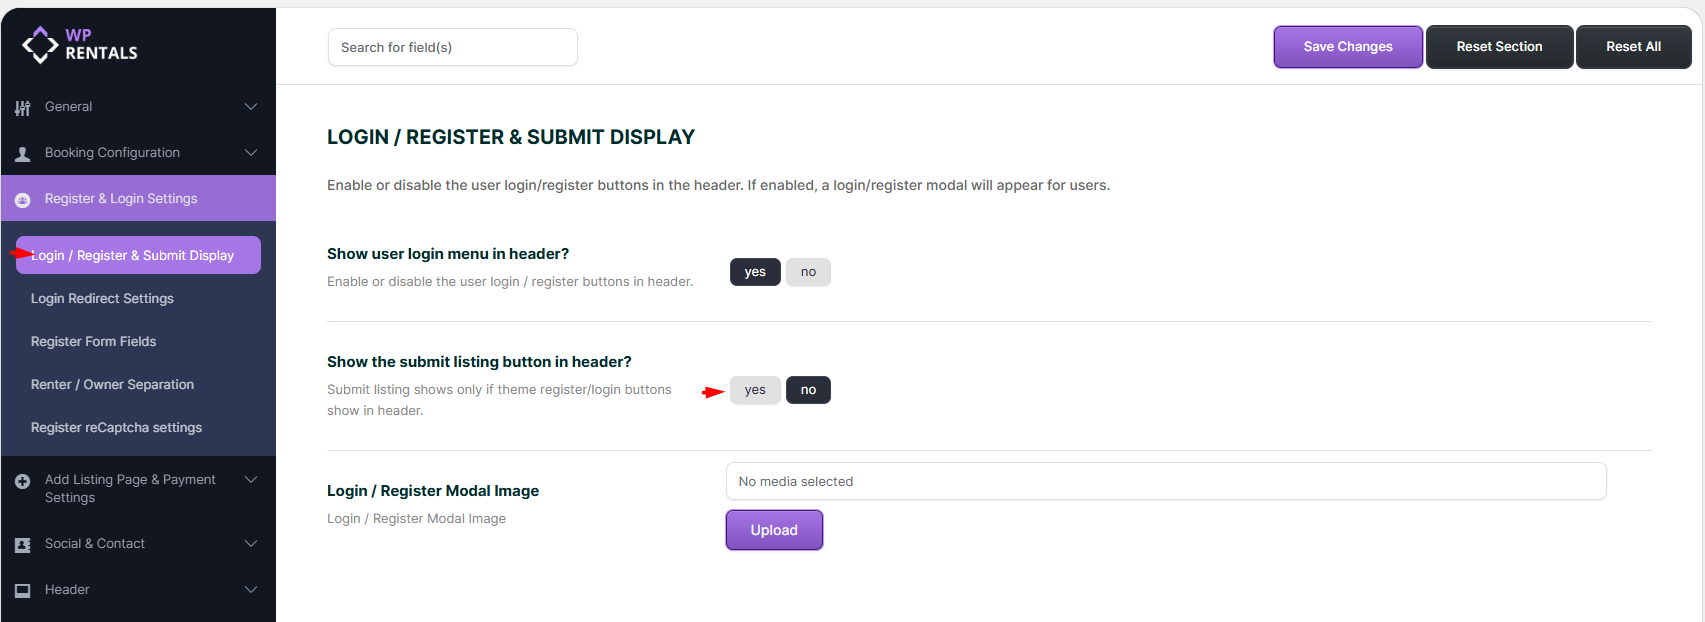
Hide the Submit Listing Button From the Header
If only the admin or selected owner should submit listings, you can hide the public Submit Listing button from the header.
Go to:
Theme Options > Register & Login Settings
Find:
Show the Submit Listing Button in Header?
Set it to NO and save the settings.

Disable Manual Approval for Your Own Submissions
If only the site admin or selected owner can submit listings, you may choose to publish submissions automatically.
Go to:
Theme Options > Add Listing Page & Payment Settings > Submission Settings
Find:
Submitted Listings Should Be Approved by Admin?
Set it to NO if you want listings to be published automatically without manual admin approval.
Important Notes
- This setup is for a single-owner or site-admin website.
- Use the front-end User Dashboard to manage listings, even if you are the admin.
- The correct listing paths are User Dashboard > My Listings > Add New Listing and User Dashboard > My Listings > Edit Listing.
- Complete My Profile from the front-end dashboard so owner details can show correctly.
- For a single-owner website, use Free Submission if you do not want to charge for adding listings.
- To collect money for bookings, configure Deposit Fee and Service Fee from Booking Payment Settings.
- Online booking payments go to the site admin payment account.
- Use the allowed usernames option to limit who can submit listings.
- Hide the Submit Listing button if you do not want public users to see the submission option in the header.
- Do not make hidden submission fields mandatory.
- If automatic approval is enabled but a listing stays pending, check mandatory fields first.
Related Help Articles
Demo Setup with 1-Click Import
Submit a Property from the User Dashboard
Adding Listings with Free Submission
Booking: How to work with Deposit Fee and Service Fee
How to confirm a booking when admin deposit and / or service fee is set
How to confirm a booking when admin deposit and service fees are 0
What payment platforms are supported in WPRentals?
Owner info does not show. What to do.
How to allow only certain users to submit properties in front end
How to hide the Submit Property and Login/Register buttons