Overview
The WPRentals List Items by ID widget and shortcode allow you to display specific properties or blog articles on a page.
You can choose exactly which properties or articles should appear by selecting them in Elementor or by adding their IDs in WPBakery.
Where This Widget Can Be Used
The List Items by ID option can be used with:
- Elementor – as the WPRentals List Items by ID widget.
- WPBakery – as the List Items by ID shortcode/element.
You can use it to display:
- Selected property listings.
- Selected blog articles.
Before You Start
Before adding the widget or shortcode, check the following:
- The properties or blog articles you want to show are already published.
- You know whether you want to display Properties or Articles.
- If you use WPBakery, you have the property IDs or post IDs ready.
- If you use Elementor, you can select the items from the widget options.
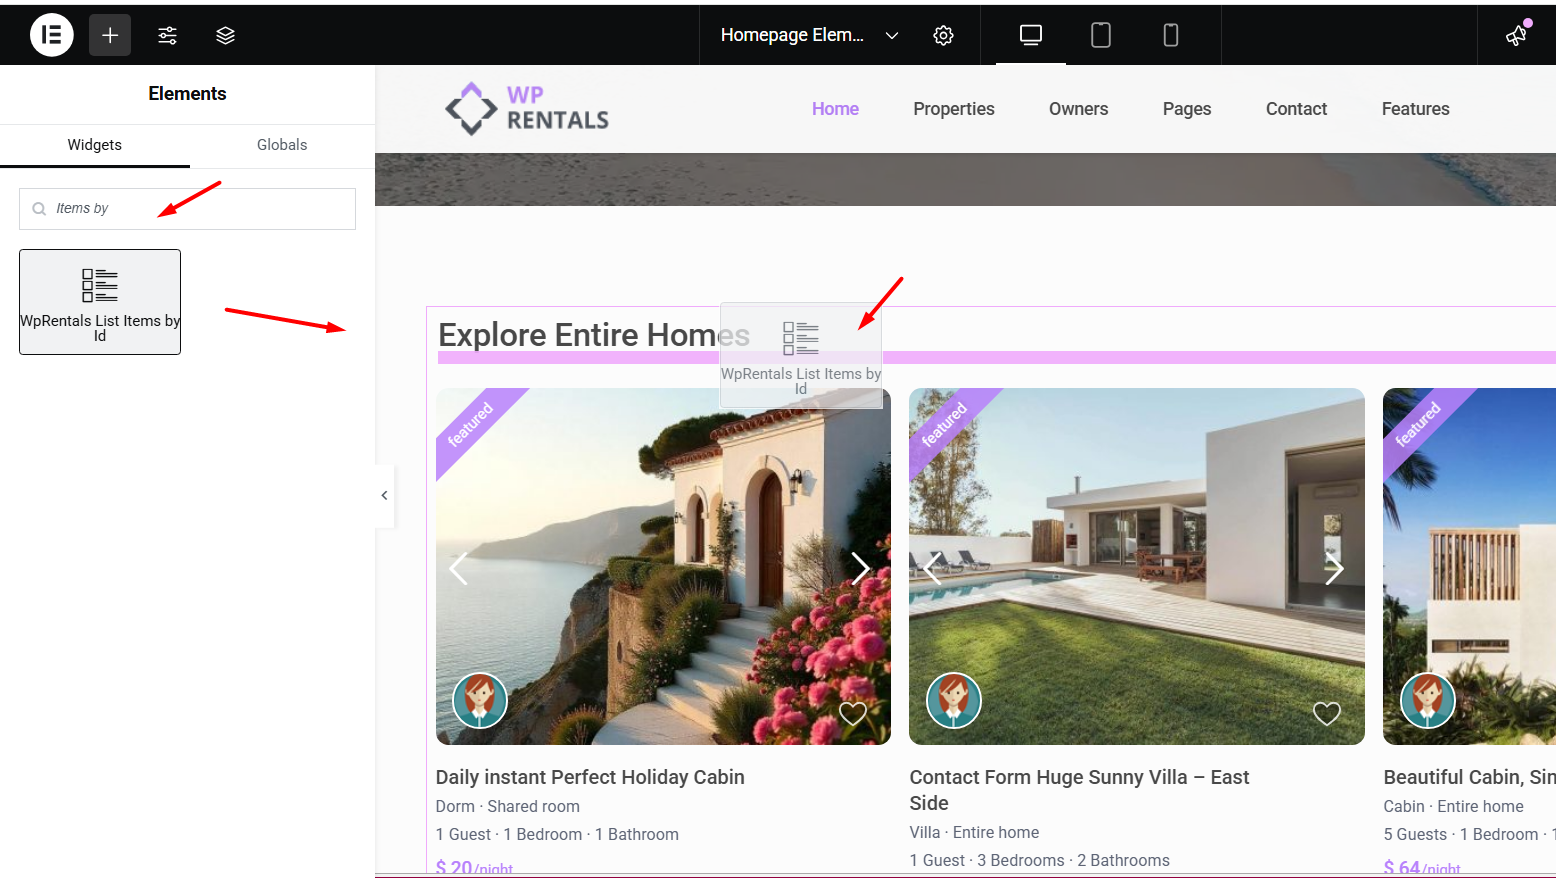
How to Add the Widget in Elementor
Step 1: Edit the Page with Elementor
- Go to the page where you want to display selected properties or articles.
- Click Edit with Elementor.
- Select the section where the items should appear, or create a new section.
Step 2: Add the Widget
- In the Elementor sidebar, search for WPRentals List Items by ID.
- Drag the widget into the section where you want the selected items to appear.
Elementor Widget Settings Explained
Type
This option controls what type of items the widget displays.
- Select Properties if you want to show selected property listings.
- Select Articles if you want to show selected blog posts.
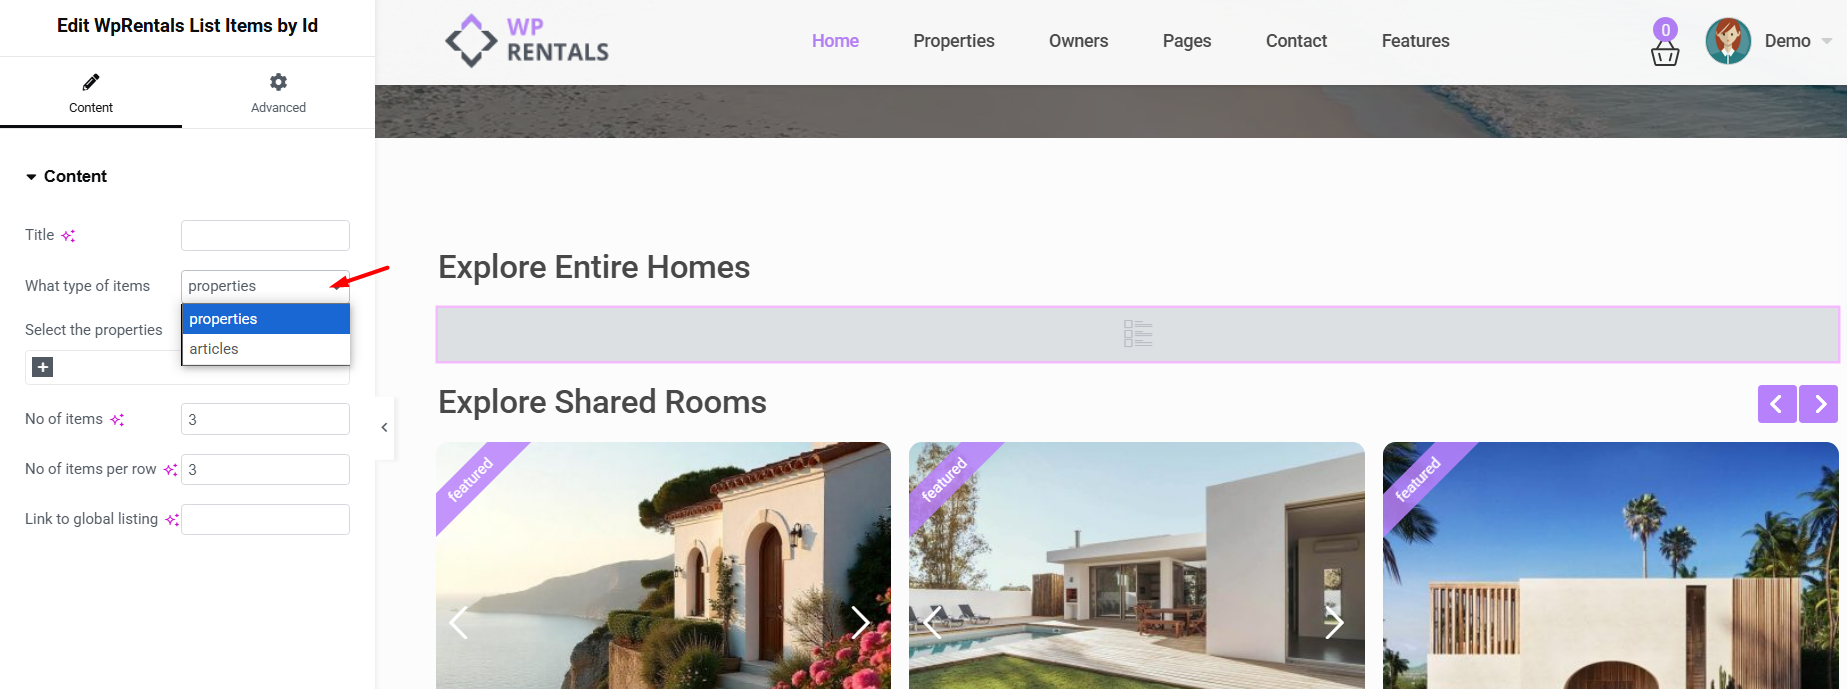
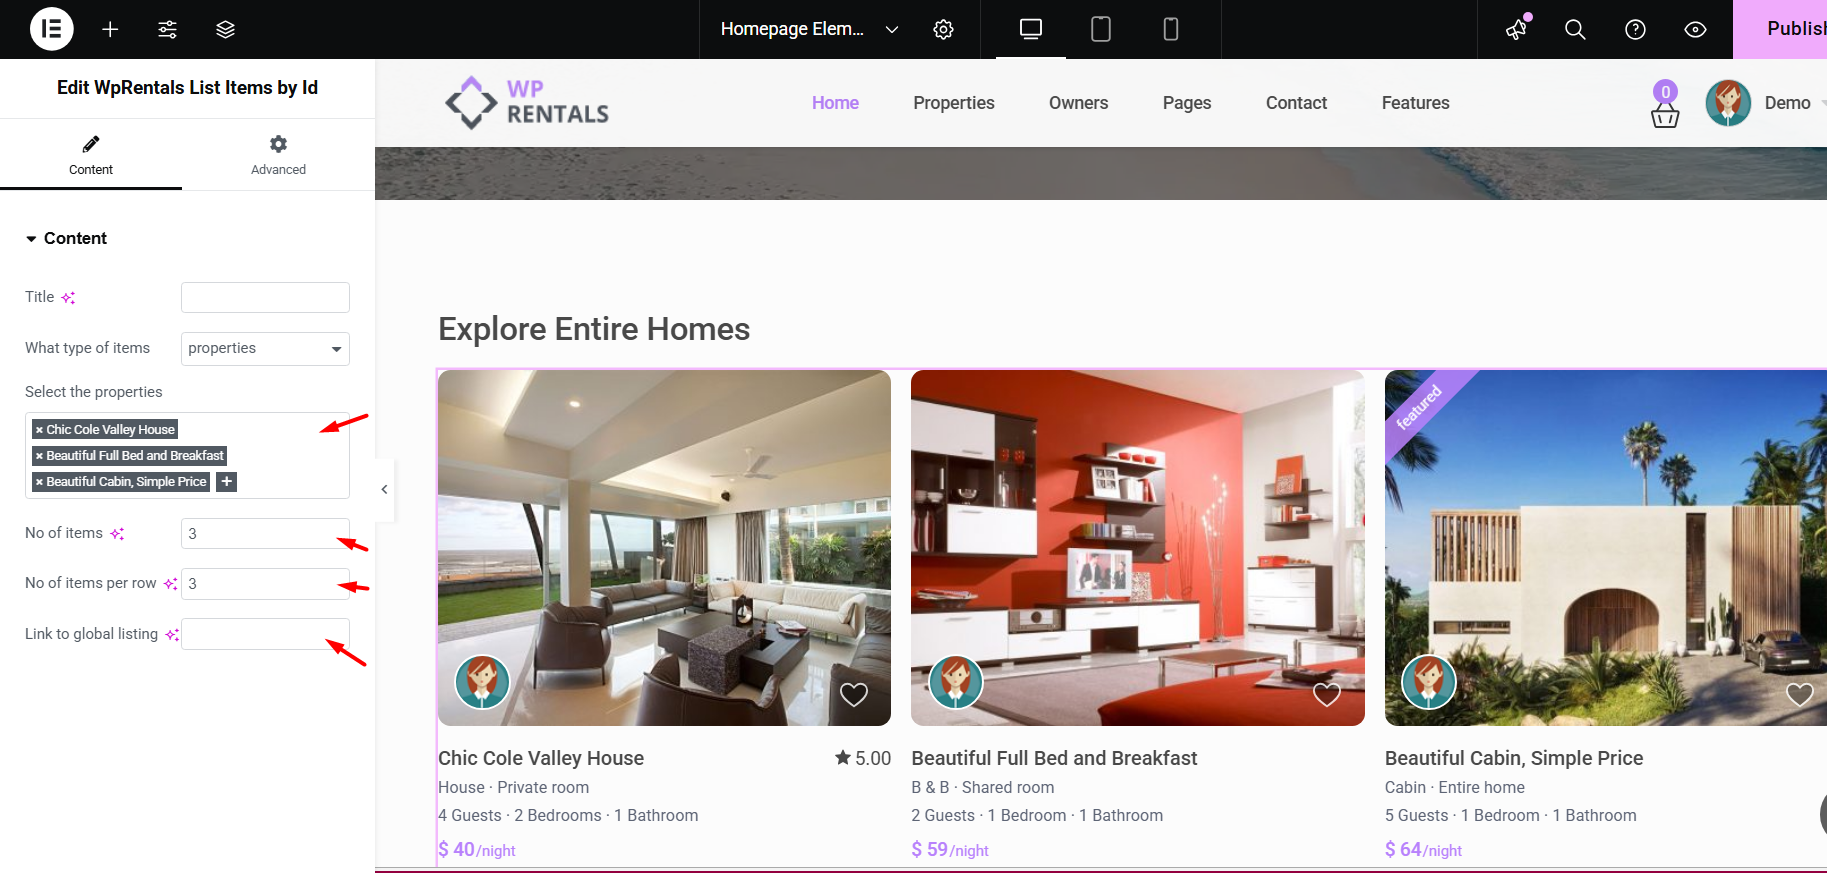
Select Listings or Articles
Use the auto-complete or dropdown option to select the exact listings or articles you want to show.
Number of Items
This option controls how many selected items are displayed.
Items per Row
This option controls how many items appear in one row.
For example, if you select 3, the widget will show 3 items per row on desktop, depending on the available page width and responsive behavior.
Link to Global Listing or Blog Page
This optional field can be used to add a link to the full properties page or the full blog page.
Use it if you want visitors to click from the selected items section to a larger list of properties or articles.
How to Find Property or Article IDs
You may need the property or article IDs when using the WPBakery shortcode or when checking which items should be displayed.
Find Property IDs
- Go to Wp-admin > Listings.
- Find the property you want to display.
- Copy the number from the ID column.
Find Blog Article IDs
- Go to Wp-admin > Posts.
- Find the blog article you want to display.
- Copy the post ID from the ID column, if available.
Styling and Display
The design of the displayed cards depends on whether you show properties or articles.
- If you display Properties, the card design follows the settings from WPRentals Options > Listing Card Design.
- If you display Articles, the card design follows the settings from WPRentals Options > Blog > Blog Card Settings.
Use these Theme Options sections to manage the card layout, image behavior, and general card design.
How to Use List Items by ID in WPBakery
Step 1: Edit the Page with WPBakery
- Go to Pages.
- Edit the page where you want to add the selected items.
- Click Edit with WPBakery Page Builder.
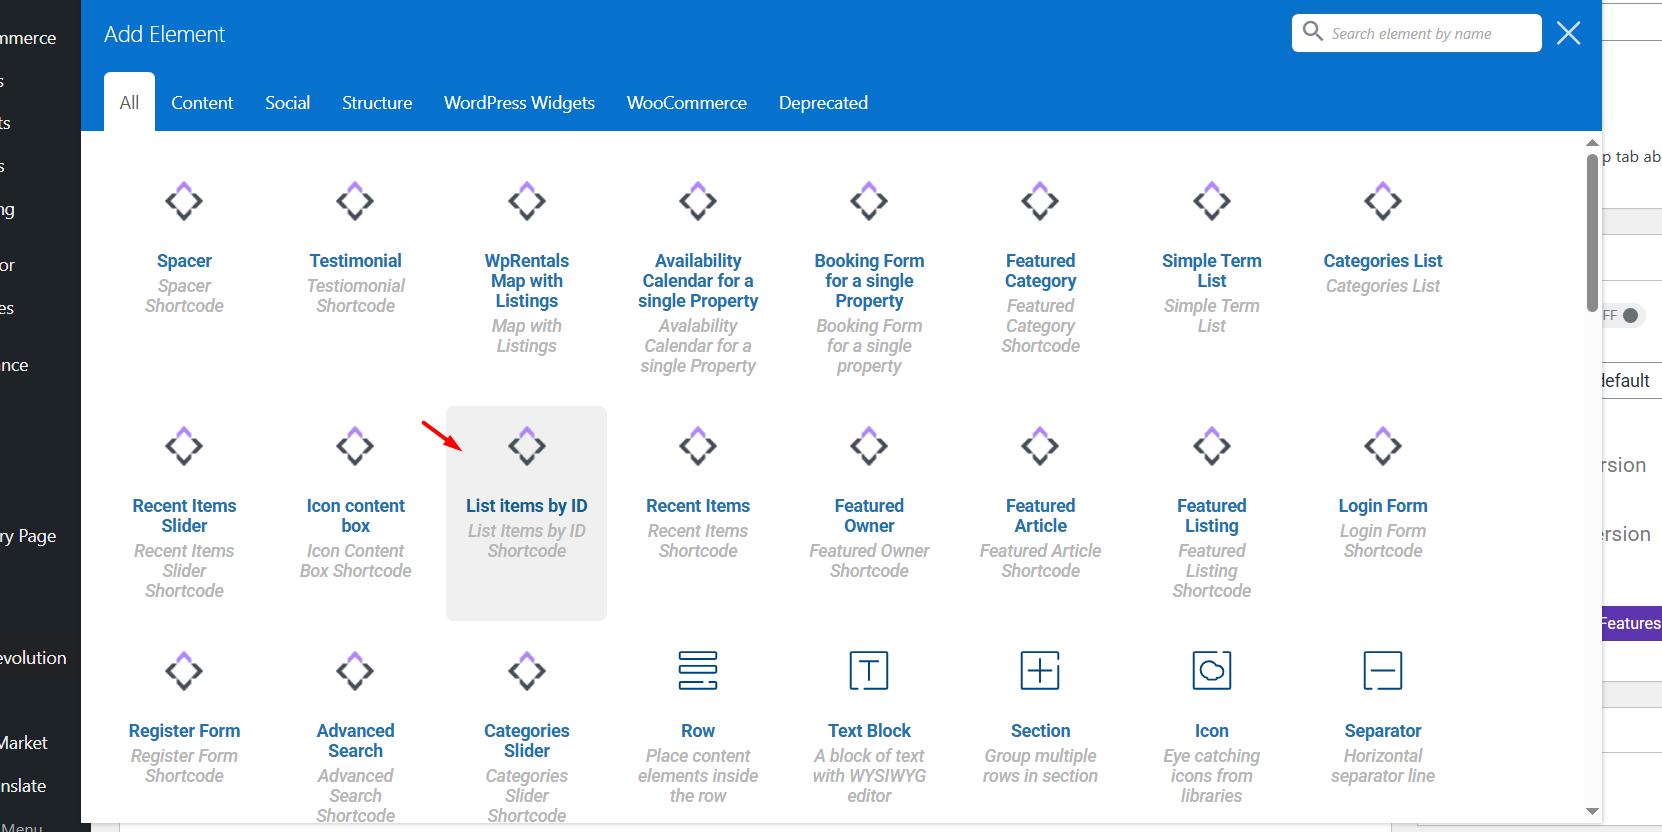
Step 2: Add the List Items by ID Element
- Click the + Add Element button.
- Search for List Items by ID.
- Click the element to insert it into the page.
Step 3: Add the Item IDs
In the WPBakery element settings, add the post IDs for the properties or blog articles you want to display.
Add the IDs separated by commas.
Example:
123,456,789
Then select the other shortcode options, such as:
- The item type: properties or articles.
- The number of total items to show.
- The number of items per row.
- The optional link to the global listing or blog page.

Save and Test the Page
After configuring the widget or shortcode:
- Save or update the page.
- Open the page on the front end.
- Check that the selected properties or articles are displayed.
- Check that the number of items and items per row are correct.
- Click each item to confirm it opens the correct property or blog article.
Important Notes
- The WPRentals List Items by ID widget displays selected properties or selected blog articles.
- In Elementor, you can select the items from the widget settings.
- In WPBakery, add the item IDs separated by commas.
- Use property IDs when displaying properties.
- Use blog post IDs when displaying articles.
- The selected items must be published to appear correctly on the front end.
- The total number of items should match the number of selected items or IDs you want to display.
- The property card design is managed from WPRentals Options > Listing Card Design.
- The blog card design is managed from WPRentals Options > Blog > Blog Card Settings.
- Do not mix Elementor and WPBakery on the same page.
- If changes do not appear, clear plugin cache, server cache, CDN cache, and browser cache, then test again.