Overview
WPRentals includes several default sidebar and widget areas where you can add WordPress widgets, WPRentals widgets, or widgets from third-party plugins.
You can use widget areas for pages, posts, footer columns, top bar sections, owner pages, splash pages, and custom page layouts.
Default WPRentals Sidebar and Widget Areas
By default, WPRentals includes the following widget areas:
- Primary Widget Area
- Secondary Widget Area
- First Footer Widget Area
- Second Footer Widget Area
- Third Footer Widget Area
- Top Bar Left Widget Area
- Top Bar Right Widget Area
- Owner Page Widget Area
- Splash Page Left Widget Area
- Splash Page Right Widget Area
Sidebar Types Explained
Primary and Secondary Widget Areas
These are the main sidebar areas used on pages, posts, and layouts that support a sidebar.
You can assign these sidebars from the page or post settings, depending on the layout used.
Footer Widget Areas
The footer widget areas are used for footer columns.
You can add widgets such as text, menus, contact information, social links, or other widgets that should appear in the footer.
Top Bar Widget Areas
The top bar widget areas are used in the top bar section, if the top bar is enabled.
WPRentals includes separate widget areas for the left and right side of the top bar.
Owner Page and Splash Page Widget Areas
These widget areas are used only in their specific theme sections.
- Owner Page Widget Area is used for owner page layouts.
- Splash Page Left Widget Area and Splash Page Right Widget Area are used for splash page layouts.
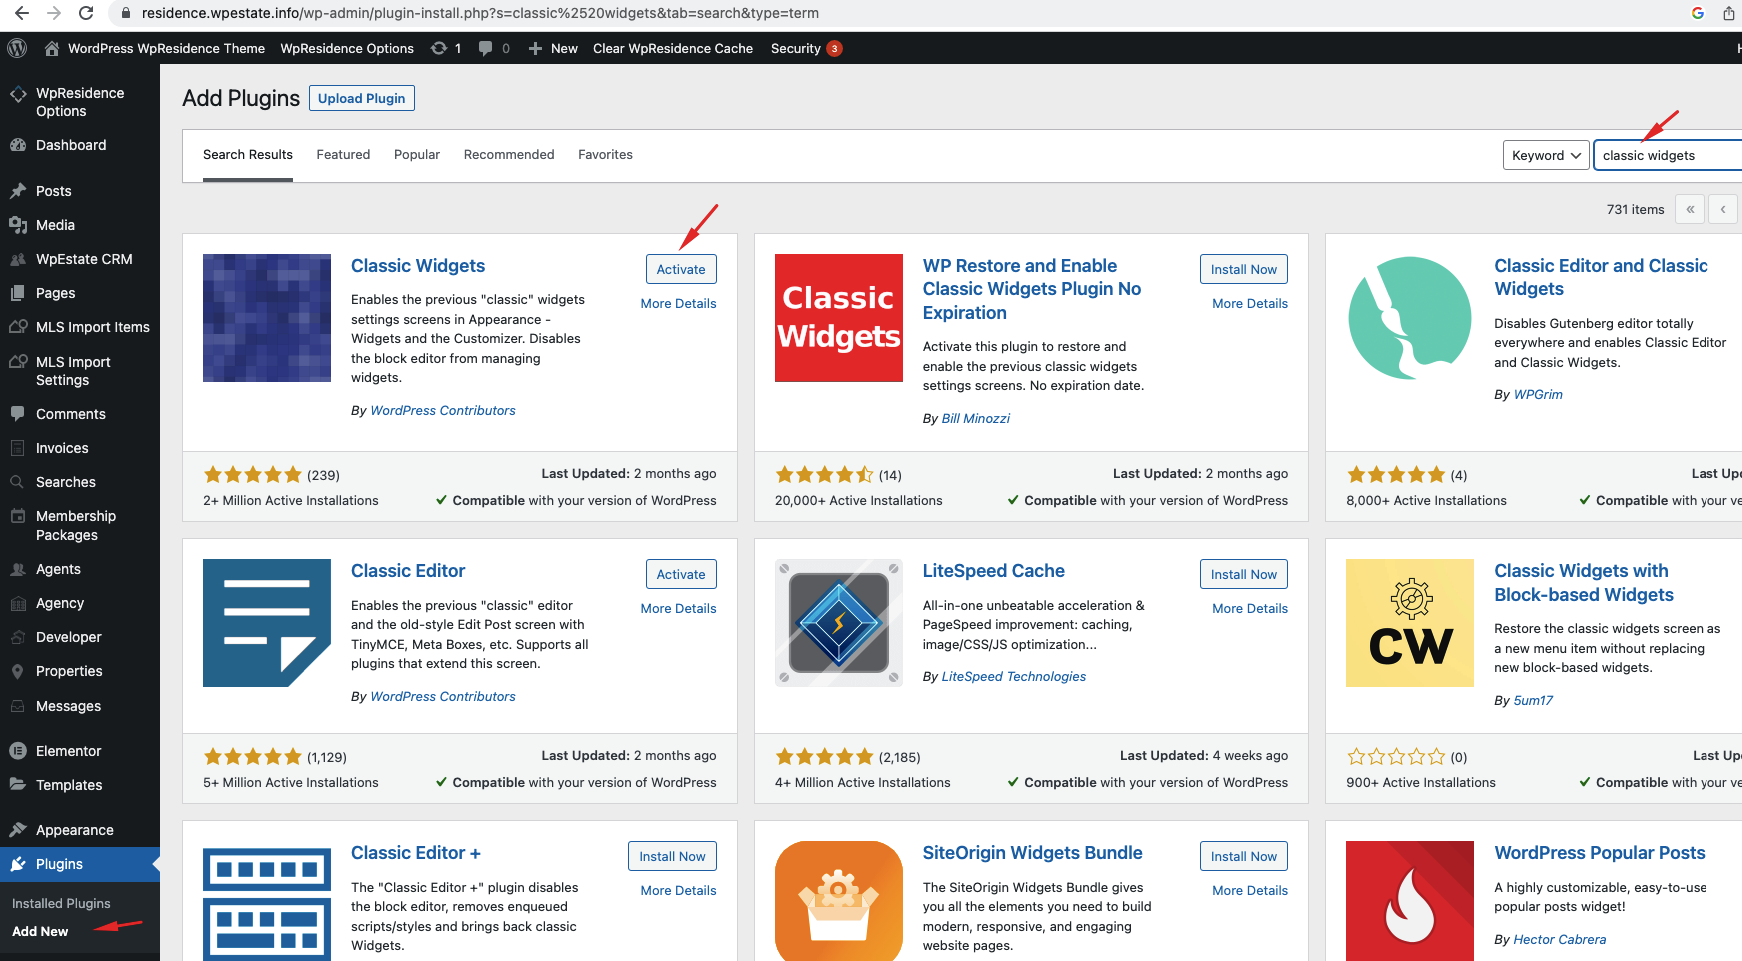
Classic Widgets Plugin
This help is based on the WordPress Classic Widgets interface.
If your WordPress installation uses the block-based widget editor and you prefer the classic drag-and-drop widget screen, you can install the Classic Widgets plugin.
How to Add Widgets to a Sidebar
WPRentals includes several built-in widgets. You can also use default WordPress widgets or widgets added by third-party plugins.
To add widgets:
- Go to WordPress Dashboard > Appearance > Widgets.
- Select the widget you want to use.
- Add it to the sidebar or widget area where you want it to appear.
- Use drag and drop to reorder widgets inside the sidebar.
- Open the widget settings and configure the title, text, or options.
- Save the widget area.
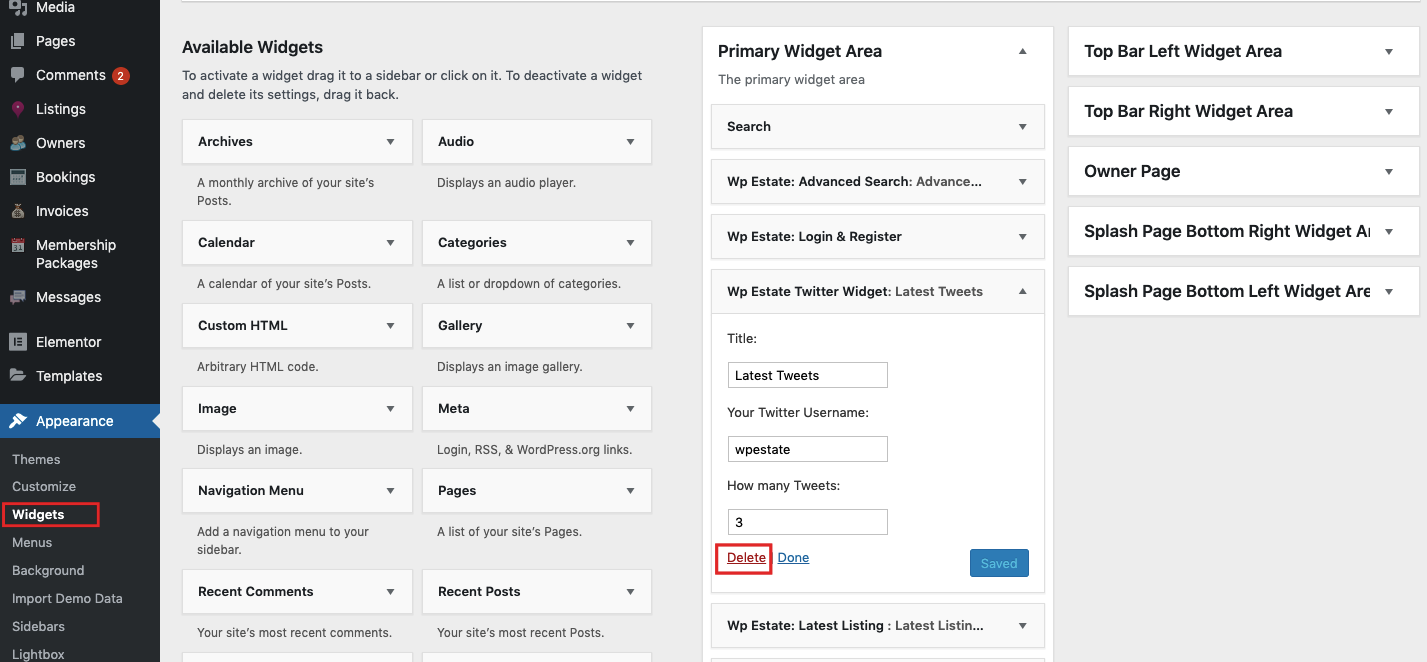
How to Edit Widget Titles
Widget titles are managed directly inside each widget.
For example, if you add a widget to the footer or sidebar, open that widget and edit the Title field.
The title is not automatically created from Theme Options. The site admin must add the title manually in the language that should appear on the website.
Examples:
- For an English website, add a title such as Featured Listings.
- For a French website, add the title in French.
- For a Spanish website, add the title in Spanish.
How to Create a New Sidebar
Besides the default Primary and Secondary sidebars, you can create custom sidebars and assign them to individual pages or posts.
To create a new sidebar:
- Go to WordPress Dashboard > Appearance > Sidebars.
- Click + Add Sidebar.
- Add a name for the new sidebar.
- Save the sidebar.


After creating the sidebar, go to:
Appearance > Widgets
Add the widgets you want to display in that sidebar.
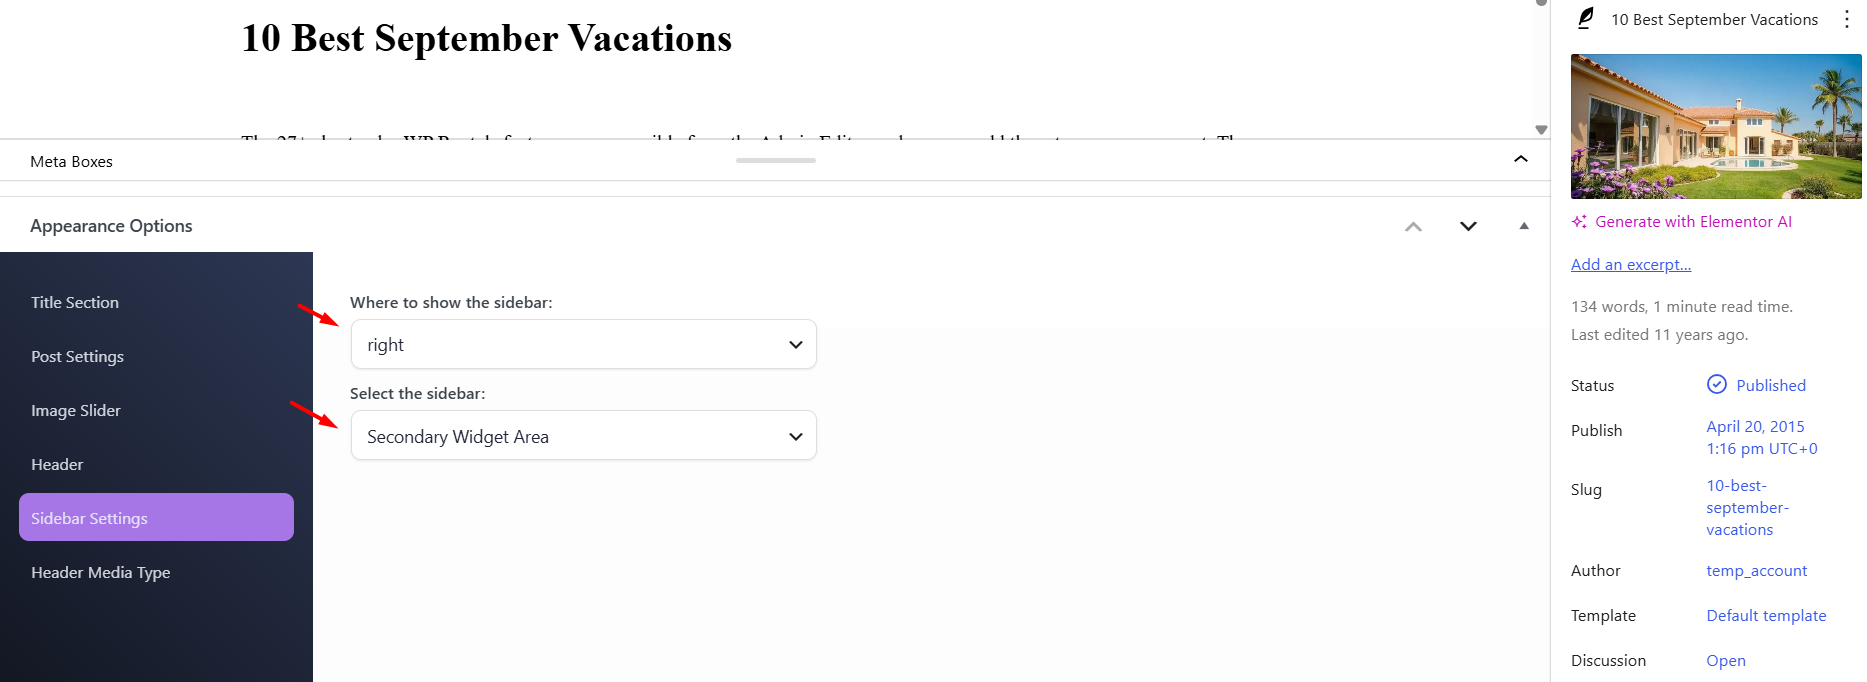
How to Change the Sidebar for a Page or Post
You can choose which sidebar appears on each page or post.
To change the sidebar:
- Edit the page or post.
- Go to Sidebar Settings.
- Choose the sidebar position.
- Select which sidebar should display.
- Update the page or post.
Available sidebar positions:
- Right – the sidebar appears on the right side.
- Left – the sidebar appears on the left side.
- None – no sidebar is displayed.
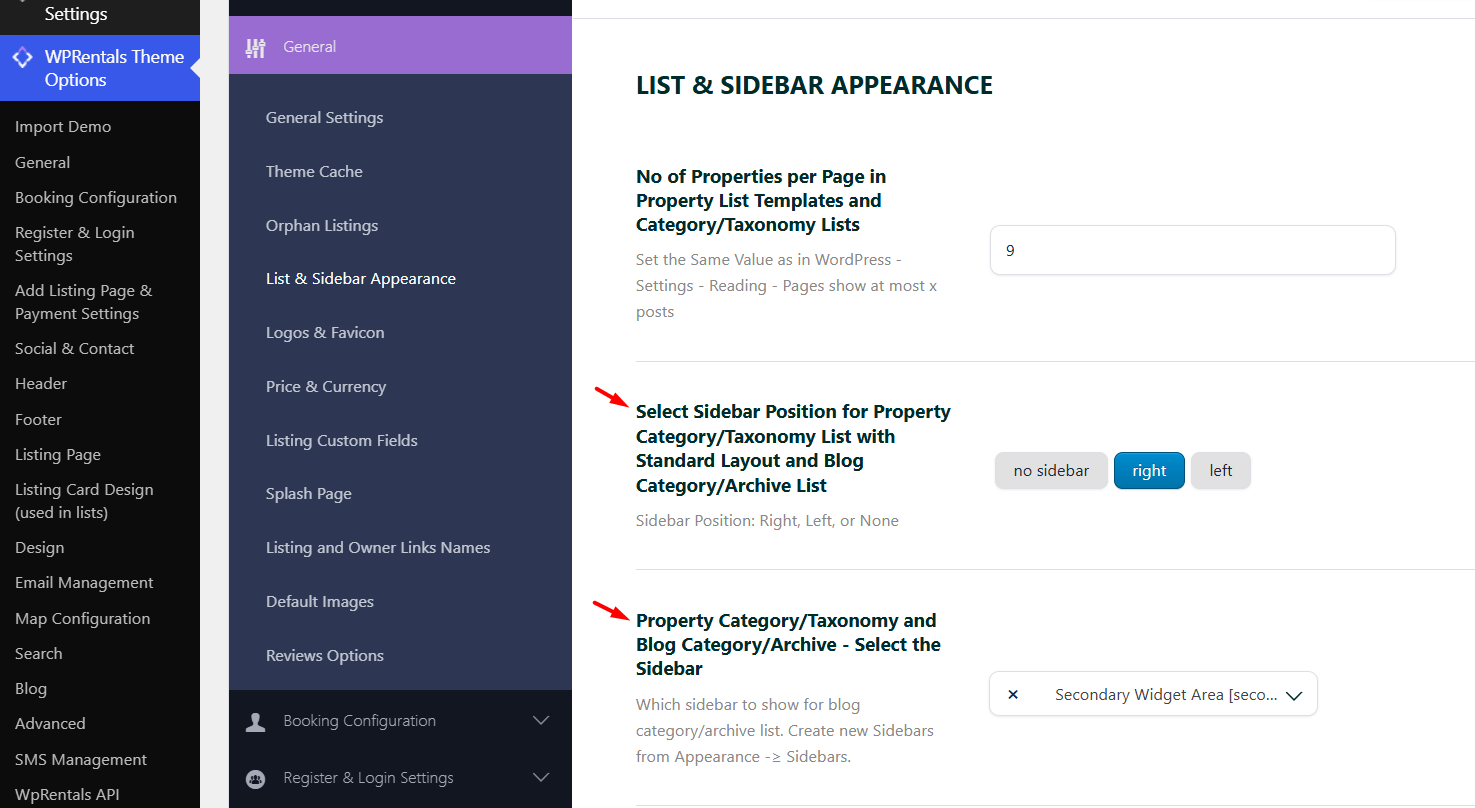
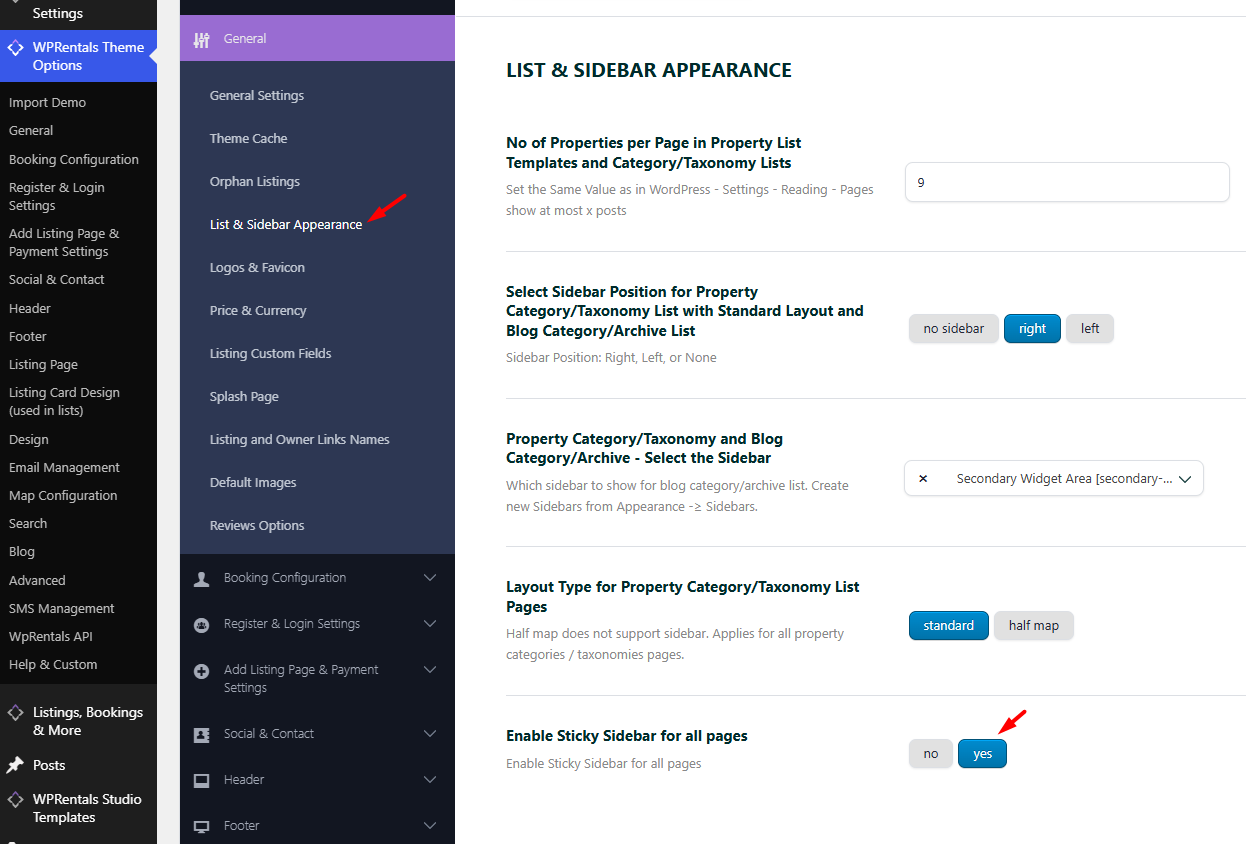
Sidebar Settings for Property Taxonomies and Categories
You can also manage the sidebar layout for property taxonomy and category pages.
These options apply to the standard taxonomy layout.
Go to:
Theme Options > General > List & Sidebar Appearance
From there, you can change the sidebar type and position used for property taxonomy pages.
Property Taxonomies / Categories
How to Enable Sticky Sidebar
The sticky sidebar option keeps the sidebar visible while users scroll on pages where a sidebar is displayed.
To enable or disable sticky sidebar, go to:
Theme Options > General > List & Sidebar Appearance
Find the option Enable Sticky Sidebar for All Pages.
- Set it to Yes to enable sticky sidebar.
- Set it to No to disable sticky sidebar.
Important Notes
- WPRentals includes several default sidebar and widget areas.
- Widgets are managed from Appearance > Widgets.
- Custom sidebars are created from Appearance > Sidebars.
- After creating a custom sidebar, you must add widgets to it.
- Pages and posts can use different sidebars from their sidebar settings.
- Property taxonomy sidebar settings are managed from Theme Options > General > List & Sidebar Appearance.
- Sticky sidebar is also managed from Theme Options > General > List & Sidebar Appearance.
- Widget titles are edited directly inside each widget.
- Add widget titles in the language you want visitors to see.
- If using a multilingual plugin, check the multilingual plugin settings for widget title translations.