
WPEstate Translate is our own plugin for running a WPRentals site in several languages. This guide describes version 1.0.9. If you run an older version, update the plugin first.
What WPEstate Translate Does
- Creates linked translations of pages, posts and rental listings, by hand or with automatic translation.
- Translates categories and other taxonomy terms (Taxonomy Translation).
- Copies a menu structure into the other languages (Menu Synchronization).
- Translates texts from the WPRentals theme, the WPRentals Core plugin and the WPRentals Elementor plugin (Theme & Plugins Strings).
- Translates labels you typed in Theme Options, for the extra languages.
- Serves every extra language under its own URL prefix, for example example.com/es/, and adds hreflang tags for search engines.
- Adds a language switcher to a menu or a widget area.
How the Visitor Language Is Chosen
The URL decides the language. A page opened with a language prefix, such as /es/, shows that language. A page without a prefix shows the default language.
The plugin does not read the browser language and does not remember the last language in a cookie. Visitors change language with the language switcher.
Getting Started
- Install and activate WPEstate Translate. A new WPEstate Translate menu appears in wp-admin.
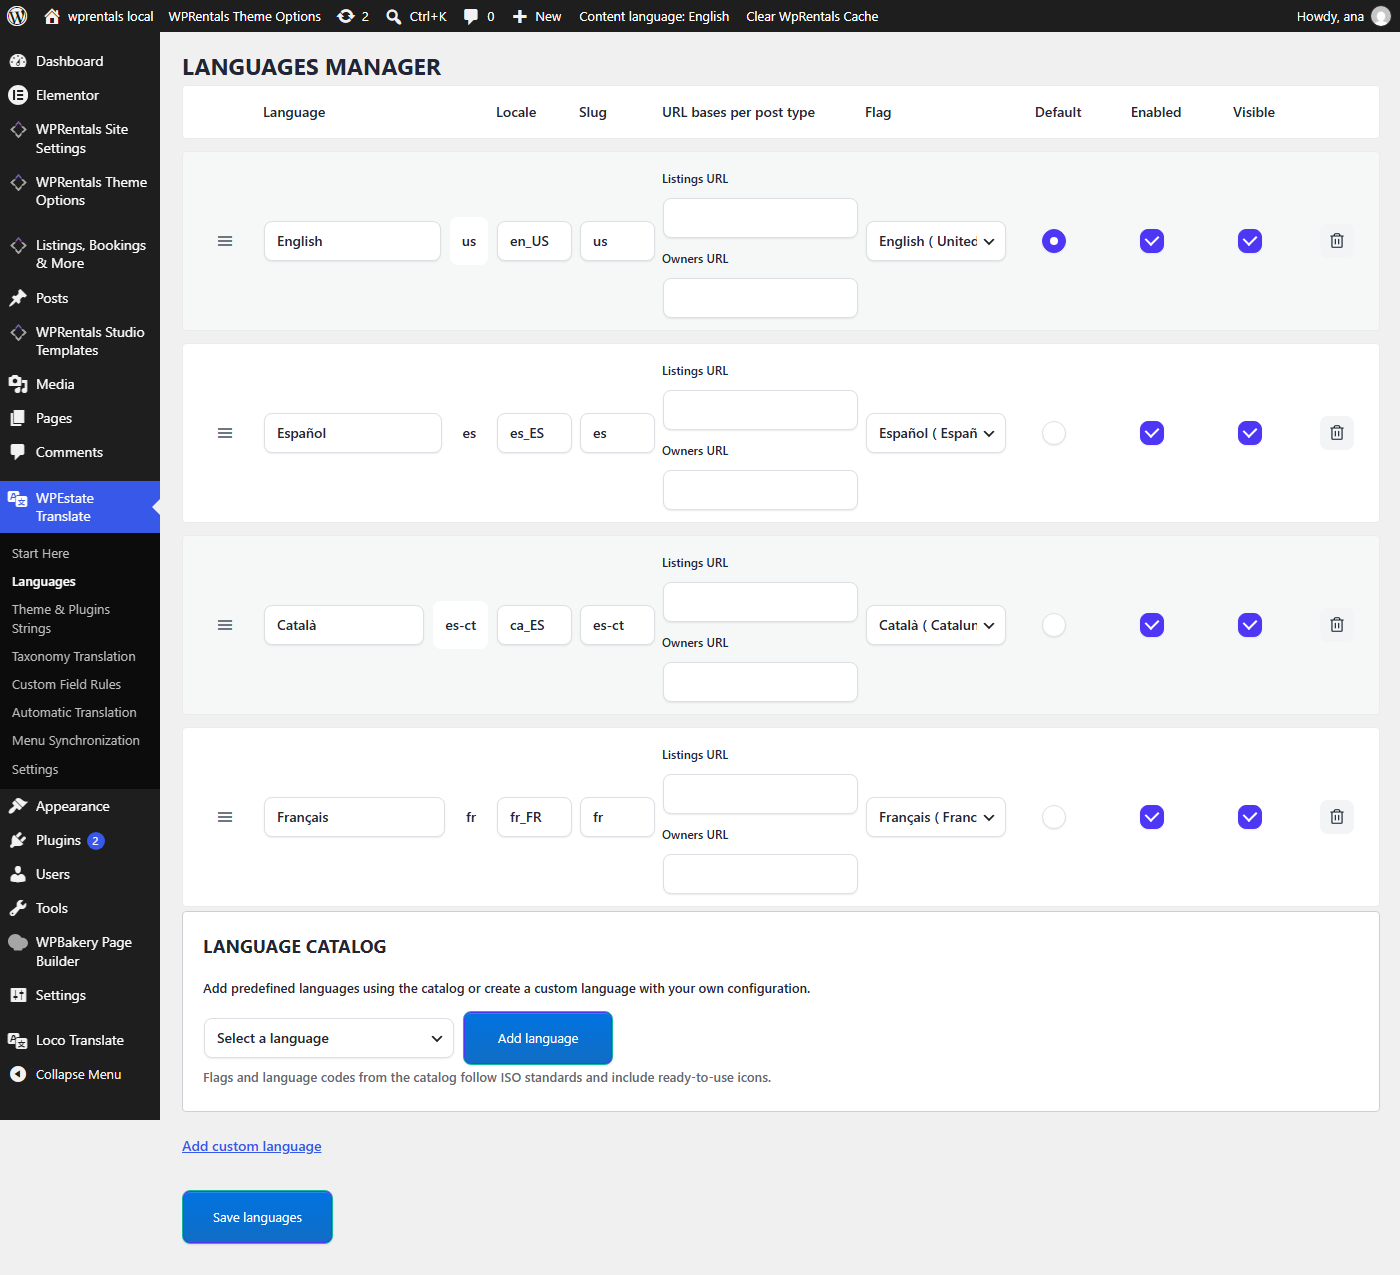
- Add your languages in WPEstate Translate > Languages. Pick them from the language catalog and make sure each one has the correct locale, for example it_IT.
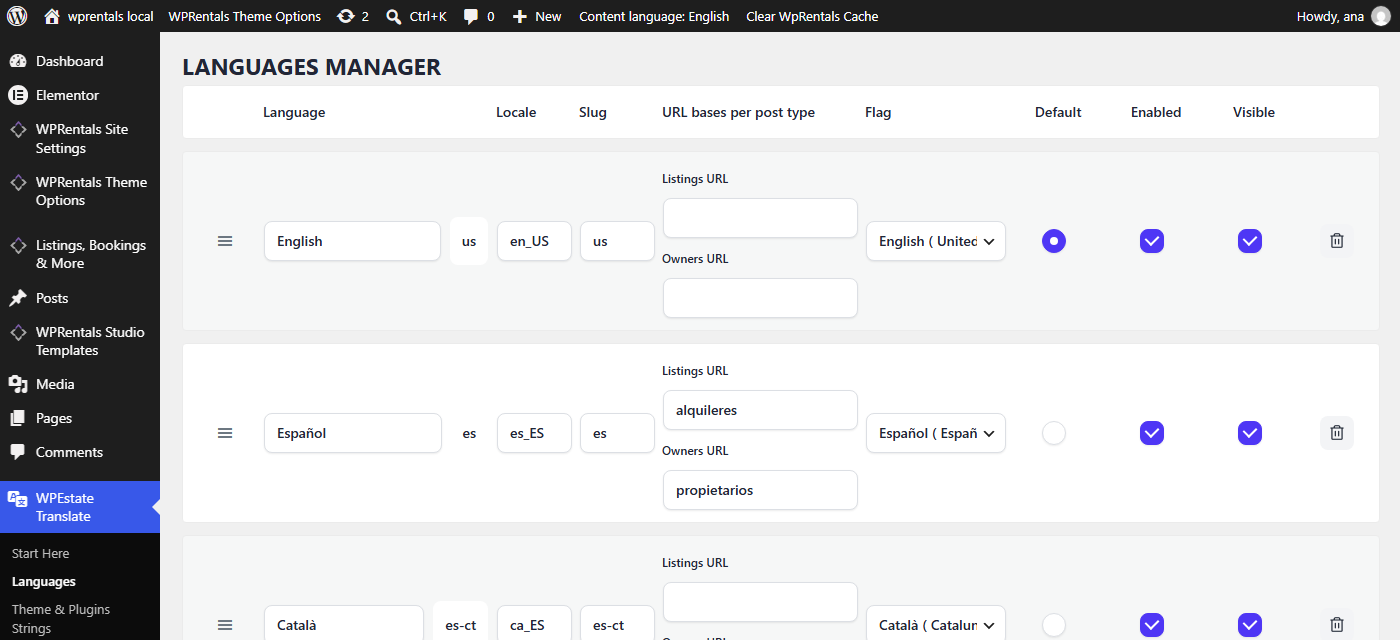
- Mark the default language. Select the Default radio button next to your main language in the same Languages Manager screen and click Save languages.
![WPEstate Translate Languages Manager with the default language selected]()
- Translate your content. See Manual and Automatic Translation.
- Translate theme and plugin texts. See Translate Theme and Plugin Texts below.
- Translate categories and menus. See Translate Categories, Cities and Features and Translate Menus.
- Add the language switcher. See Language Switcher below.
- Clear all caches and test each language.
Manual and Automatic Translation
Every translated page, post or listing starts as a copy of the original. You then translate the copy by hand, or let a translation service do it for you.
Manual translation
This works the same for pages, posts, listings, Elementor pages and any other content.
- Open the original in the editor. Go to Pages, Posts or Listings and click Edit on the item you want to translate.
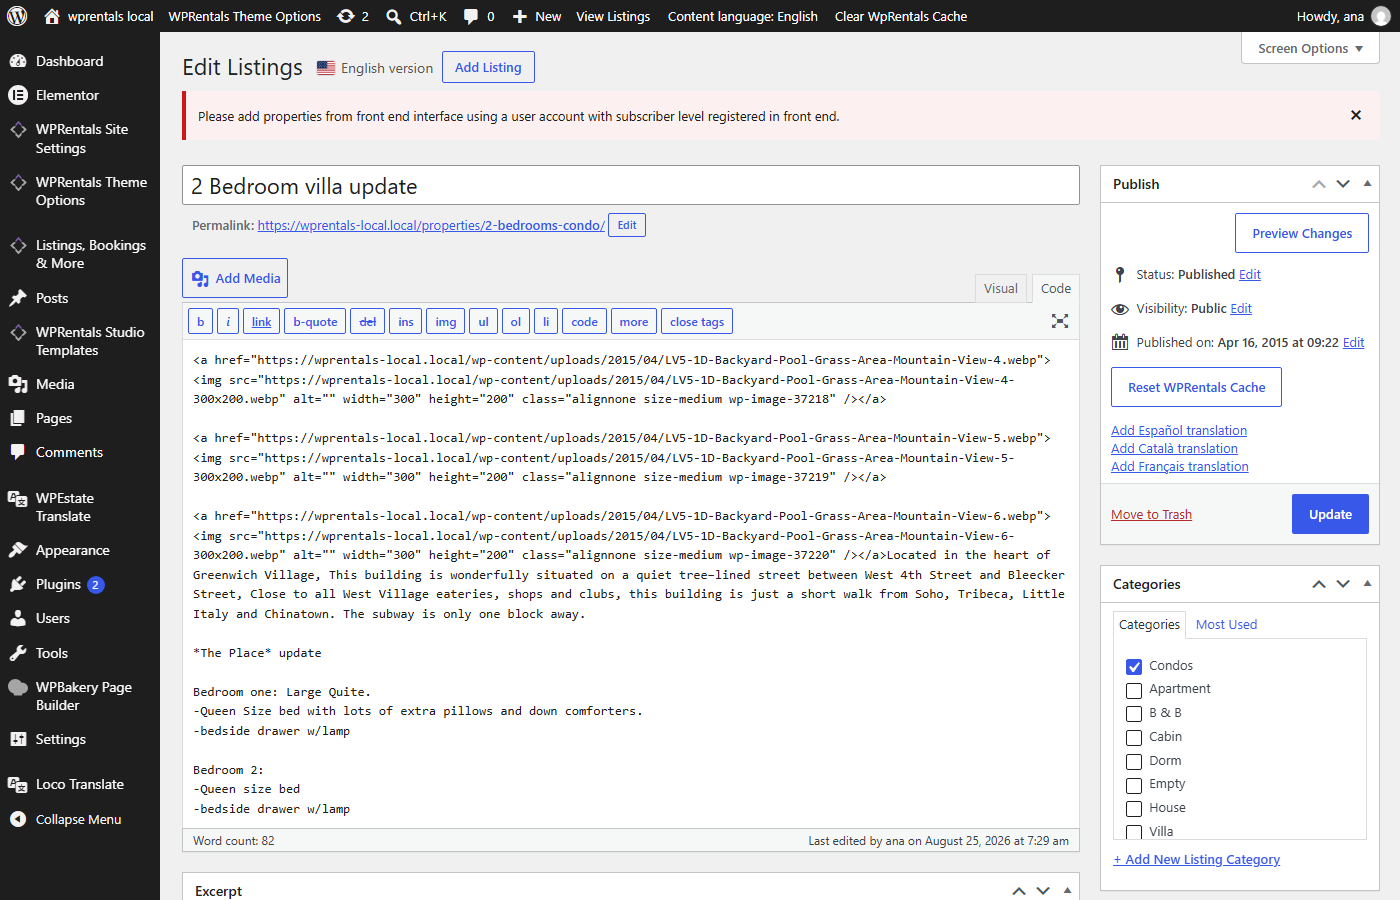
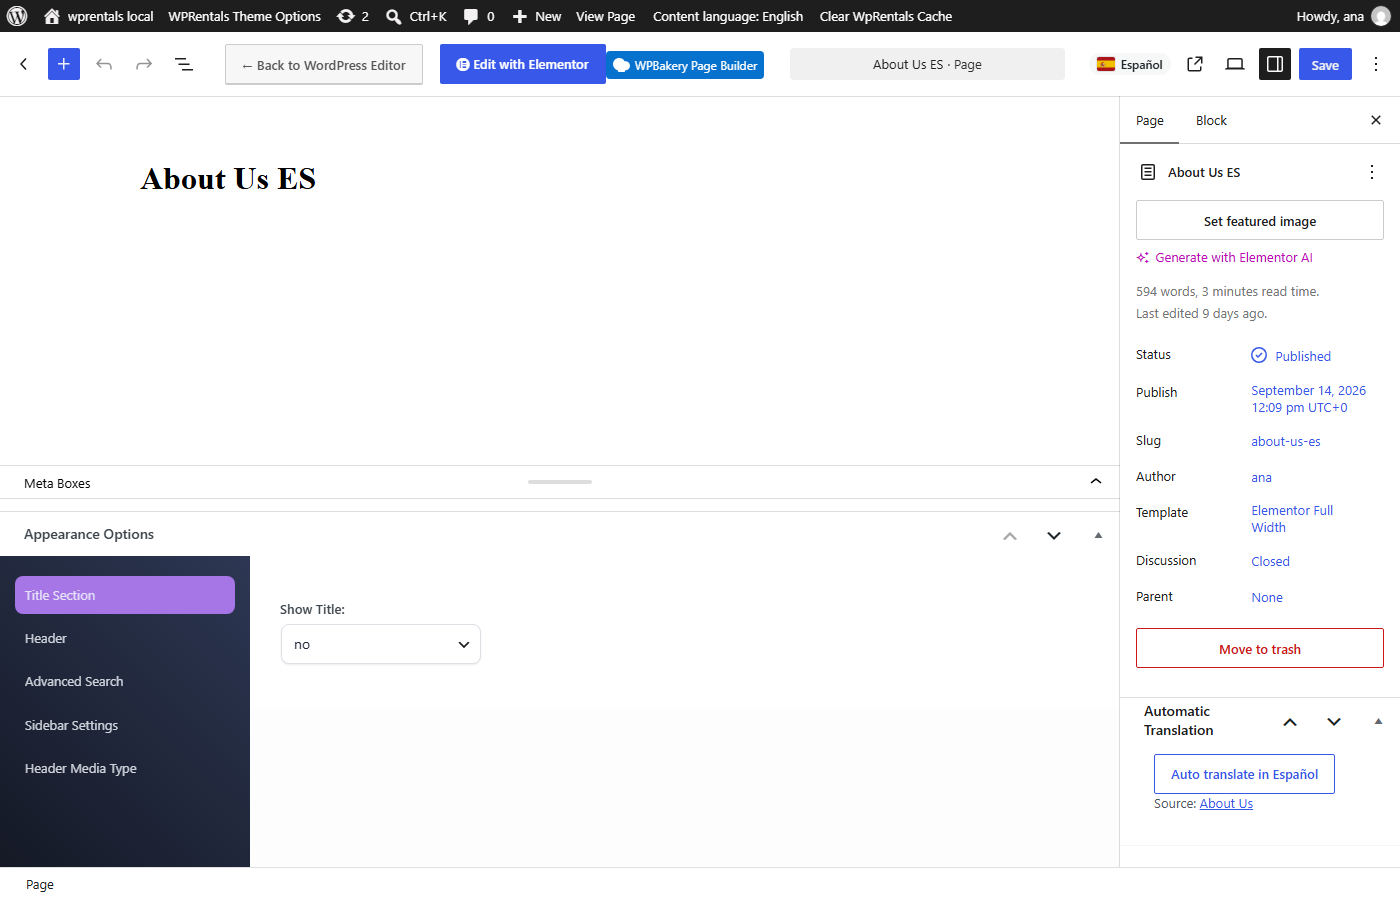
- Click Add Español translation (your language). The links are in the Publish box, or in the Automatic Translation box on the right when the page uses the block editor. When a translation already exists, the link says Edit Español translation.
- The translation opens in the editor as a draft. It is a full copy of the original: text, layout, Elementor design, images and listing details. Categories and other terms are set to their translations, see Translate Categories, Cities and Features.
- Translate the texts. Change the title and the text. For Elementor pages, click Edit with Elementor and change the text in each widget. The layout stays the same.
- Publish the translation.
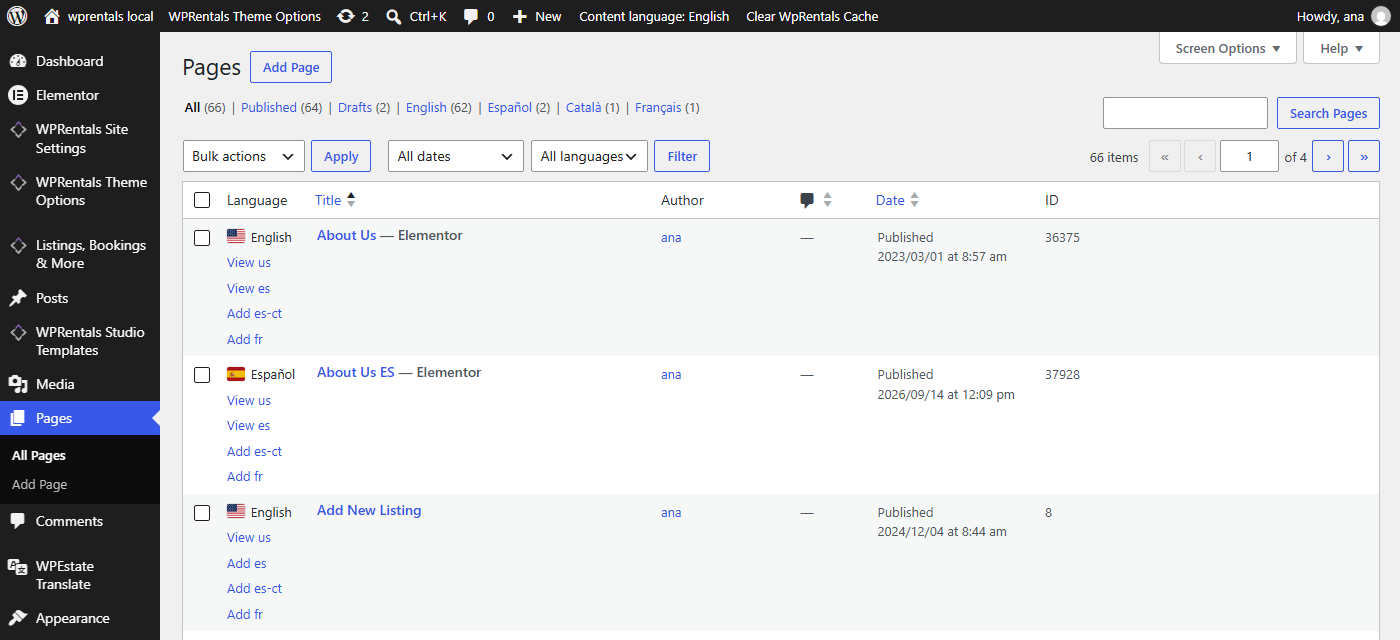
The same links are in the Language column of the Pages, Posts and Listings lists: Add es creates the translation, View es opens the existing one.
Automatic translation
Automatic translation uses OpenAI, Google Translate, DeepL or Microsoft Azure. You need an account and an API key from one of them. Without it, translate by hand.
- Go to WPEstate Translate > Automatic Translation.
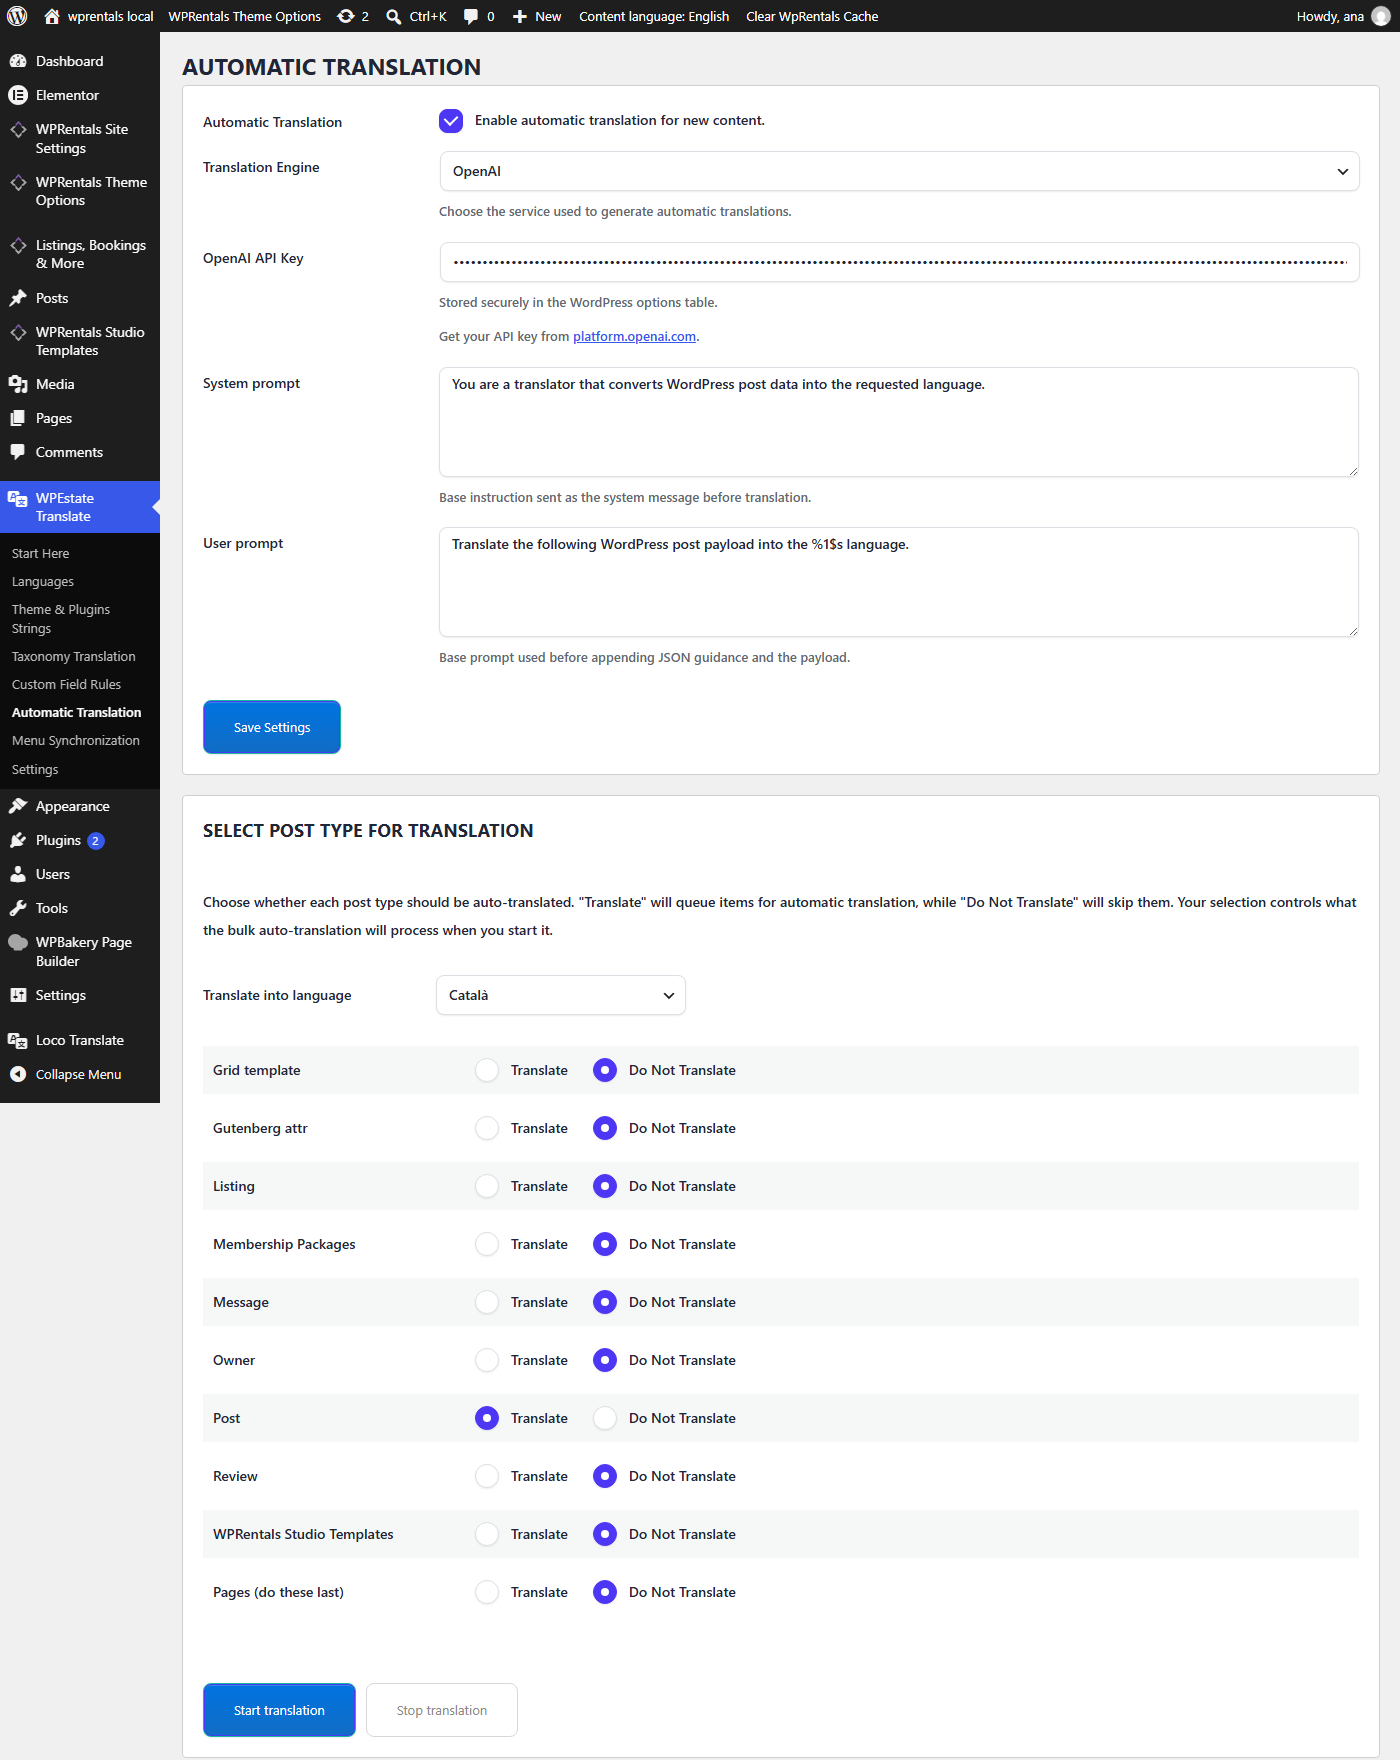
- Tick Automatic Translation, choose the Translation Engine and paste its API key. Click Save Settings. Setup of each service: Automatic translation with OpenAI, Google, DeepL or Azure.
- Translate one item: add the translation as described above, then click Auto translate in Español (your language) in the Publish box, or in the Automatic Translation box in the block editor. When it finishes, the button changes to Redo the translation.
- Translate many items at once: in Select Post Type for Translation, pick the language in Translate into language, set Translate for the post types you want and click Start translation. Leave pages for last, as the screen suggests.
- Translate theme and plugin texts: in Theme & Plugins Strings, under Automatic translate strings, pick the domain and the language and click Automatic Translate.
Always read machine translations before you publish them, especially house rules, booking terms, fees, legal pages and place names.
Translate Categories, Cities and Features
Listing categories, cities, areas, features and amenities are taxonomy terms. Each term gets its own translation.
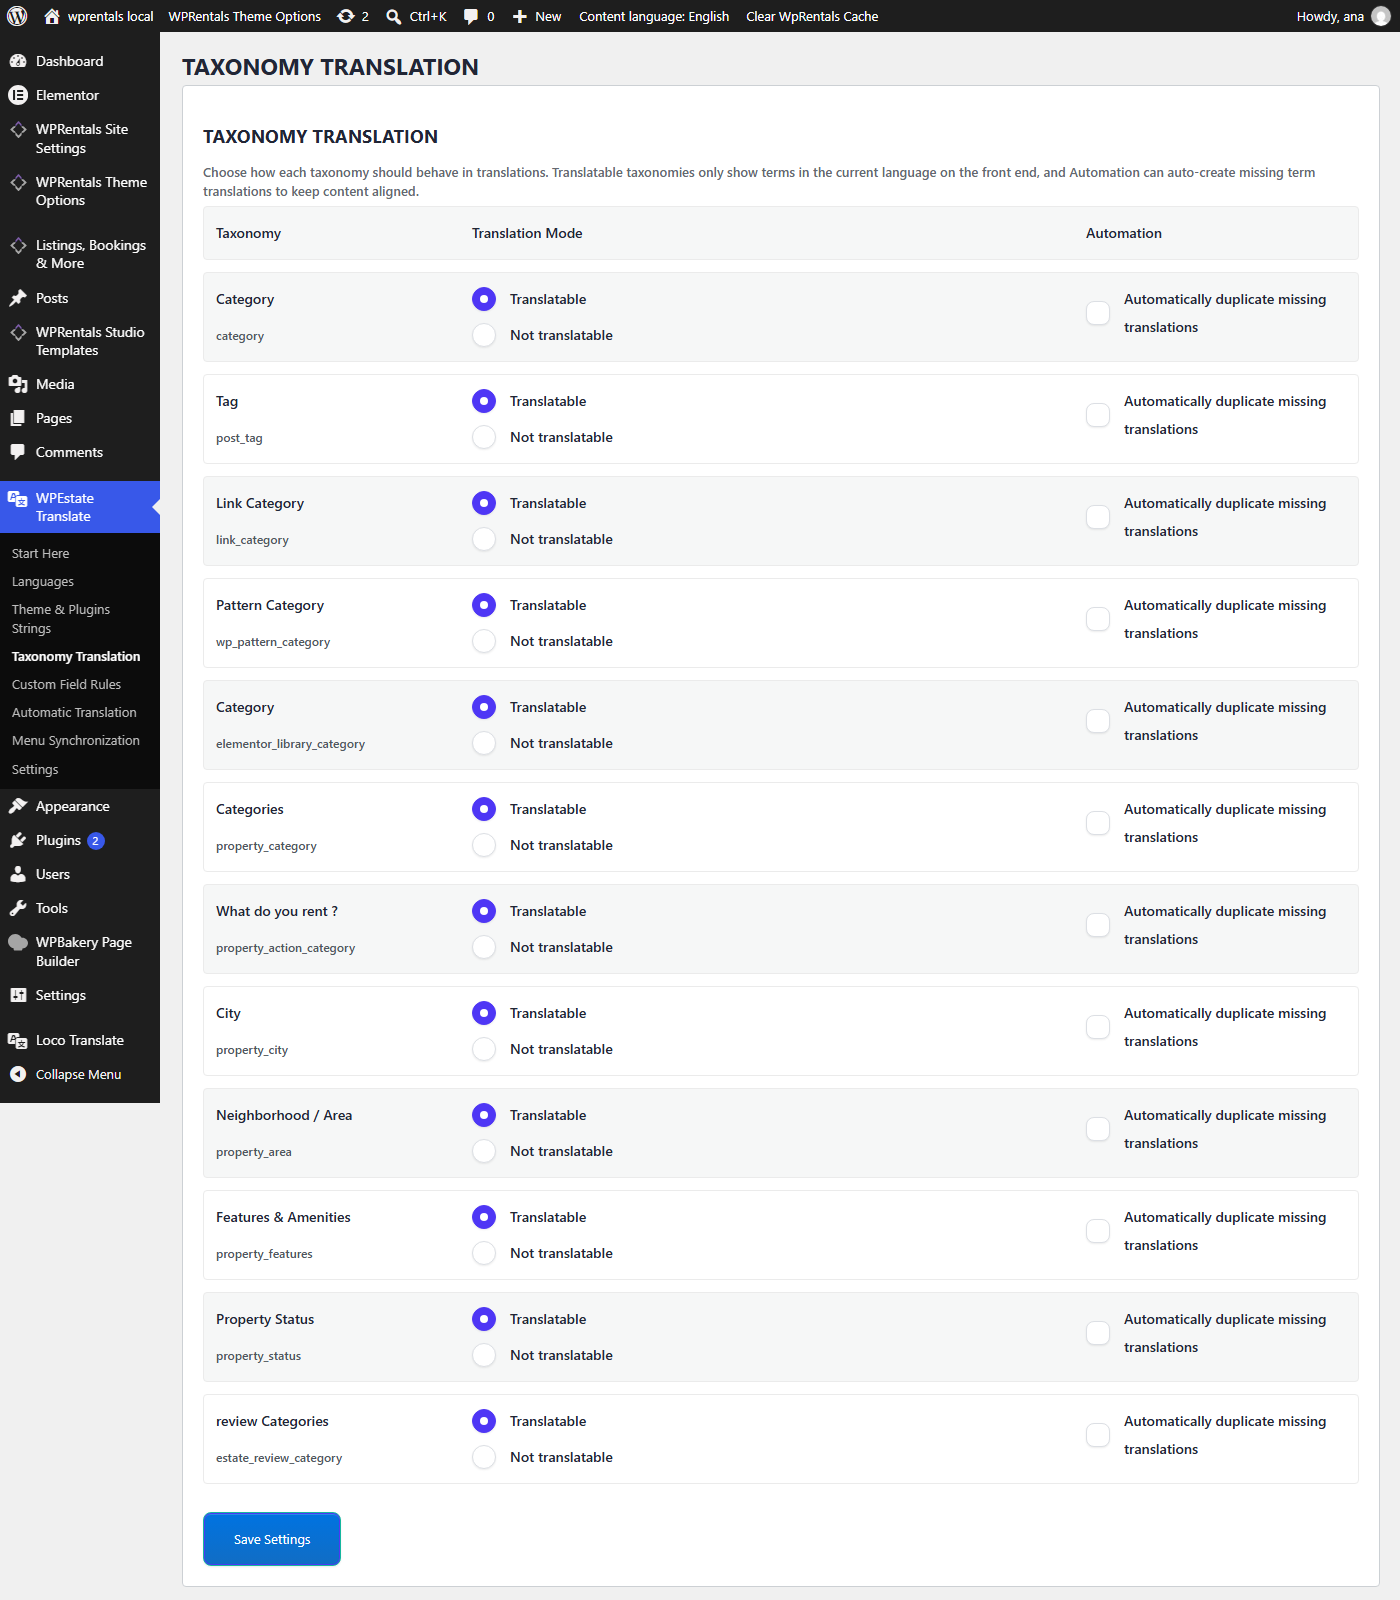
- Go to WPEstate Translate > Taxonomy Translation. Keep Translatable for every taxonomy you want in several languages. Tick Automatically duplicate missing translations if you want missing terms copied into each language for you. Click Save Settings.
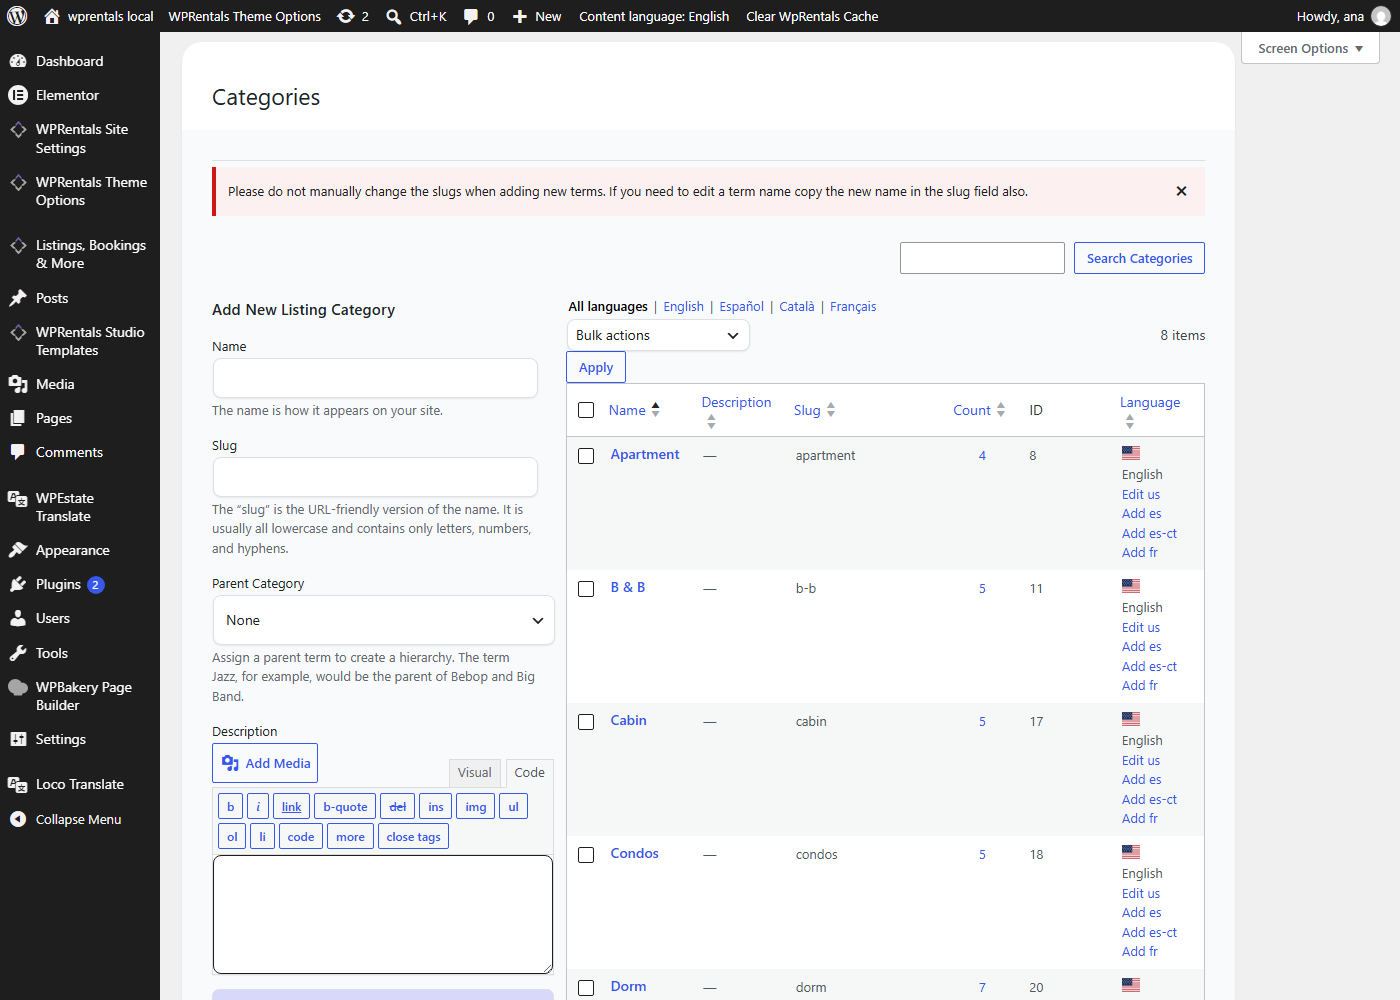
- Open the term list, for example Listings > Categories. The Language column shows Add es for missing translations and Edit es for existing ones.
- Click Add es, type the translated name and click Update.
Translate Menus
Each language has its own menu. Translate the pages first, so the menu can link to them.
- Go to Appearance > Menus and click create a new menu. Type a name, for example Primary Menu ES, and pick the language in the dropdown next to the name.
- Tick the menu locations (Primary Menu, Mobile Menu, Footer Menu) and click Create Menu. The menu shows in those locations only for its language.
- Fill the menu. Go to WPEstate Translate > Menu Synchronization, pick your default menu in Source Language Menu and the new menu in Translated Menus, then click Menu synchronization. The structure is copied and the links point to the translated pages. Pages without a translation use the Fallback link, if you add one. You can also add the items by hand in Appearance > Menus.
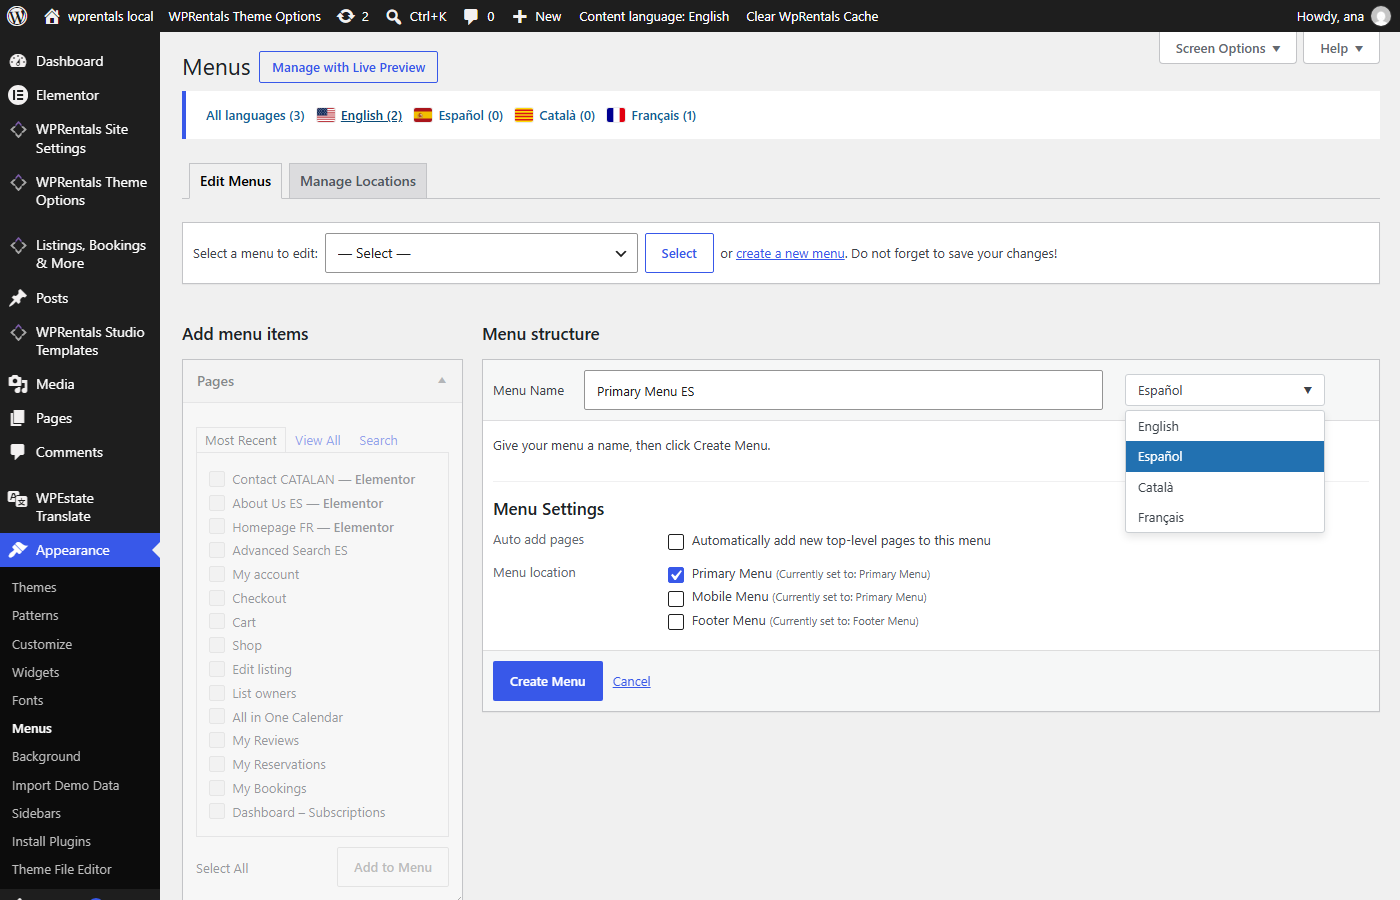
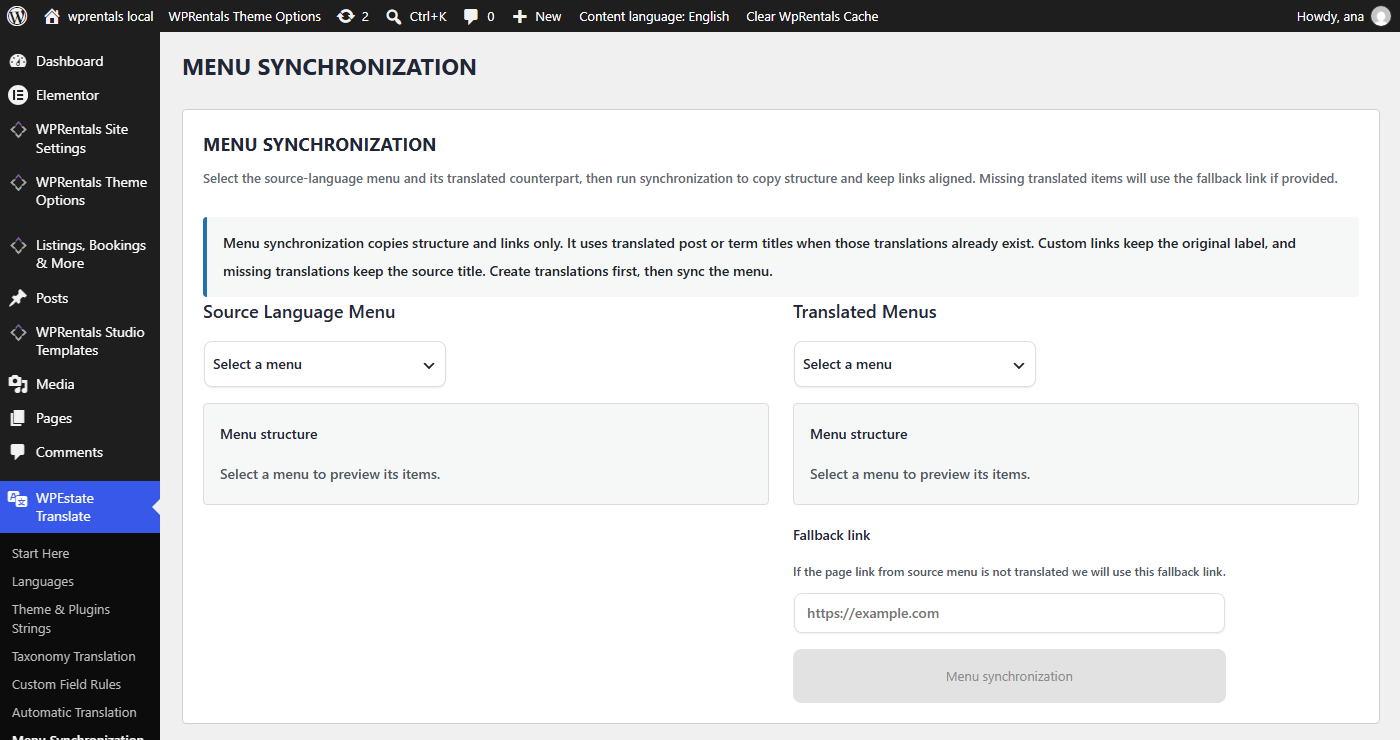
The language links above the menu list (English, Español and so on) show the menus of each language.
Custom Field Rules
WPEstate Translate > Custom Field Rules decides what happens to each field of a listing, page, post or owner when a translation is created. WPRentals comes with the rules already set.
| Rule | What it does |
|---|---|
| Translate | Each language has its own value. You type it in the translated listing. |
| Copy | The value is copied from the original and kept in sync with it. |
| Copy Once | The value is copied when the translation is created. After that, each language keeps its own value. |
| Ignore | The field is left alone. |
The default rules for listings:
| Rule | Listing fields |
|---|---|
| Translate | Cancellation policy, check-in message, other rules, custom details, listing label, text before and after the price, listing status, header title and subtitle over the image or video |
| Copy Once | Paid extra options (name and price). Copied once, so you can translate the names in each language. |
| Copy | Everything else: prices and fees, guests, bedrooms and bathrooms, size, address and map position, gallery, video, virtual tour, booking settings and calendar import |
To change a rule, open the group (for example Listing Fields > Translate) and pick another rule in the dropdown next to the field. The change is saved at once and applies to translations you create or refresh from then on.
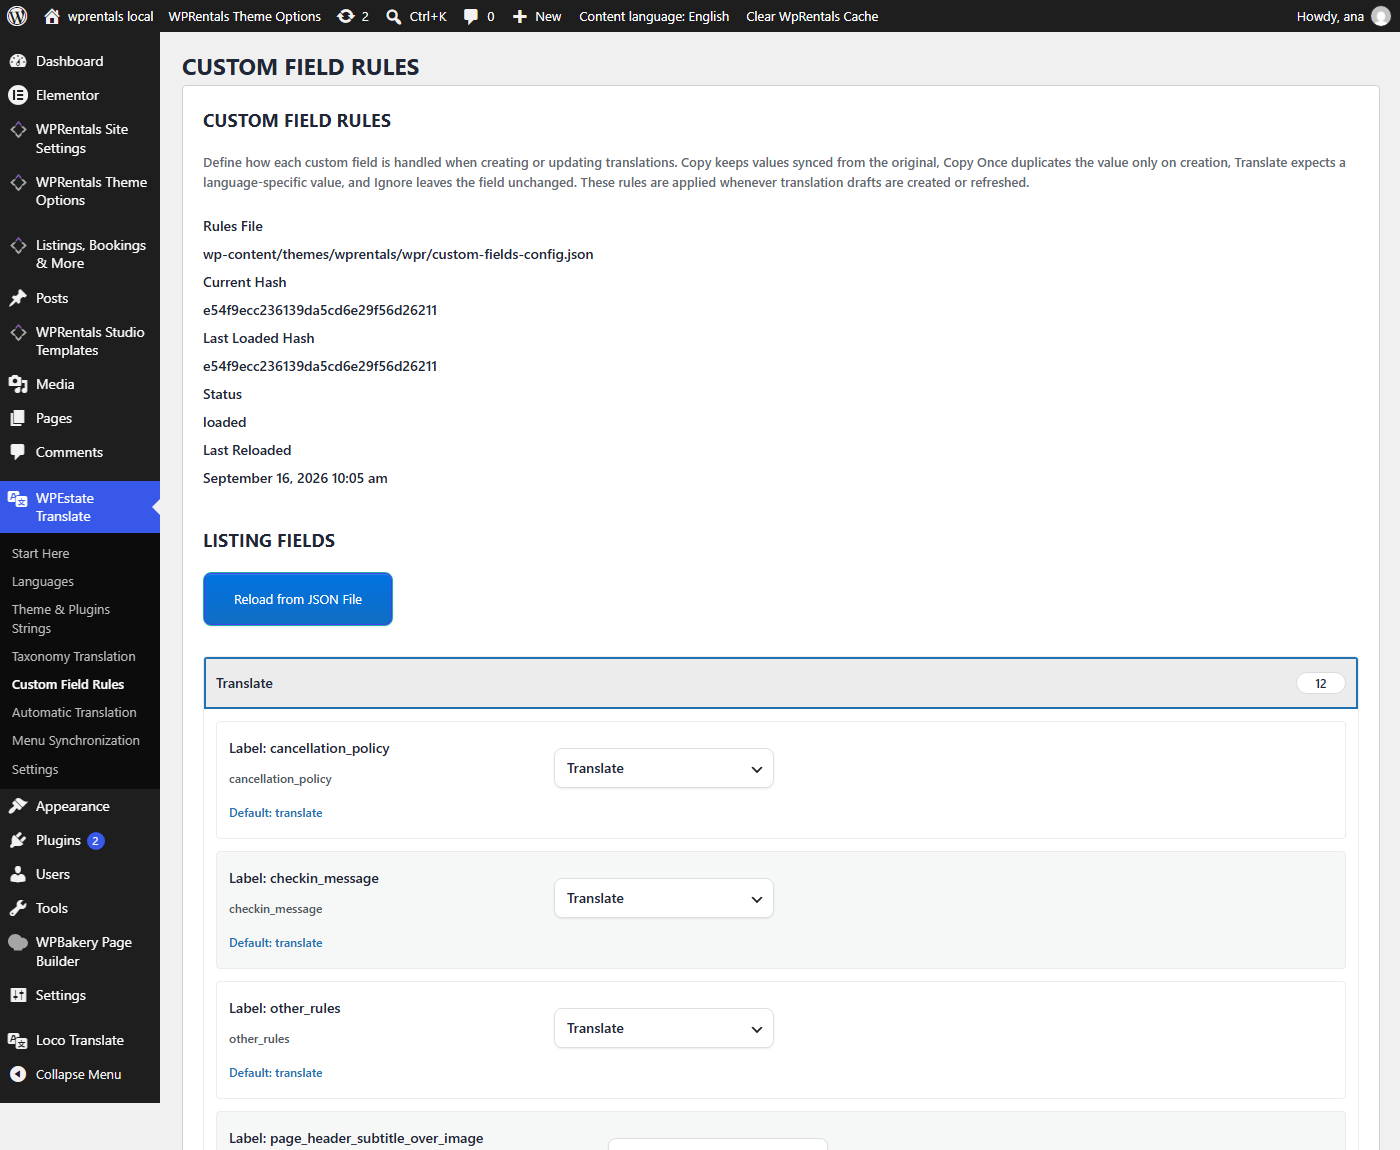
Translate Theme and Plugin Texts
Theme and plugin texts are the buttons, labels, booking form, dashboard and email texts. They are translated in two places, and both work together.
| Tool | Use it for |
|---|---|
| .po files, edited with Loco Translate | The default language, and any other language you want as a full translation file. Create one file per language, for example es_ES.po in the child theme and wprentals-core-es_ES.po for WPRentals Core. File names and folders: How to translate WPRentals. |
| WPEstate Translate > Theme & Plugins Strings | The extra languages. Review what the .po files already hold, fill in what is missing and change any text you want. |
Each visitor gets the file of the language in the URL, so /es/ loads the Spanish .po files. A translation saved in Theme & Plugins Strings wins over the same text in the .po file. Texts you leave empty there keep the .po translation.
Translate in Theme & Plugins Strings
- Open WPEstate Translate > Theme & Plugins Strings. The box Where are translation files loaded from? lists the .po files the plugin reads, from the child theme, the parent theme and the plugins.
- Click Scan for translations. Texts from the theme and plugins are listed, with a column for each language. Translations that already exist in your .po files are filled in.
- Find the text. Type it in Search, pick a Domain if needed (for example Theme: Wprentals) and click Filter.
- Type the translation in the language column. It saves when you click outside the box, and the label under it changes to Saved. The default language column is the source text and cannot be edited here.
- Click Generate translation files. New translations show on the site only after this step.
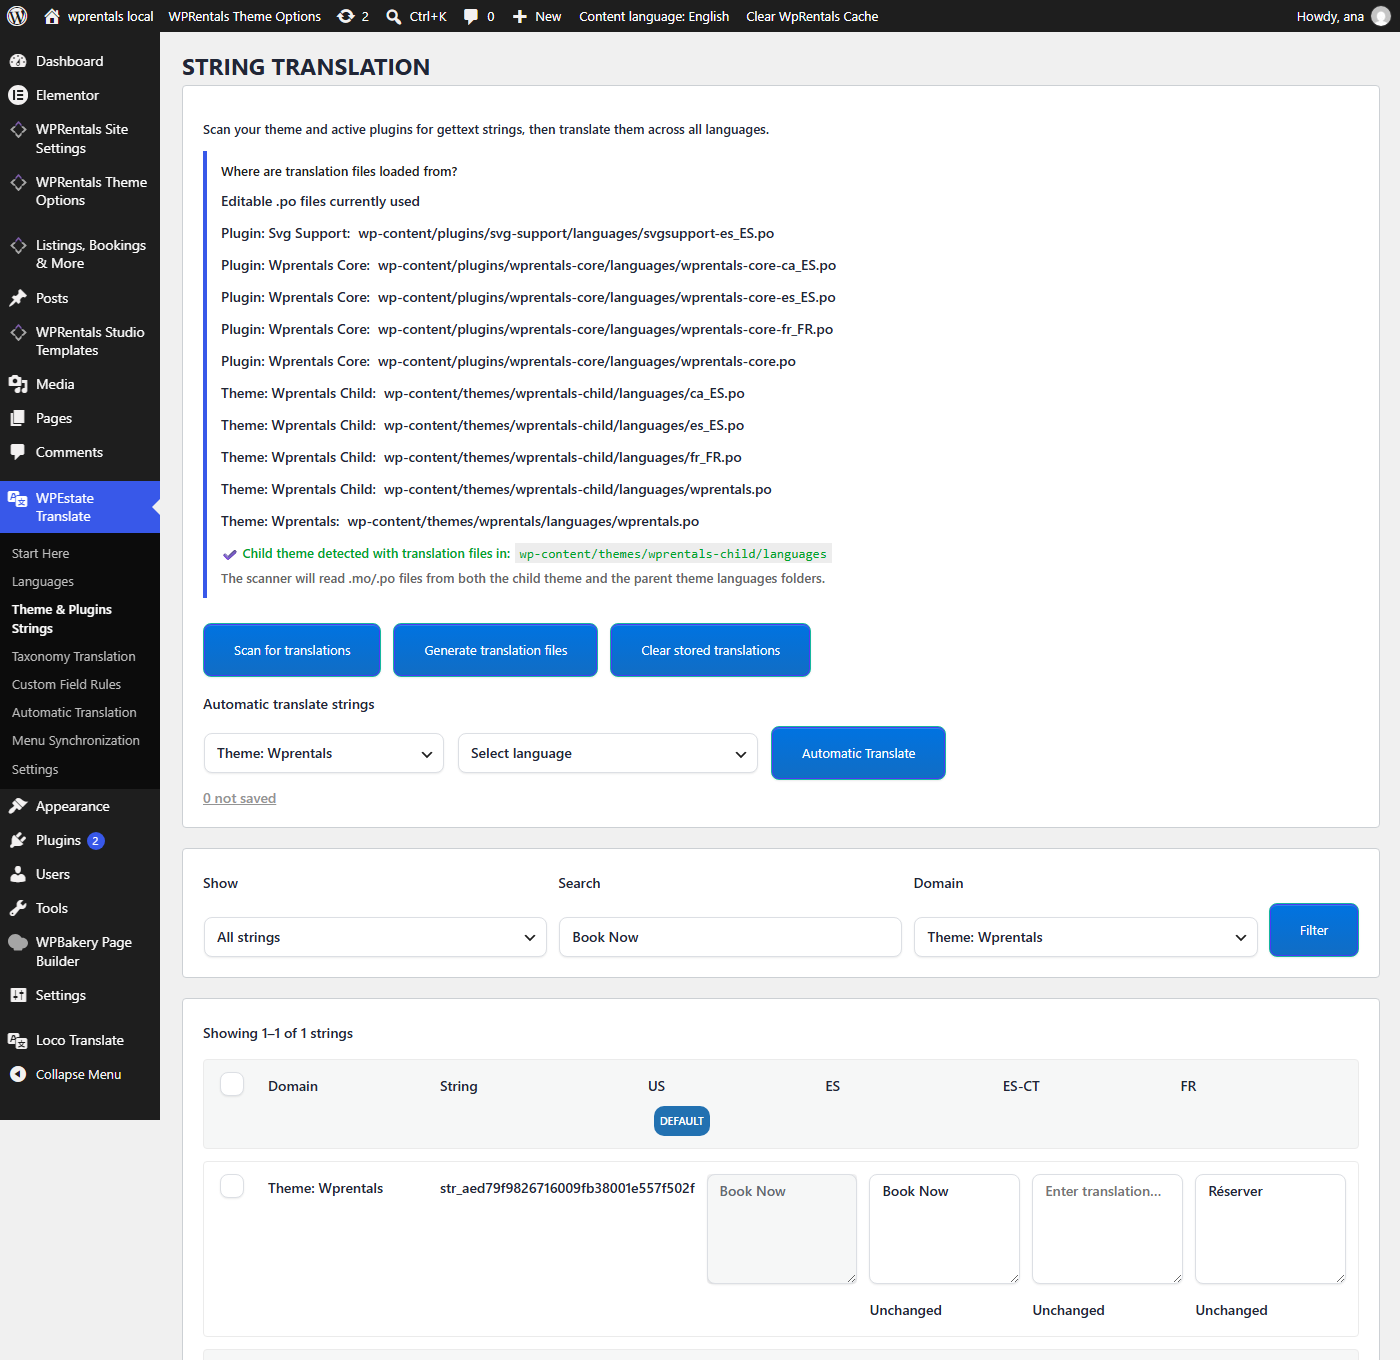
Labels you typed in Theme Options are listed under the domain wprentals_admin. Translate them for the extra languages in the same way.
More about this screen: https://help.wpresidence.net/article/the-string-scanner/
Where Other Texts Are Translated
| Kind of text | Default language | Other languages |
|---|---|---|
| Labels typed in Theme Options, for example Theme Options > Listing Page > Listings Page Text Labels | The Theme Options field itself. | Theme & Plugins Strings, domain wprentals_admin. |
| Pages, listings, posts | The original post. | The translated post. |
| Categories, features and other terms | The original term. | The translated term, see Translate Categories, Cities and Features. |
| Menus | The original menu. | The translated menu, see Translate Menus. |
Translate the Listing and Owner URL Names
Listing and owner pages have a name in their URL, for example example.com/properties/sea-view-villa/. You can use a different name for each language.
| Language | Where to set the URL name |
|---|---|
| Default language | WPRentals Theme Options > General > Listing and Owner Links Names |
| Other languages | WPEstate Translate > Languages, fields Listings URL and Owners URL in the row of each language |
- Set the default names in Theme Options. Go to WPRentals Theme Options > General > Listing and Owner Links Names, change Property Page and Owner Page if needed and click Save Changes.
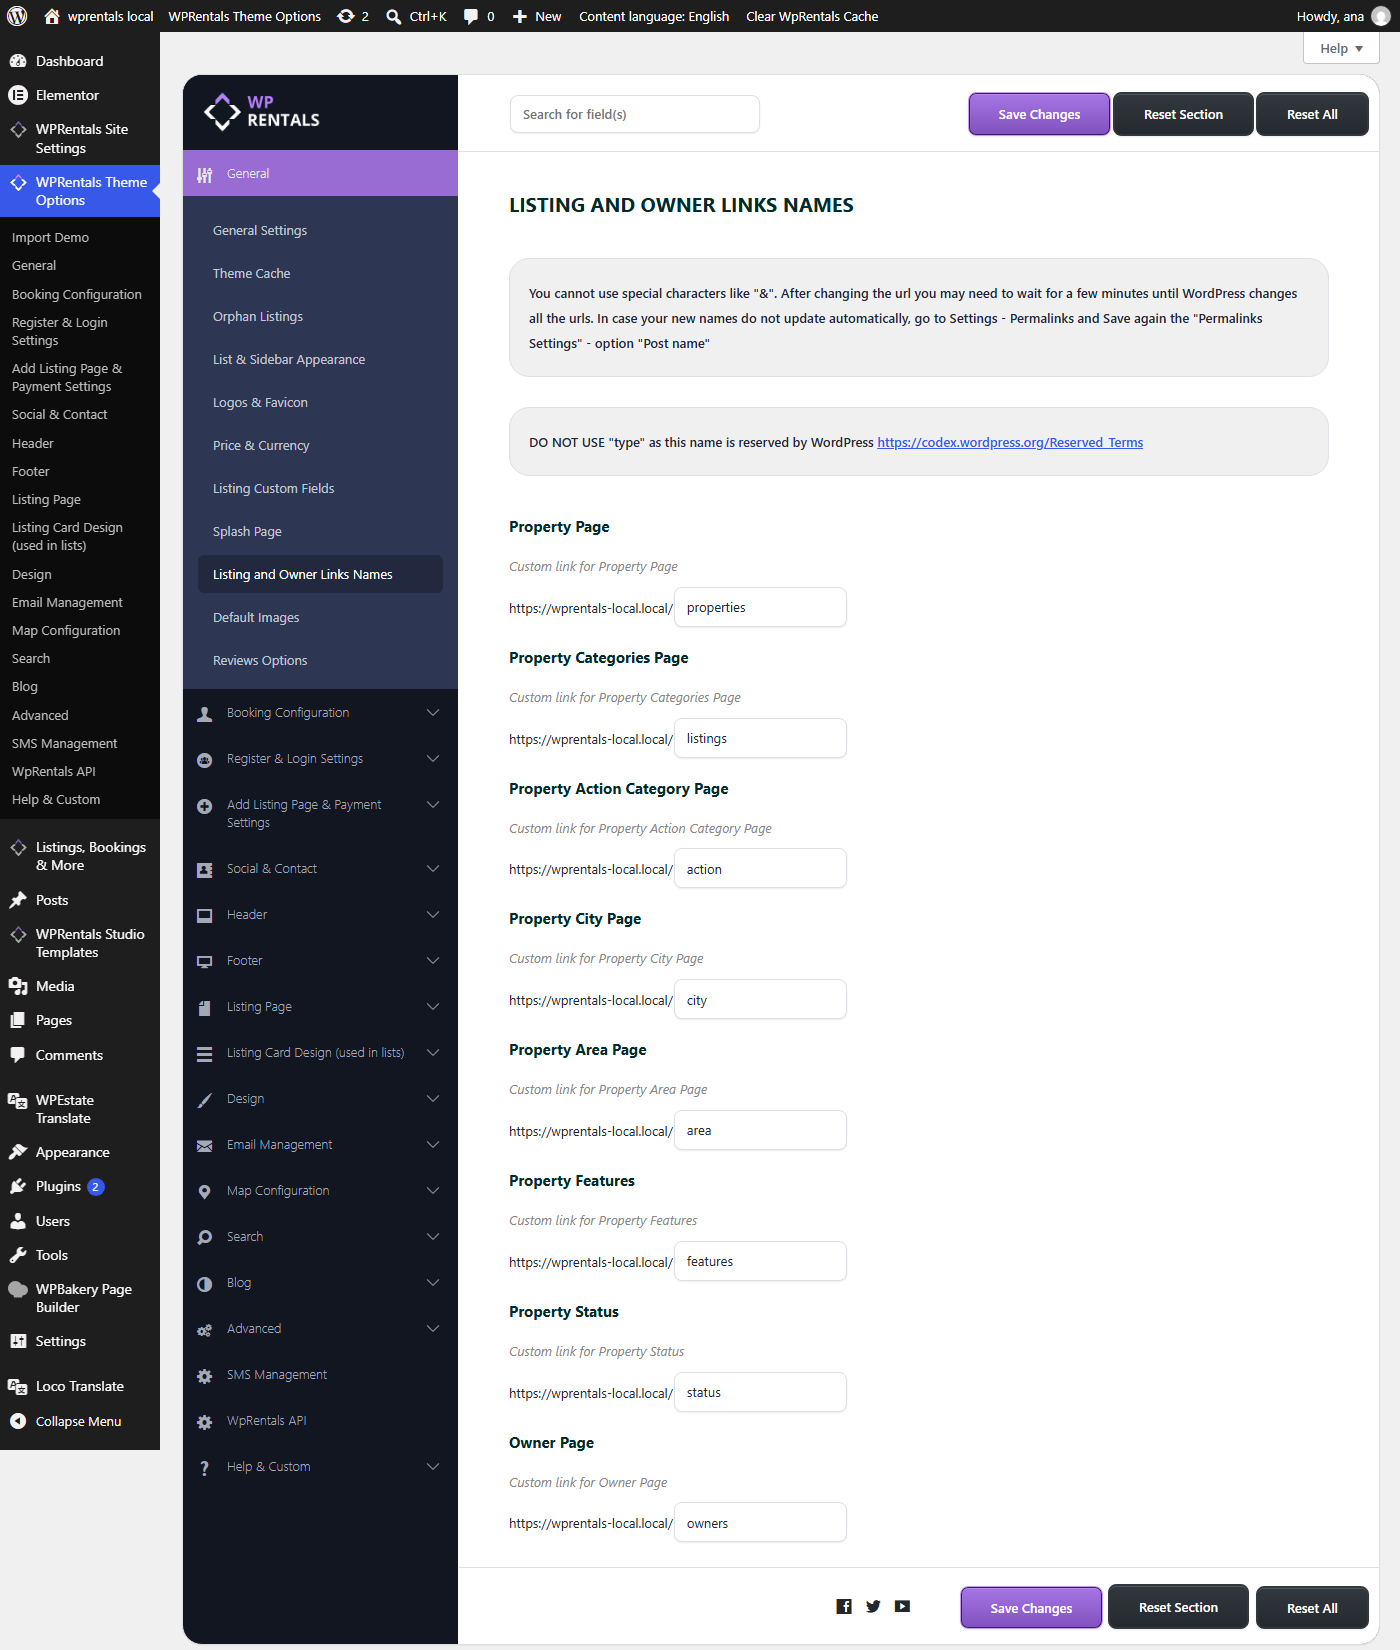
- Set the names for each extra language. Go to WPEstate Translate > Languages, fill in Listings URL and Owners URL for that language and click Save languages. With alquileres for Spanish, a listing opens at example.com/es/alquileres/sea-view-villa/. Leave a field empty to use the default name.
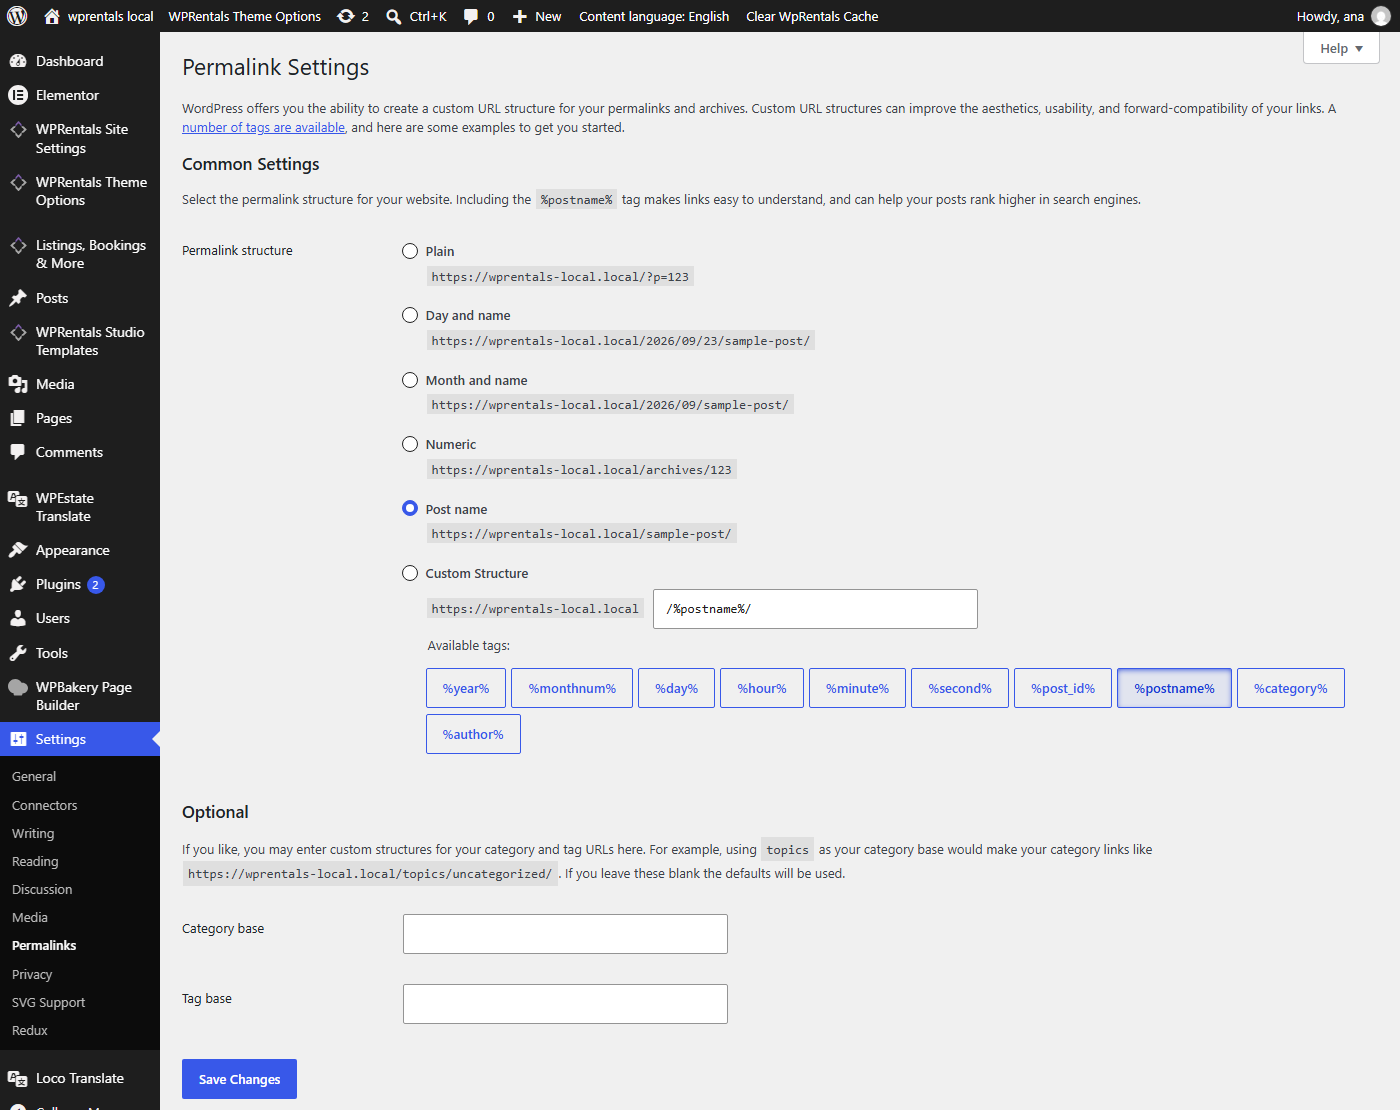
- Save the permalinks. Go to Settings > Permalinks, keep Post name selected and click Save Changes. Do this after every change to a URL name, or the new links show a 404 page.
The other names on the Theme Options screen, such as city or area, are the same in all languages.
Language Switcher
| Where | How to add it |
|---|---|
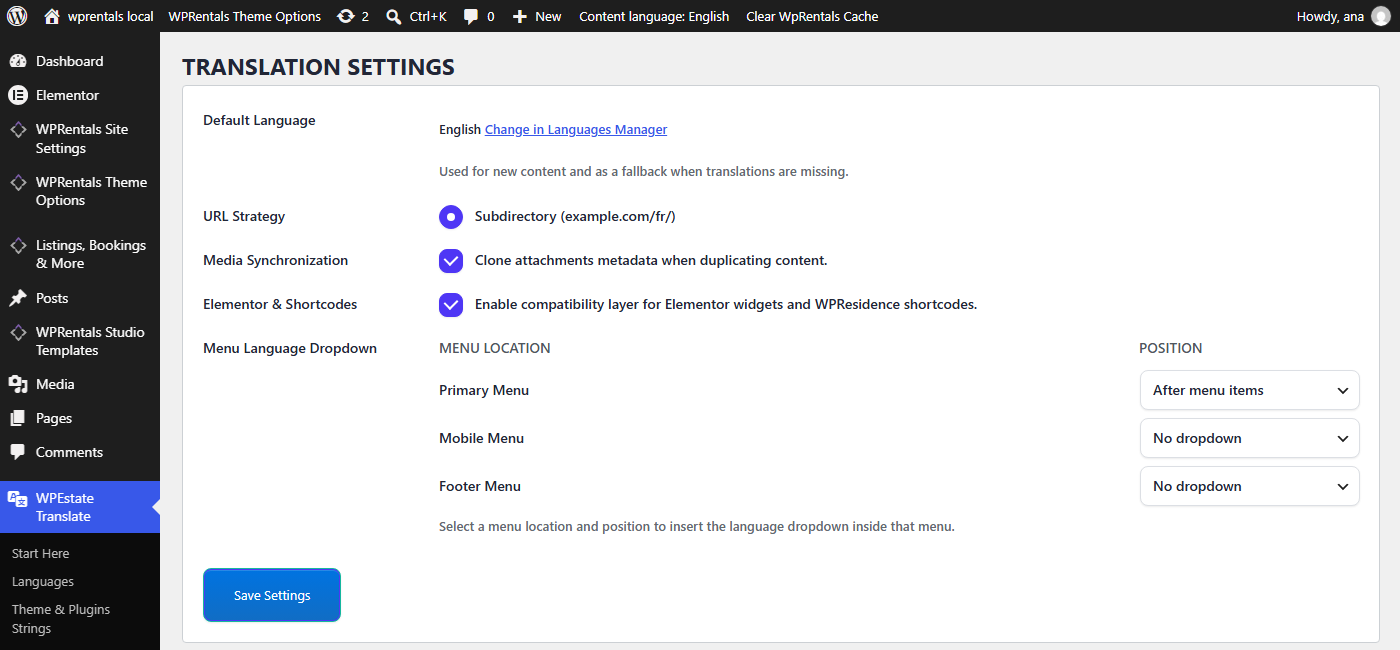
| Theme header menu | WPEstate Translate > Settings > Menu Language Dropdown. For each menu location (Primary Menu, Mobile Menu, Footer Menu) choose Before menu items or After menu items, then click Save Settings. |
| Elementor header or footer (WPRentals Studio) | Edit the header or footer template with Elementor and add the Language Switcher widget. The Navigation Menu widget also shows the dropdown when its menu is assigned to a menu location that has the dropdown turned on in Menu Language Dropdown. Do not use the Language Dropdown widget, it does not work with WPEstate Translate. |
| Sidebar or other widget area | Appearance > Widgets, add the widget listed as WPResidence Language Switcher. The same widget works on WPRentals. |
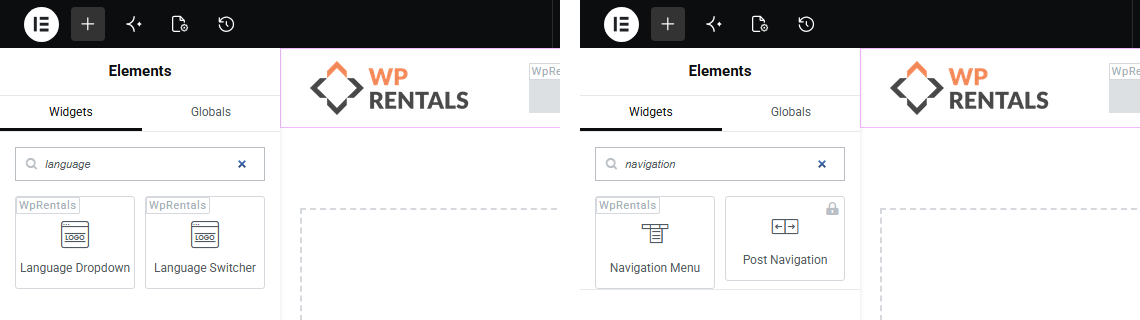
More help: WPRentals Studio and Elementor Free and Menu and Mega Menu Setup.
To change its font sizes and colors, go to Theme Options > Header > Language Switcher. This section is shown only while WPEstate Translate is active.
Some Texts Are Not Translated
- Check the plugin version. Update WPEstate Translate if it is older than 1.0.9.
- Find where the text comes from. See Translate Theme and Plugin Texts and Where Other Texts Are Translated. Page content, Elementor widgets and Studio templates are edited on the translated page or template, not in the strings screen.
- Default language wrong? Fix it in the .po file with Loco Translate, or in the Theme Options field.
- Extra language wrong? In Theme & Plugins Strings, pick the language, search the text, add the translation and click Generate translation files. New translations load only after you generate the files.
- Text not in the list? Click Scan for translations so newly added theme or plugin texts are picked up.
- Clear every cache. Theme cache, Elementor files, caching plugins, server cache, CDN and browser.
Translate WPRentals Studio Templates
Headers, footers, listing pages and the other WPRentals Studio templates have their own text, so each one needs a translation. It works the same way as a page.
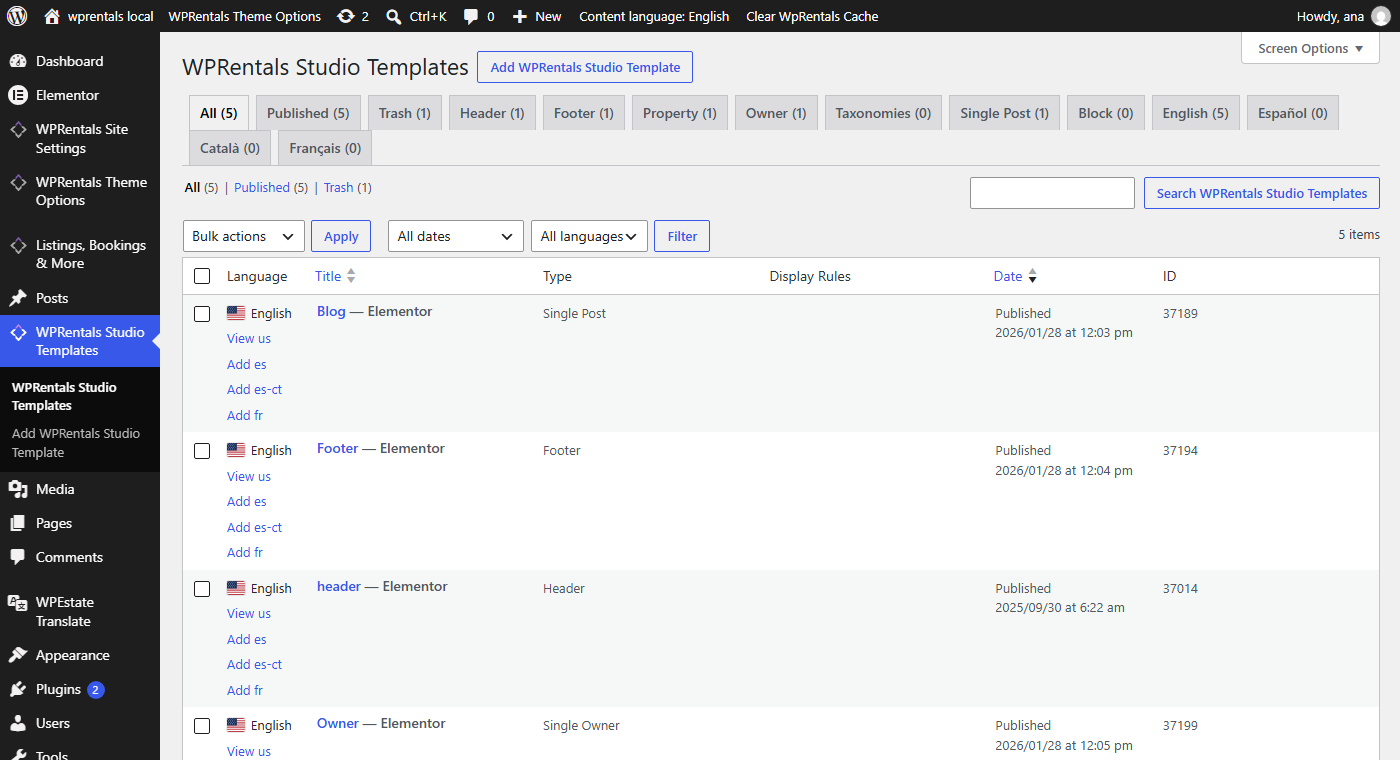
- Go to WPRentals Studio Templates. The Language column shows which templates are already translated.
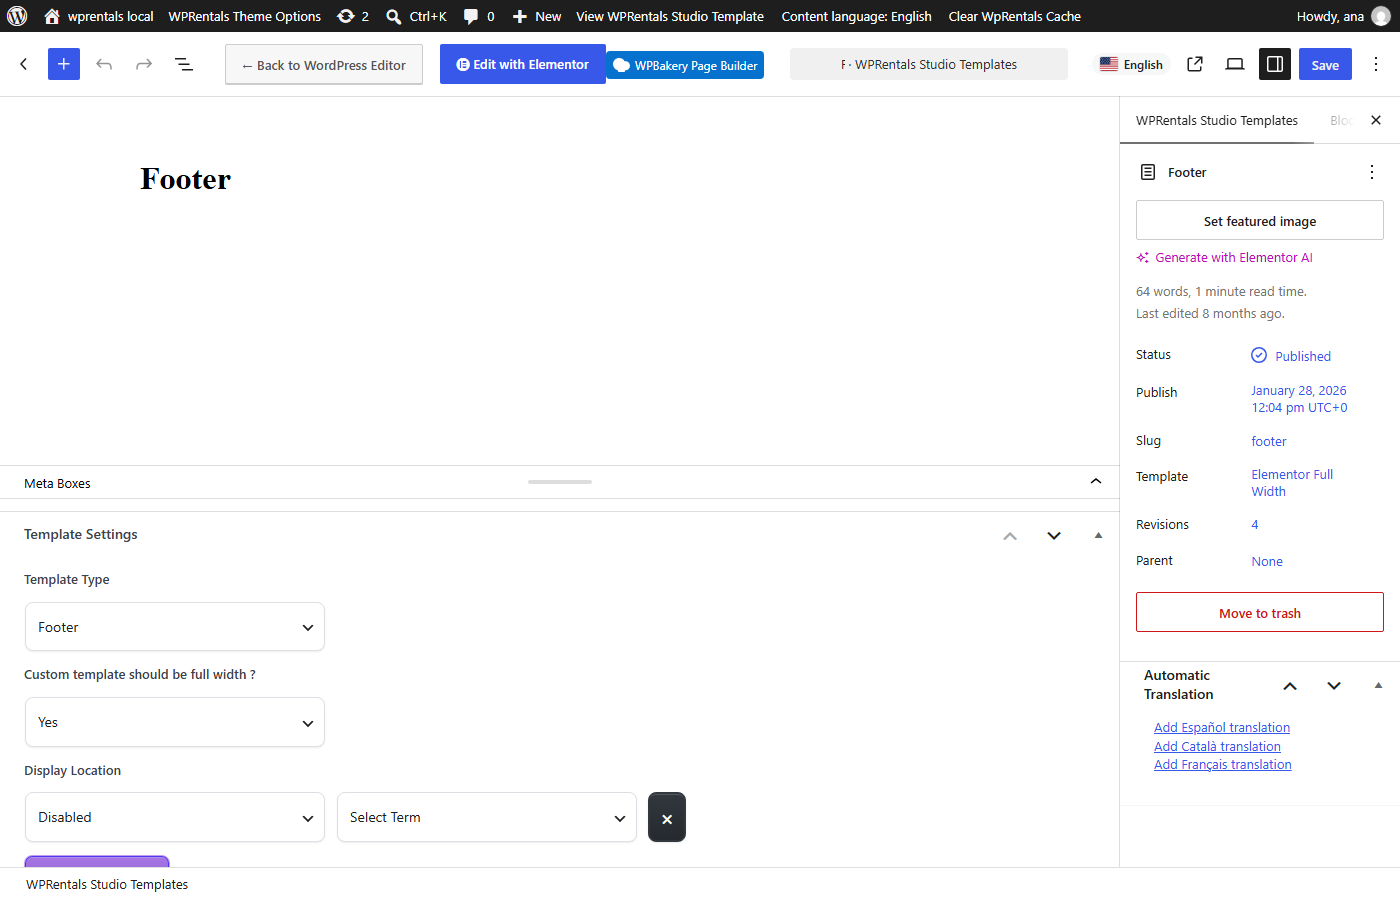
- Click Add next to the language, for example Add es, or open the template with Edit and click Add Español translation in the Automatic Translation box.
- The translated template opens as a draft. It keeps the same design and the same template settings (type and display location), so it shows on the pages of that language.
- Click Edit with Elementor and translate the texts by hand, widget by widget. With a translation service connected, you can click Auto translate in Español instead and then check the result.
- Publish the template. Repeat for every template and every language.
The menu and the language switcher in a header template are covered in Language Switcher.