Overview
The WPRentals Categories List widget is an Elementor widget that lets you display WPRentals taxonomy items on a page.
You can use this widget to show selected cities, areas, property types, or property categories in a list or grid layout.
Before You Start
Before using the WPRentals Categories List widget, check the following:
- The page is edited with Elementor.
- The WPRentals Elementor Widgets plugin is installed and activated.
- The taxonomy items you want to show already exist.
- If you want images to appear, each taxonomy item must have a featured image added.
WPRentals taxonomy items can include:
- Categories
- Types
- Cities
- Areas / Neighborhoods
Edit the Page with Elementor
- Go to the page where you want to add the categories list, for example your homepage.
- Click Edit with Elementor.
- Select the section where the widget should appear, or create a new section.
Add the WPRentals Categories List Widget
- In the Elementor sidebar, search for WPRentals Categories List.
- Drag the widget into the section where you want the categories to appear.

Select the Categories to Display
After adding the widget, open the widget Content settings.
From this section, you can choose which taxonomy items should appear in the widget.
You can select items from available taxonomy groups such as:
- Cities
- Areas
- Types
- Categories
You can select the items manually and set how many items should show per row, for example 4 items per row.


Choose the Design Type
The widget includes 3 design types.
- Type 1
- Type 2
- Type 3
Select the design type that matches your page layout. You can switch between the designs and preview the result in Elementor.
Type 1

Type 2

Type 3

Display Categories as a Grid
When you display the categories as a grid, the selected items are arranged in columns, like tiles or boxes, instead of one below the other.
This layout is useful for homepage sections, landing pages, and visual browsing sections.
On smaller screens, the grid adjusts based on the responsive settings and available space.

Style the Categories List Widget
Open the widget Style settings to customize the design.
Depending on the selected design type, you can manage options such as:
- Item height
- Border radius for rounded corners
- Text color
- Typography
- Overlay color
- Text position over the image
- Spacing between items


How to Add Images to Categories
The images shown in the WPRentals Categories List widget come from the taxonomy item featured image.
For example, if the widget shows cities, the image must be added to the city term. If the widget shows categories, the image must be added to the category term.
Step 1: Go to the Taxonomy Section
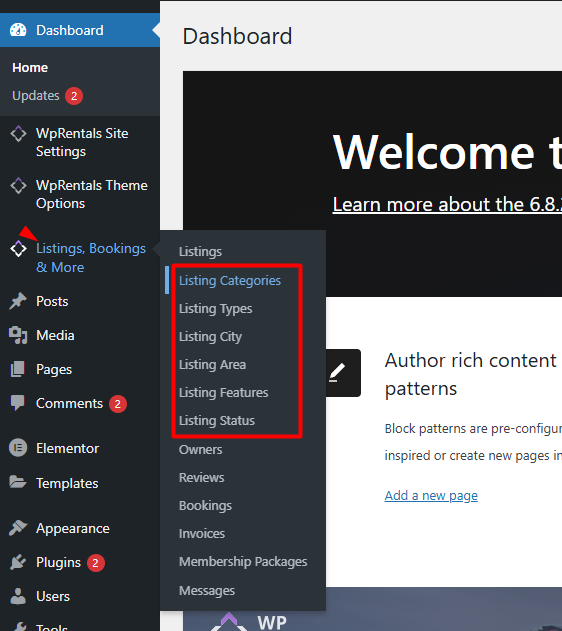
In the WordPress dashboard, go to:
Listings, Bookings & More
Then open the taxonomy you want to edit, such as:
- Categories
- Types
- Cities
- Areas / Neighborhoods
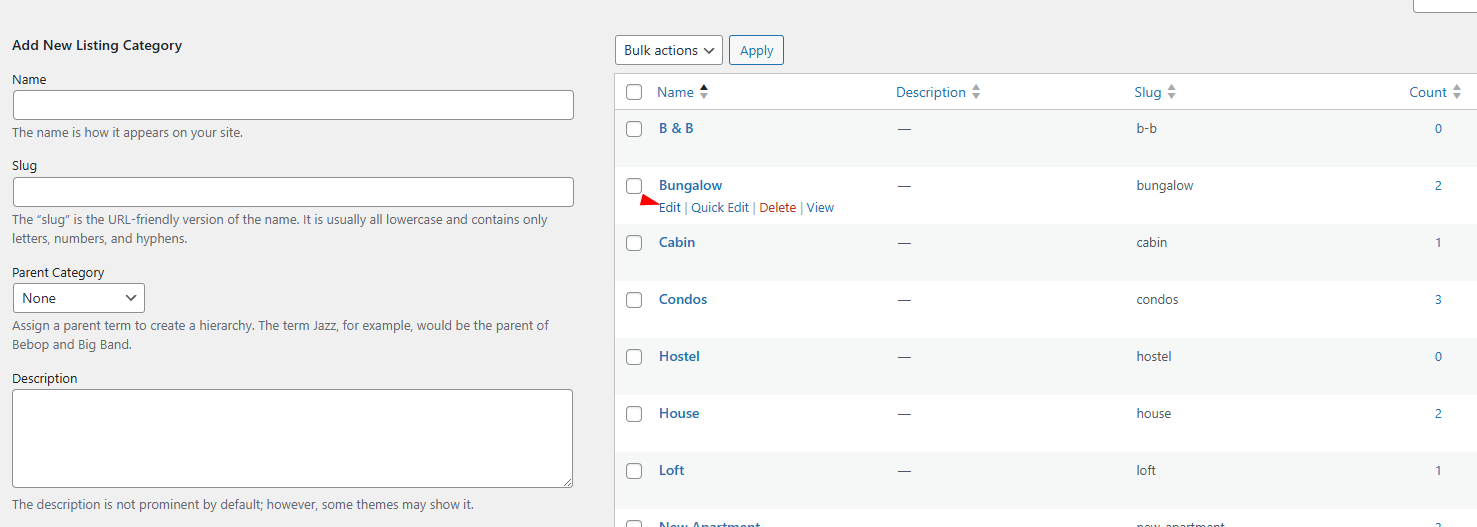
Step 2: Edit or Add a Taxonomy Item
To add an image to an existing item, hover over the item name and click Edit.
To create a new item, add the name in the form and click the button to add the new taxonomy item.
Step 3: Set the Featured Image
In the taxonomy edit screen, look for the option to upload or set a Featured Image.
- Click Upload/Add Image.
- Choose an image from the Media Library or upload a new image.
- Click Update to save the taxonomy item.
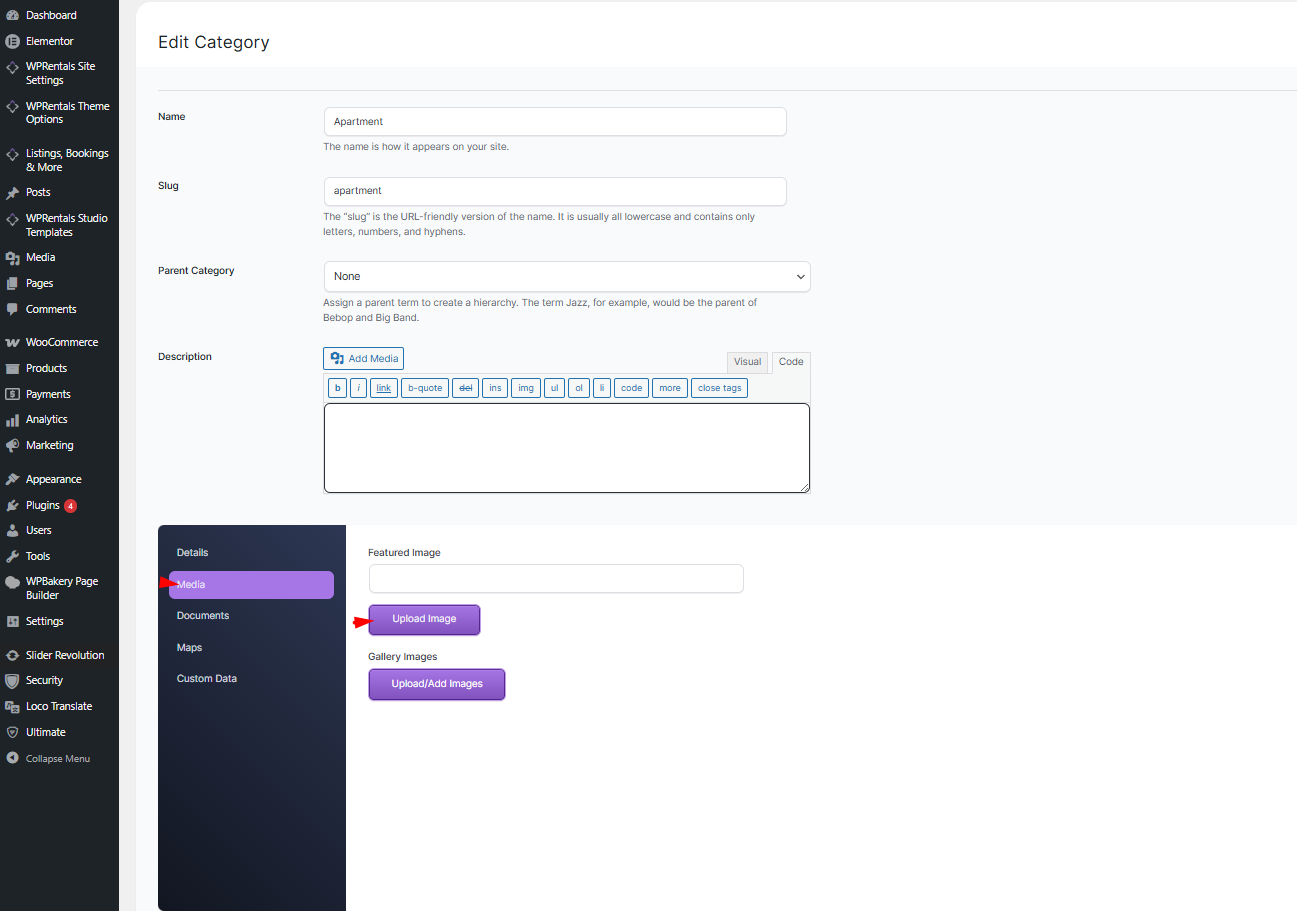
Image Tips
- Use images with similar size and orientation for a cleaner layout.
- Use large enough images so they do not look blurry on desktop screens.
- Use images that match the taxonomy item, for example a city image for a city term.
- If the widget item appears without an image, check that the taxonomy item has a featured image saved.
- After changing taxonomy images, clear cache and refresh the page.
Troubleshooting
The widget does not appear in Elementor
- Make sure Elementor is installed and active.
- Make sure the WPRentals Elementor Widgets plugin is installed and active.
- Update WPRentals theme and plugins to compatible versions.
The expected categories do not show
- Check that the correct taxonomy items were selected in the widget.
- Check that the taxonomy items exist in Listings, Bookings & More.
- Check that the listings are assigned to the correct categories, types, cities, or areas.
- Clear cache and test the page again.
The image does not show
- Edit the taxonomy item and check that a featured image is saved.
- Check if the image still exists in the Media Library.
- Clear cache and reload the page.
The layout does not look correct
- Check the selected design type.
- Check the number of items per row.
- Check the Elementor section or container width.
- Adjust the widget style options for height, spacing, and text position.
- Test the page on desktop, tablet, and mobile.
Important Notes
- The WPRentals Categories List widget is an Elementor widget.
- The widget displays taxonomy items, not individual listings.
- The widget can display selected categories, types, cities, or areas.
- The displayed image comes from the taxonomy item featured image.
- The widget includes 3 design types.
- The grid layout displays items in columns.
- The widget design is managed from the Elementor widget settings.
- If a taxonomy item has no featured image, it may show without the expected image.
- After changing images, widget settings, or taxonomy details, clear cache and test the page again.